This is a tutorial only. No login is required.
INTRODUCTION
The Add a Class pages allow students to add, drop, swap and edit classes in their schedule for a particular term within published registration dates.
You can add classes online throughout the registration periods, even after classes have started. For dates and policies including late add and drop, see:
The Add a Class pages have three main steps:
- Select Classes to Add
- Confirm Classes to Add
- View Results
Step 1
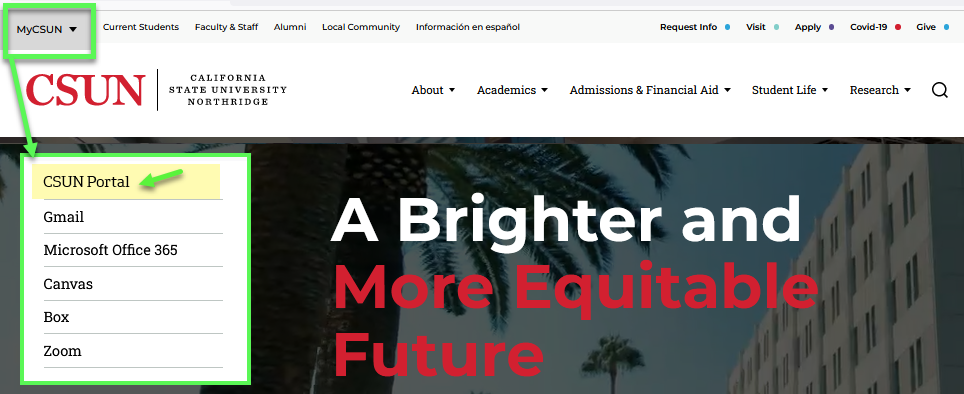
Go to the CSUN home page at www.csun.edu and:
- Open the MyCSUN menu in the top navigation.
- Select the CSUN Portal link.
- Log in with your CSUN user ID and password.
Step 2
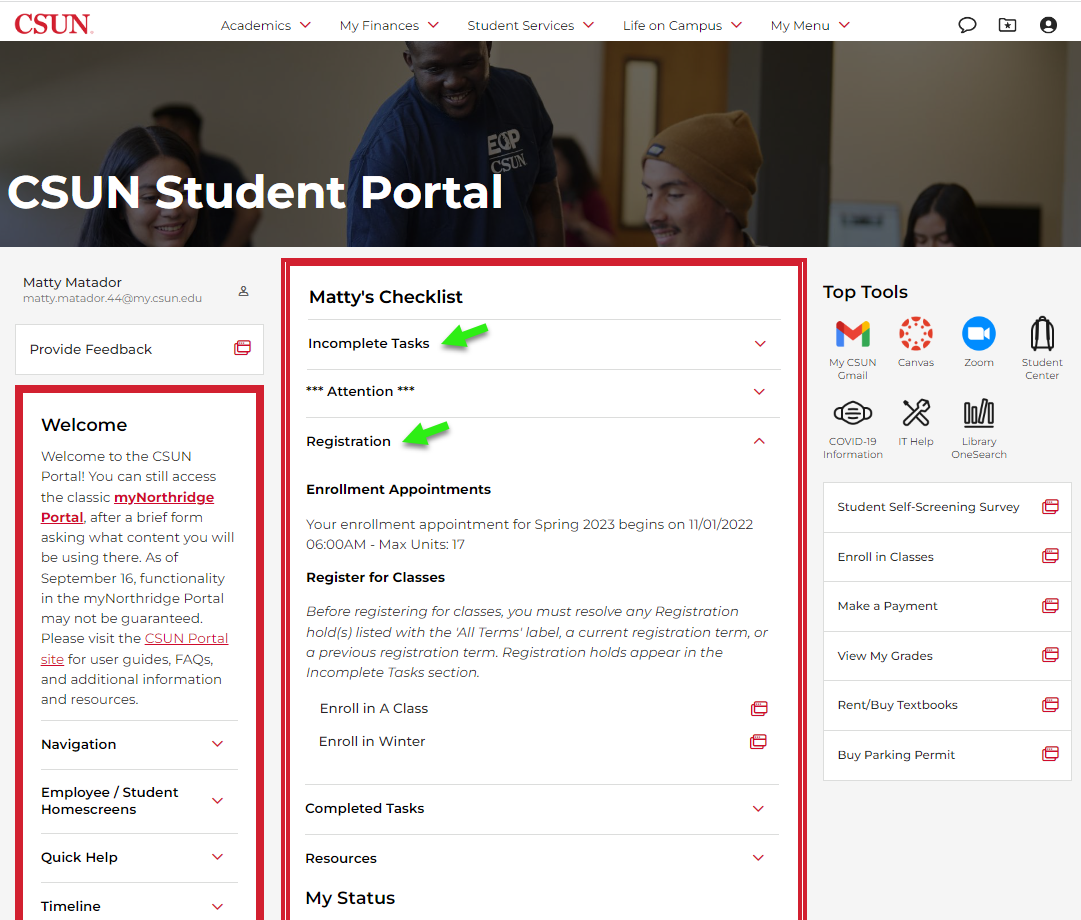
Your CSUN Portal home page displays.
In your Checklist, review the Incomplete Tasks and Registration sections to locate any registration hold alerts, your enrollment appointment, and the allowable maximum unit load.
Let's review Incomplete Tasks first.
Step 2A
Open the Incomplete Tasks section. This is where your registration holds, if any, are listed.
- Always check for registration holds because they will block your enrollment in classes until you clear them.
- Resolve registration holds as soon as possible. This student has three registration holds to clear now and must also complete immunization requirements before the end of their second semester.
Learn more at view and clear registration holds.

Step 2B
Once your registration holds are resolved, you can enroll in classes.
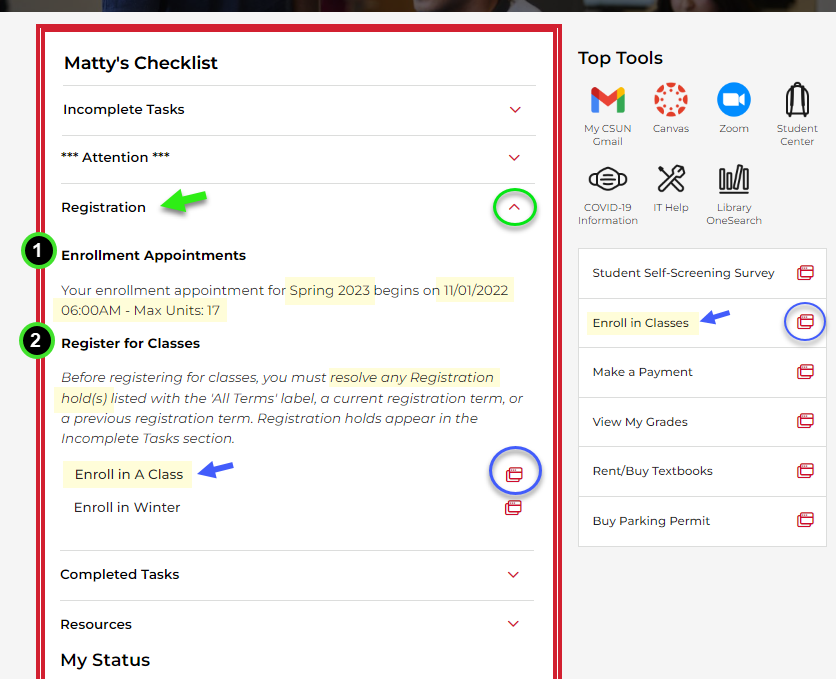
Open the Registration section to review two subsections:
- Enrollment Appointments. Displays your registration start date and time. You may enroll in classes from this time and after, through the end of the registration period.
- Register for Classes.
- Reminds you to check Incomplete Tasks for registration holds.
- Also links to whichever terms are available for enrollment (fall, winter, spring or summer). You’ll receive an assigned enrollment appointment for fall and spring semesters only.
Select the Enroll in Classes icon link. (You can also select Enroll in Classes from the stack of links under Top Tools.)
Step 3
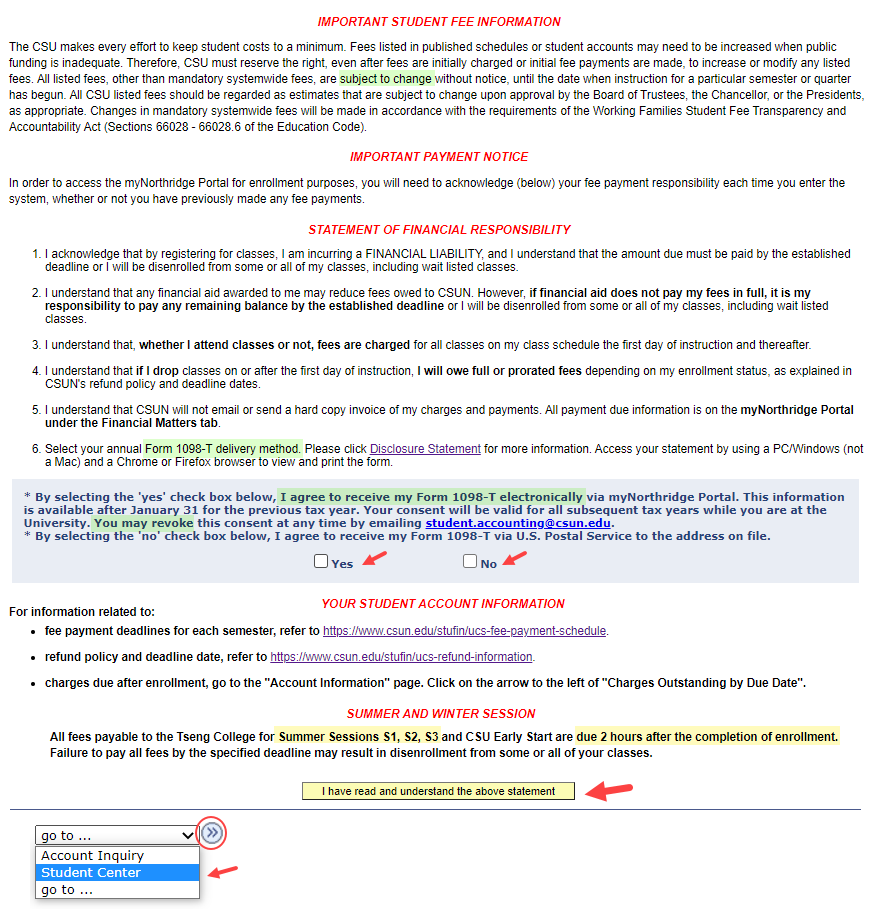
The Student Fee Payment Notice opens in a new tab.
- Read the disclosures and where to find your account charges and payment deadlines. Then select your Form 1098-T delivery option.*
- To return to a previous page:
- Select "Back To Portal" in the upper right corner (not shown), or
- Choose “Student Center” from the drop-down menu and select the “go” button.
- To continue, accept the Statement of Financial Responsibility.
* Select the “yes” or “no” box for electronic delivery of your IRS Form 1098-T. You only need to do this once. The form helps students and families determine if they are eligible for an Education Tax Credit. Helpful: About the 1098-T Disclosure Statement
Step 4
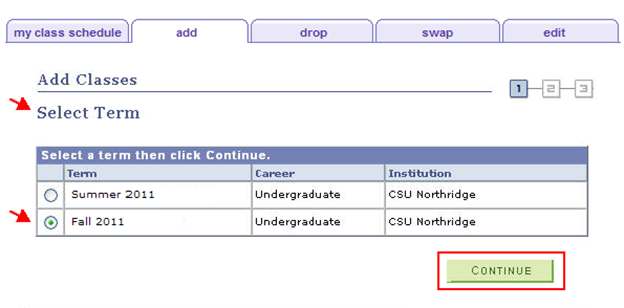
When the registration periods for two terms overlap, the Select Term page displays.
Click the desired Term from the list and click Continue.
Step 5
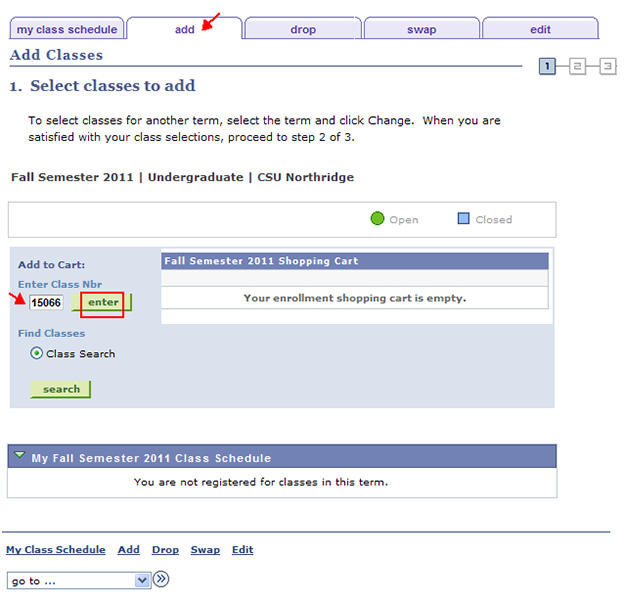
The Select Classes to Add page displays, including the enrollment shopping cart and your class schedule.
- Type the five-digit Class Number and click Enter.*
or - Select Class Search to look up available classes. Click Search.
Learn about: Class Search
*Note: For spring 2022 only, some class sections will have four-digit Class Numbers while others will have five digits. Use the four- or five-digit numbers to enroll as you normally would. Both will work.
Step 6
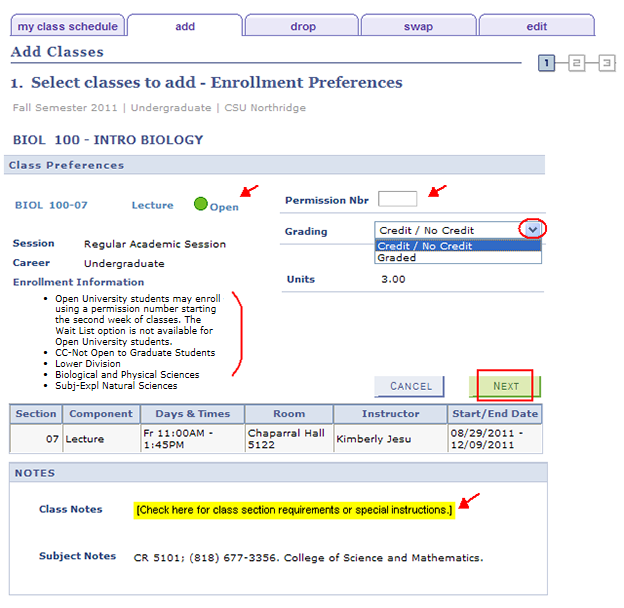
The Select Classes to Add – Enrollment Preferences page displays.
- Check the status of the class: open or closed.
- Enter a permission number if the section requires consent; otherwise skip.
- Optional: Select the basis of grading. (Check with your advisor first; a grade of Credit/No Credit may be a disadvantage. See the CR/NC grading policy.)
- Review enrollment information. Do you meet the course requirements?
- Review Class Notes. Concurrent enrollment in another class might be required (co-requisite).
- Click Next.
If a co-requisite class is required, put both classes in the shopping cart before submitting the enrollment transaction. Otherwise, you'll get a "Requisites Not Met" error.
Step 7
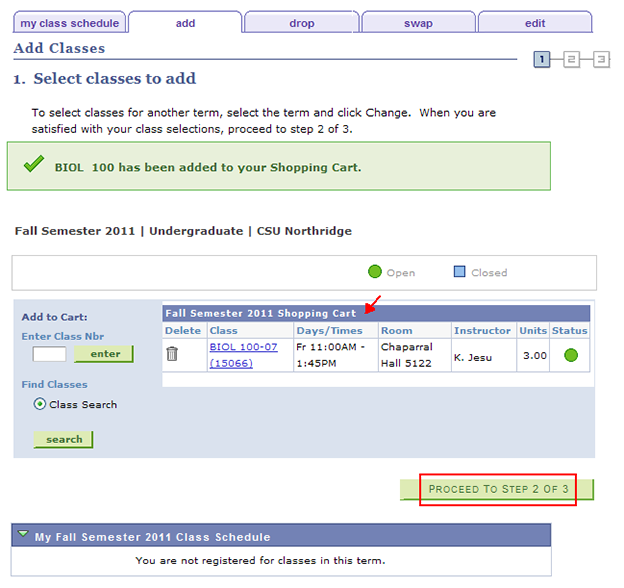
Your enrollment shopping cart displays the class you selected.
You are not yet enrolled in the class!
- Search for more classes to add (add co-requisite classes now, if required).
- When done, click Proceed to Step 2 of 3 to continue.
Step 8
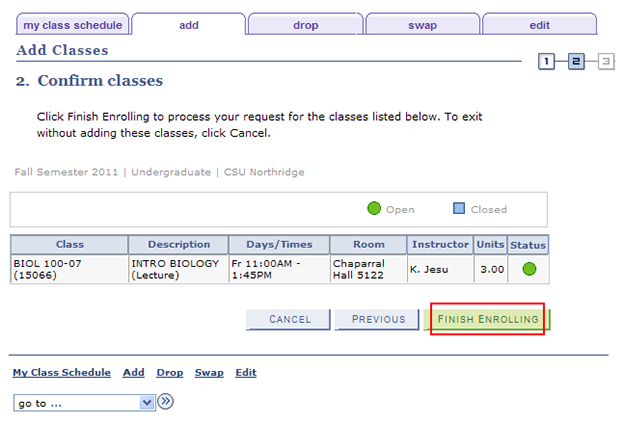
The Confirm Classes page displays.
- Review the class(es) in your shopping cart.
- Click Finish Enrolling to process the request.
or
Click Cancel to exit without adding.
Step 9
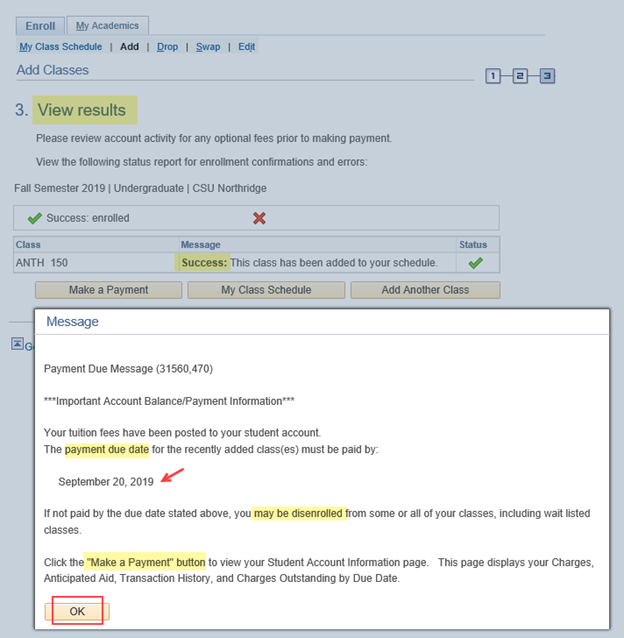
When you finish enrolling (submit your request), a pop-up window will display the fee payment deadline for the class(es) you just added.
- Pay on time to avoid disenrollment (being dropped) from some or all of your classes.
- Click the OK button to close the pop-up window and reveal the View Results page.
IMPORTANT: The pop-up window displays when you successfully enroll in at least one, but not necessarily all, of the classes you submitted. So be sure to confirm success and/or errors on the View Results page!
Step 10
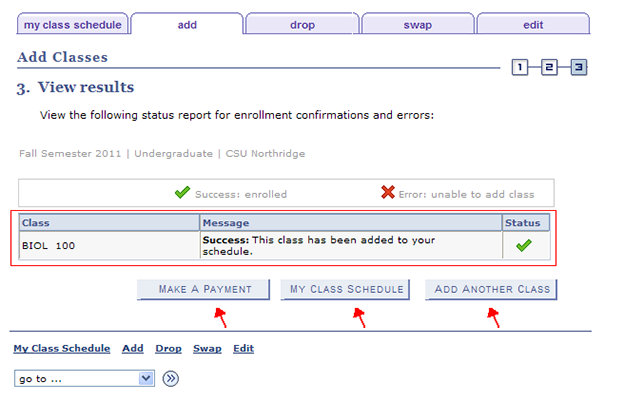
The View Results page displays errors or confirms success for the enrollment.
If errors are found:
- Follow the instructions in the error message (not shown) to fix the problem.
- Print error message (optional) to discuss with faculty or staff.
- Click the Add Another Class button to search for more classes.
If successful:
- Read results and print any messages you want to discuss with faculty or staff.
- To add more classes, click Add Another Class.
Check your account balance and payment due dates to avoid disenrollment.
Step 11
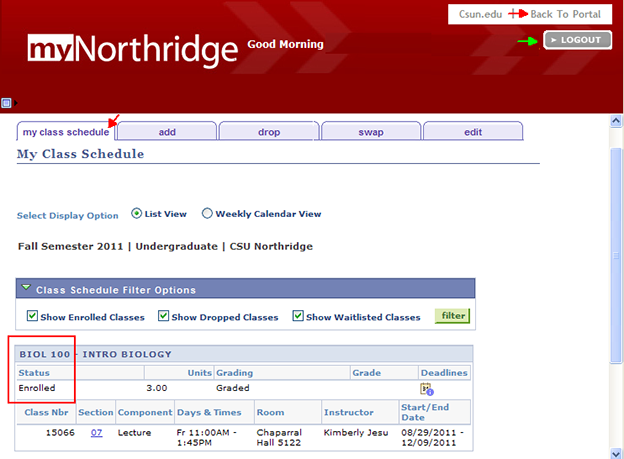
Select the My Class Schedule tab to print a copy of your class schedule for your records.
To return to myNorthridge, click Back To Portal (upper right corner).
If finished, select logout to exit.
[NOTE: This image will soon be replaced with a new one.]