This is a tutorial only. No login is required.
Introduction
The wait list feature in the self-service registration system allows students to secure a position on a waiting list for closed classes in the fall and spring semesters. Wait-listed students will automatically be enrolled when a seat becomes available and all requirements are met (see below).
For wait listing start/end dates, see the Registration Calendar.
As a regular CSUN student, you can wait list when:
- Space is available on the wait list
- You meet the class prerequisites
- You are at or below the maximum limit of thirteen (13) wait list units
- You receive a permission number for a restricted class that is full
You cannot wait list for corequisite classes (i.e., two classes that must be taken concurrently such as a corequisite lecture and lab) UNLESS you've previously taken and passed one of the corequisite pair or you are currently enrolled in both corequisites.
You are moved from the wait list to enrolled status when:
- Space is available in the class
- You meet the class prerequisites
- You are below your maximum academic unit load for the term
- You have resolved time conflicts between a wait listed class and a class you're already enrolled in
- You are not already enrolled in another section of the same course
Tips for Wait Listing:
- Plan alternative schedules early on. Use the degree planning tools (Registration Planner, DPR/Planner) and the Degree Road Maps or Associate Degree for Transfer Road Maps (STAR Act) to choose priority classes. Discuss options with your academic advisor.
- Drop yourself from the wait list of a class you no longer want. Check your schedule! If you don't drop and you are auto-enrolled, you'll incur possible tuition fee charges. If you're auto-enrolled and forget to drop, you'll get a "WU" grade, which counts as an "F" in GPA calculation.
- When you successfully enroll in a class, you will be dropped from all other wait list sections of the same course.
- If you are auto-enrolled from a wait list into a class, check your account balance and payment due date(s). Pay on time to avoid disenrollment from some or all of your classes, which could also include other waitlisted classes.
- Choose wisely. You may need to decide whether to keep a class you're enrolled in, or drop it and wait list for another class in the hope that a seat becomes available. You won't be auto-enrolled into a wait listed class if it duplicates a course in which you are already enrolled. Similarly, you cannot be auto-enrolled into a wait listed class if it creates a time conflict with any of your enrolled classes. Be sure to enroll in enough units to maintain your full- or part-time student status if needed.
- View the Wait List FAQs (PDF).
Reducing the number of enrolled units may affect your eligibility for financial aid, campus housing, international student status, etc. See Academic Program Changes.
Step 1
Go to the CSUN home page at www.csun.edu and:
- Select the CSUN Portal link from the MyCSUN menu in the top navigation.
- Log in with your CSUN user ID and password.

Step 2
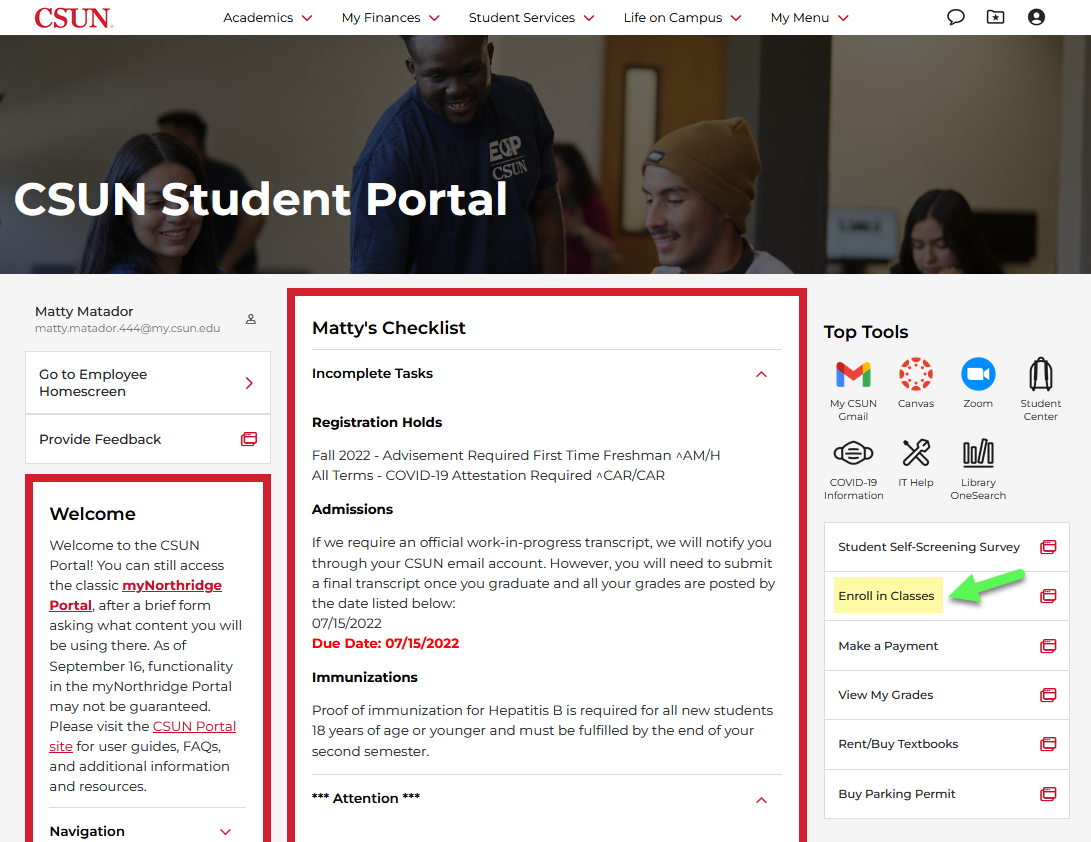
Your CSUN Portal home page displays.
- In My Checklist, locate the Registration and Incomplete Tasks headings to review your enrollment appointment, the allowable maximum unit load, and any registration holds.
- Once you've cleared any registration holds, you may enroll.
- Under the Top Tools heading in the link block, select Enroll in Classes.
Step 3
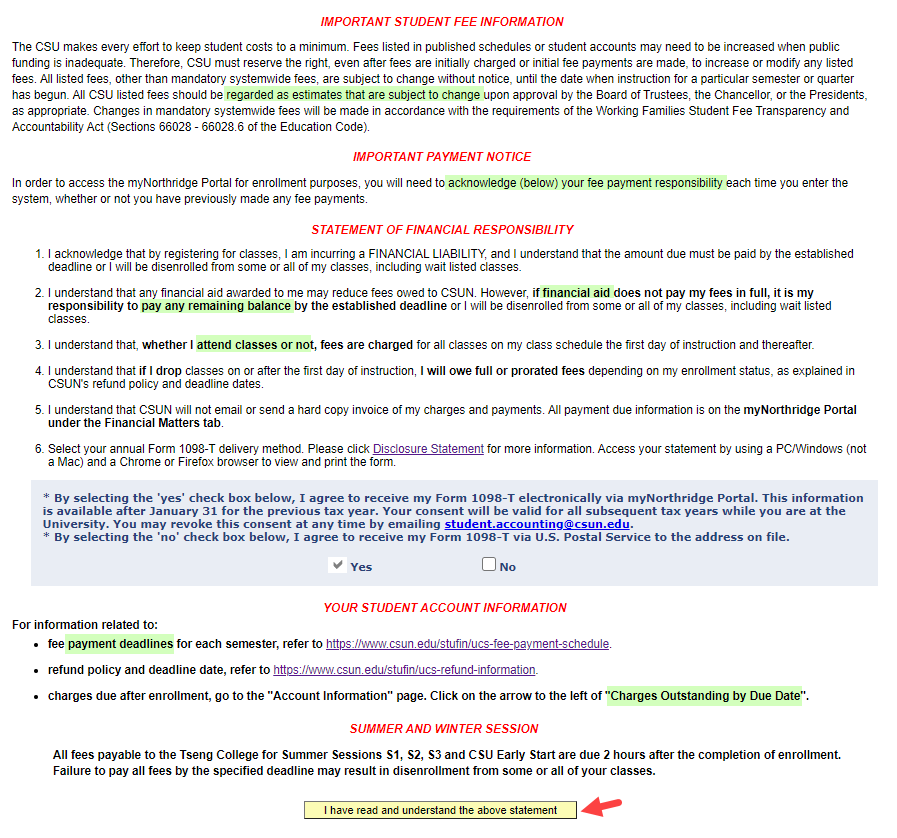
The Student Fee Payment Notice displays important disclosures, financial responsibility acknowledgements, Form 1098-T tax credit information, and where to find your account charges and payment deadlines.
To continue:
- Read the Statement of Financial Responsibility.
- If you agree, select the button "I have read and understand the above statement."
To return, select Back To Portal in the upper right corner (not shown).
Step 4
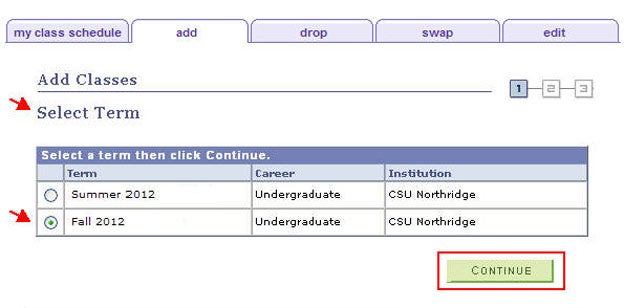
If the Add Classes - Select Term page displays, select the desired Term from the list and click Continue.
Step 5
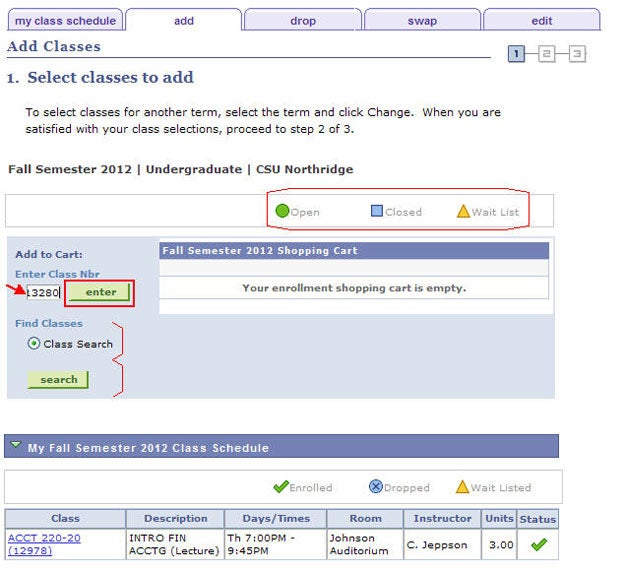
The Select Classes to Add page displays, including your enrollment shopping cart and class schedule.
Note the legend of class status icons: Open, Closed or Wait List. The orange wait list triangle always displays even when wait listing in not available.
To wait list for a class:
- Type the five-digit Class Number and click Enter.
or - Use Find Classes to look up the class. Click Search.
Select Class Search for this example.
Step 6
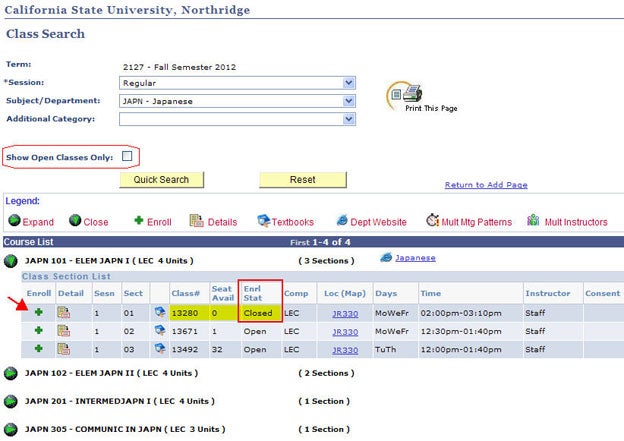
In Class Search, open, closed and canceled classes display by default.
Let’s say you want Japanese 101 class number 13280, but the Enrollment Status is “closed.” You should:
- Check the Consent column. If "department" or "instructor" displays and the section is full, you’ll need permission to wait list for the class.
- Select the class section by clicking the green plus (+) sign.
Though the class is “closed,” you may sometimes see seats available because the process to move eligible students from wait listed to enrolled in the class has not run yet. The process runs throughout the day. If you've been enrolled, you'll receive an email a few minutes after the process has run.
Step 7
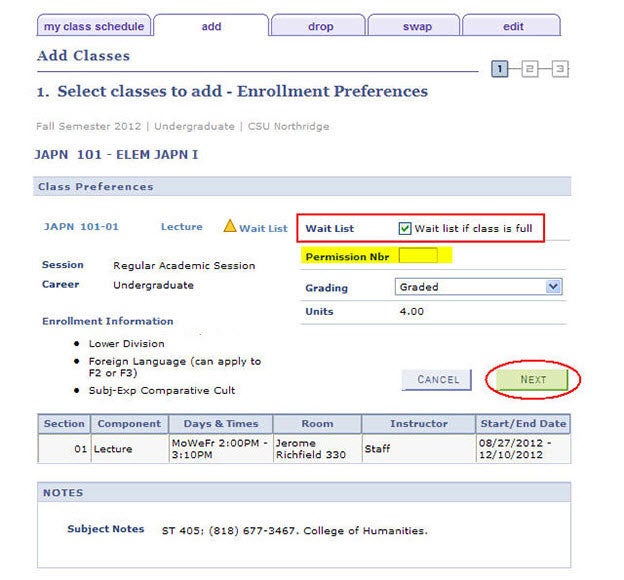
The Select Classes to Add – Enrollment Preferences page displays.
Are you eligible to enroll in the class? Review the course requirements and Class Notes on this page to find out.
Under the Class Preferences heading:
- Check the box “Wait list if class is full.”* (If the check box does not display, the wait list is full.)
- If consent is required, enter a permission number to wait list for the class.
- Click the Next button.
*Be sure to CHECK the "Wait list if class is full" BOX.
Otherwise, the class will stay in your shopping cart, and you will not be added to the wait list.
Step 8
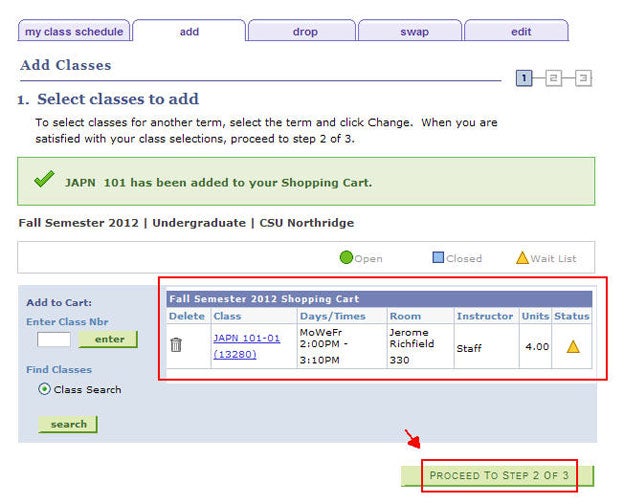
The class has been added to your enrollment cart.
You are NOT yet wait listed! The wait list icon (orange triangle) in your cart only means that the wait listing period is active and that you've requested to wait list.
IMPORTANT:
Did you forget to check the "Wait list if class is full" box? Click the class link in the cart to return to the Enrollment Preferences page (see Step 7 above).
- Click Proceed to Step 2 of 3.
KEEP GOING! You are not wait listed until you complete the process and verify success.
Step 9
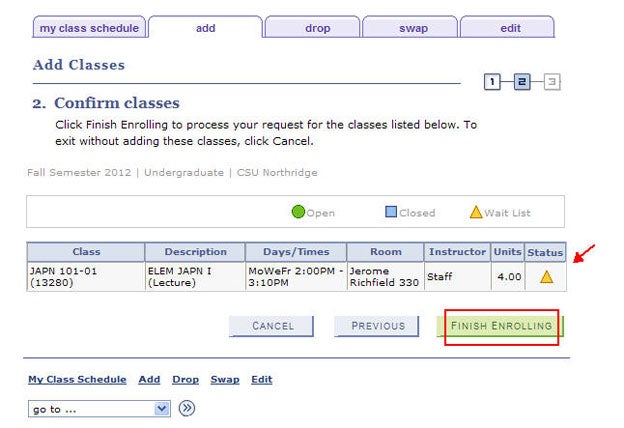
The Confirm Classes page displays.
- Proofread your course selection.
- Note the wait list icon (it just means wait list is available).
- Choose Finish Enrolling.
Step 10
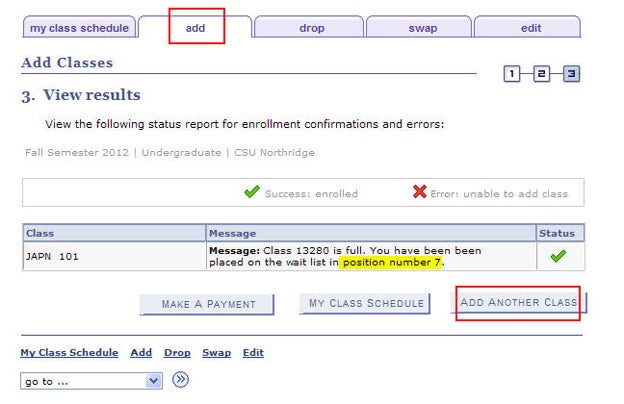
The View Results page displays success or errors for your wait list request. Success is shown with:
- A green checkmark in the Status column
- Your wait list position number
You are NOT on the wait list if:
- you see a red "X" in the Status column
- your wait list position number does not display
- An error message displays (e.g., course requisites not met)
Didn't CHECK the "Wait list if class is full" BOX? Click Add Another Class to return to the cart, re-select the class and indicate Enrollment Preferences (see Step 7 above).
Step 11
You are wait listed for the class when the Select Classes to Add page displays the JAPN 101 class in your class schedule.
Under the "Class Schedule" heading, JAPN 101 is listed in the Status column as Wait Listed.
If the class is still in your CART, you are NOT wait listed!
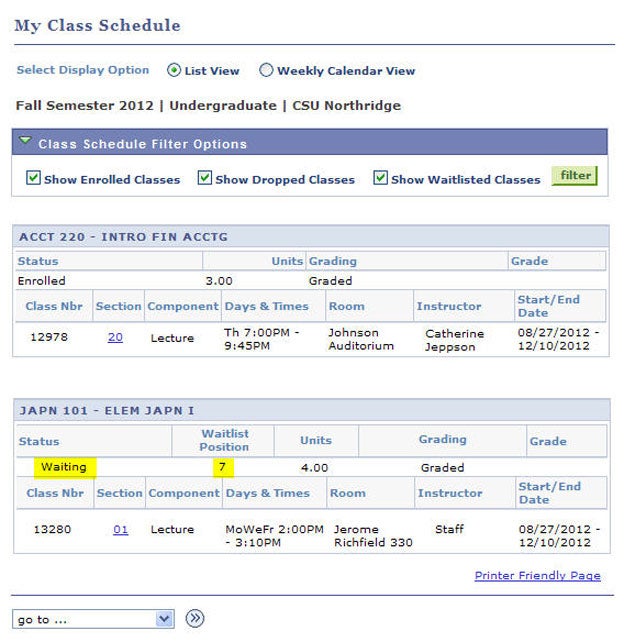
- For another view of your enrolled and wait-listed classes, including your position on the wait list, select the My Class Schedule tab at the top.

Step 12
My Class Schedule displays your enrolled, dropped and wait listed classes together in one list. You can filter the list to show wait listed classes only.
When a seat opens up in the class, your wait list position number will improve.
You will receive an email notice when:
- Your status changes from wait listed to enrolled. Check your account balance in case you owe additional tuition fees. Avoid disenrollment from some or all of your classes by paying before the due dates in the fee payment schedule.
- The registration system finds an error with your wait list request, and you are not enrolled. Error notices are emailed at the end of each day.
Learn more:
- Check your waitlist position number at anytime during the Waitlist period in the SOLAR Student Center. See View My Class Schedule.