Direct link: Registration Planner (login required)
INTRODUCTION
This is a tutorial only. No login is required.
- BASIC GUIDE - If you're new to Registration Planner, stay on this page.
- ADVANCED GUIDE - For additional tips, visit Registration Planner Features.
- ALSO HELPFUL: Registration Planner FAQs
What is Registration Planner?
Registration Planner makes it easy to create your preferred class schedule each semester. You can enter times when you want breaks for work or other activities, compare schedule options and save favorites. Once you have determined your desired schedule and validated it, you can send it to your enrollment shopping cart.
Your use of Registration Planner helps CSUN predict course demand. Find it in the CSUN Portal and on the CSUN Mobile App.
![]() Pro tips:
Pro tips:
- Registration Planner has a "Validate" button to check for unit limits, time conflicts, missing course requisites, etc., before you send a schedule to your cart.
- Registration Planner does not enroll you in classes. You must send your desired schedule to the enrollment cart to finish adding.
- Clear all registration holds beforehand; they will prevent you from viewing your cart.
- Use the Degree Road Maps and Degree Progress Report/Planner, and meet with your advisor to identify the courses needed to complete your degree.
How do I use Registration Planner?
Check out this Registration Planner video tutorial and the step-by-step instructions below it. If you have questions, please contact your academic advisor.
Step 1
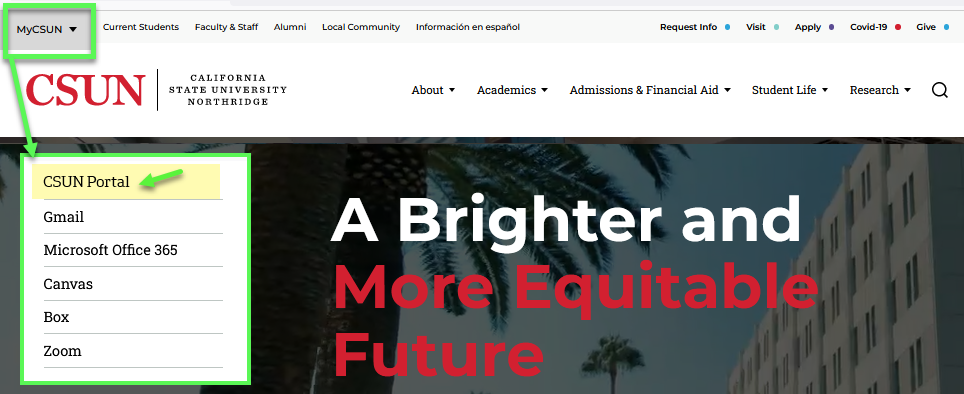
Go to the CSUN home page at www.csun.edu and:
- From the MyCSUN menu in the top navigation, select the CSUN Portal link.
- Log in with your CSUN user ID and password.
Step 2
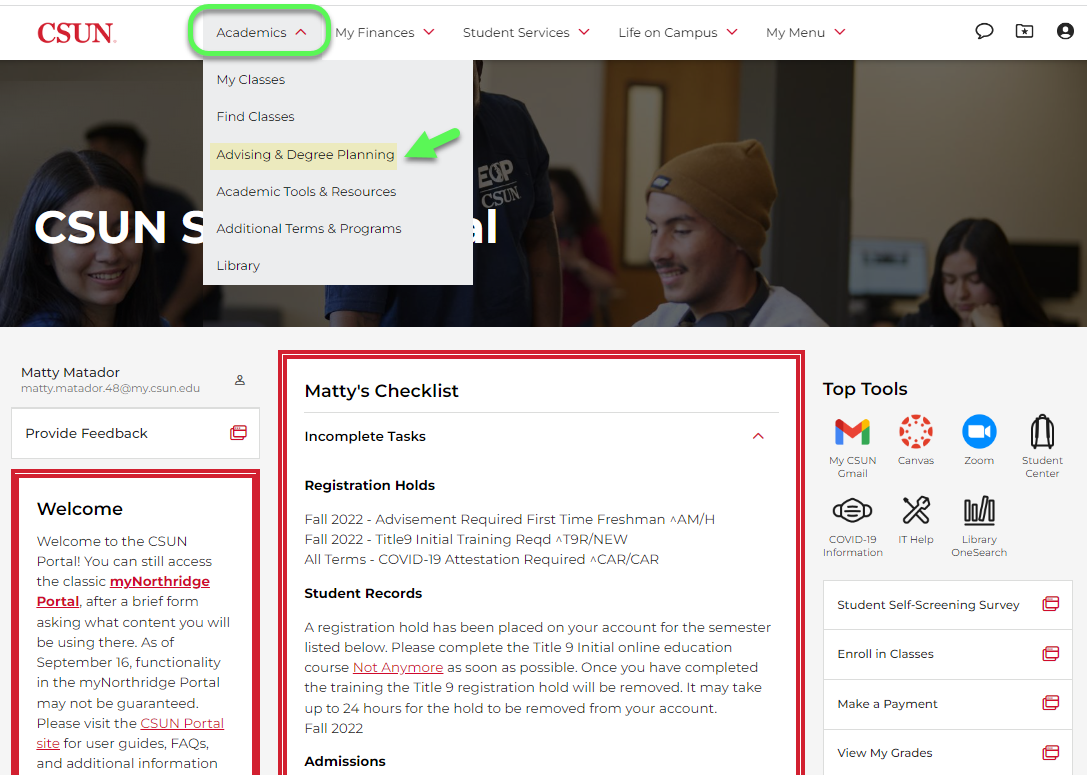
Your CSUN Portal home page displays.
- Select the Academics menu at the top.
- Then select the Advising & Degree Planning link.
Step 3
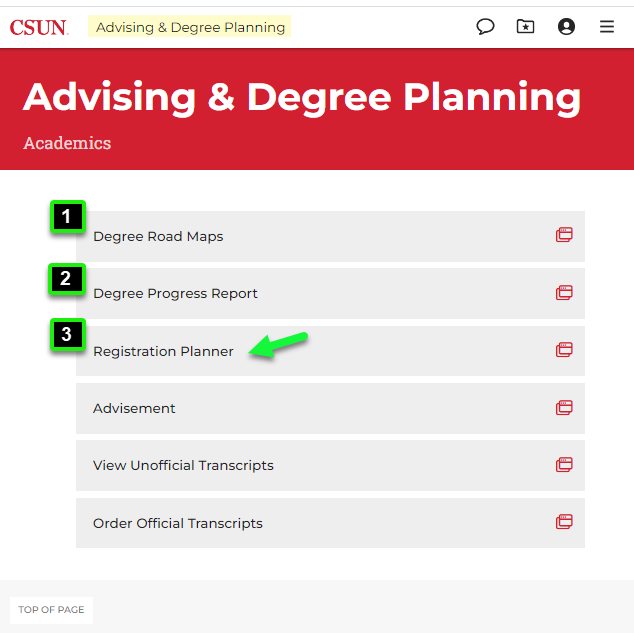
The Advising & Degree Planning page displays six related links. The first three links are your degree planning tools:
- Degree Road Maps
- Degree Progress Report/Planner
- Registration Planner
If you know the courses you want, select the third link: Registration Planner.
Step 4
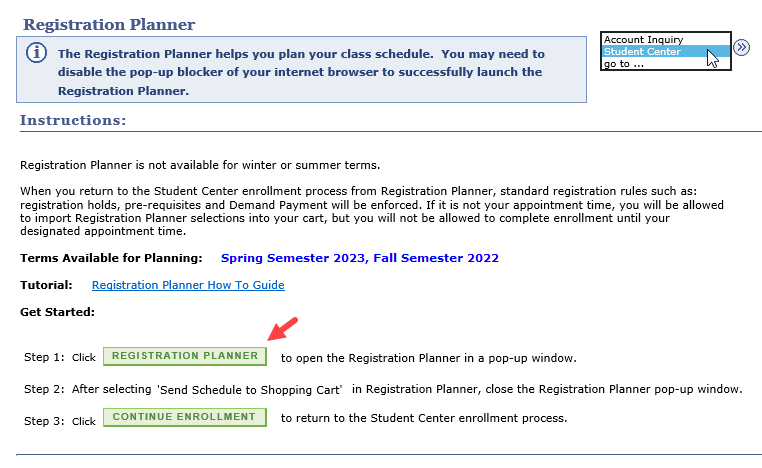
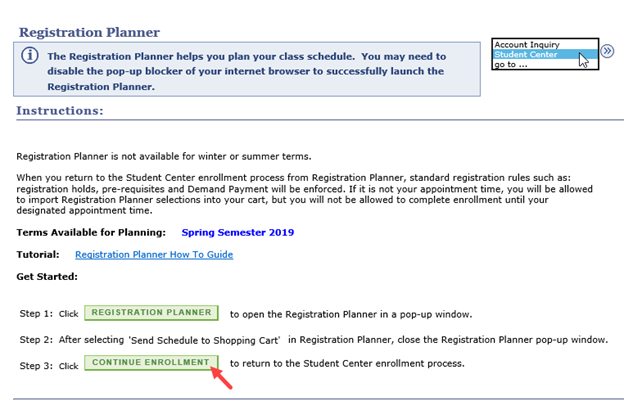
The Registration Planner Instructions page displays, including:
- Basic information and directions
- The terms available for planning
- A link to this How-To Guide
- Navigation buttons to go to Registration Planner or the Continue Enrollment pages
Under the heading Get Started, select Registration Planner.
Step 5
The Registration Planner (also called Schedule Planner) application opens in a new window. The Select Term page displays and lists the terms available for planning.
- Choose the desired term.
- Select Save and Continue.

Step 6
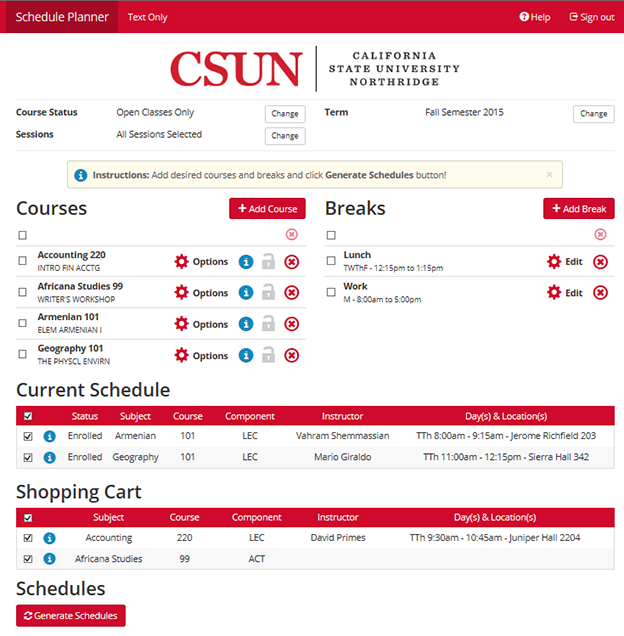
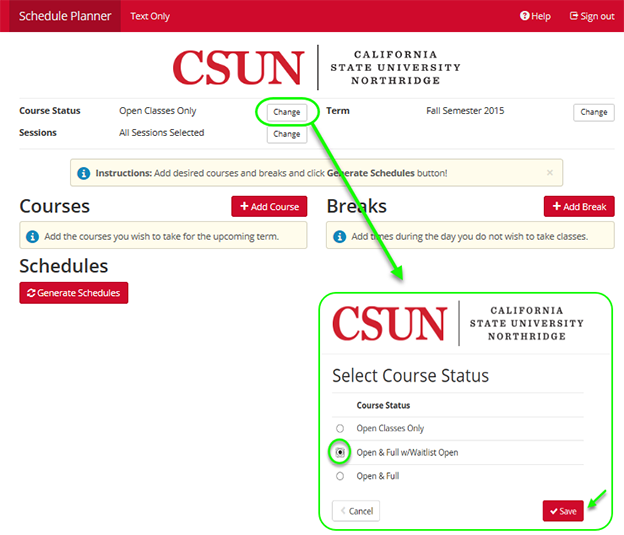
The Registration Planner home page displays. On this page you can:
- Set filters (optional): Course Status*, Session and/or Term
- Select Courses to schedule
- Enter Breaks (optional)
- View Current Schedule (enrolled classes) and Shopping Cart (pending classes) if any
- Generate Schedules
*Registration Planner defaults to open classes only. To generate schedules that include closed classes during the wait listing period, change the Course Status option:
- Select the Course Status Change button on the home page.
- On the Course Status screen, select the filter "Open & Full w/Waitlist Open.”
- Save (or cancel) to return to the home page.
Step 7
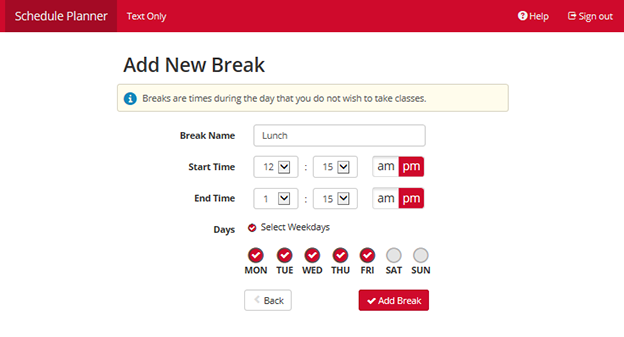
Select the Add Break button to enter times for work, athletics practice, and other activities when you don’t want to take classes.
![]() Breaks limit class options, so be flexible whenever possible. Only enter activities that you cannot change.
Breaks limit class options, so be flexible whenever possible. Only enter activities that you cannot change.
- Enter a Break Name. The title will display on schedules.
- Enter Start and End Times and corresponding am or pm values.
- Check individual day buttons or select Days to include all weekdays.
- Select the Add Break button to save your entry and return to Registration Planner home.
Step 8
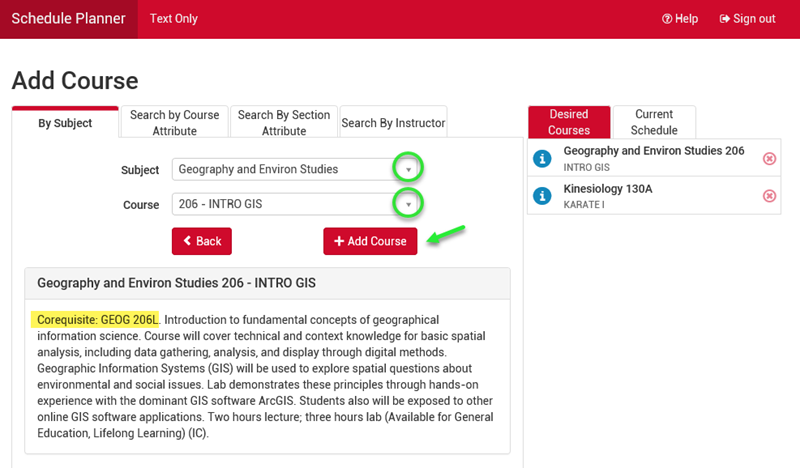
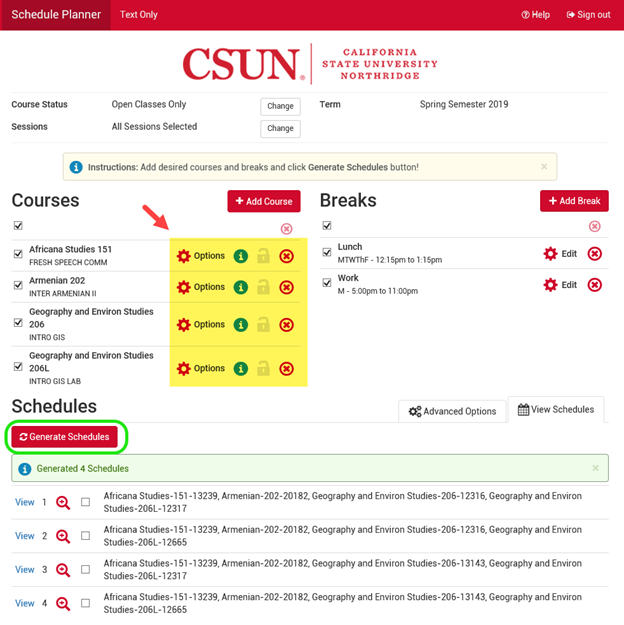
To choose courses you want Registration Planner to schedule, select Add Course from the home page. The Add Course page displays.
![]() Always read the Course Description for any prerequisites or co-requisites, as highlighted below.
Always read the Course Description for any prerequisites or co-requisites, as highlighted below.
- Use the “By Subject” “Search by Attribute,” or "Search by Instructor" tabs to select courses. In this example, we search by subject.
- Choose a Subject from the drop down menu [ex., Geography and Environ Studies].
- Choose a Course from the drop down menu [ex., 206 – INTRO GIS].
- Select the Add Course button to add it to the list.
Repeat Steps 1-4 to add all of your desired courses to the list. Be sure to include any co-requisite courses.
Select Back to return to the Registration Planner home page, view the course list and generate schedules.
Step 9
The Registration Planner home page displays the grid of desired courses along with new icons that give you more options:
- Options icon – View all class sections for the course. Choose one or more sections to include in your possible schedules, which will limit results. Works well for scheduling co-requisite lecture and lab classes when enrollment in a specific class section is required.
- (i) icon – Show course details and requisites.
- Lock icon – Memo that you have “locked” a class section that you really want in order to plan possible schedules around it. Lock the section in "View schedule" mode, shown in Step 11 below, and then regenerate schedules.
- (x) icon – Delete a course from the list.
When satisfied with your selections, select the Generate Schedules button and view results (View 1, View 2, etc.).
Step 10
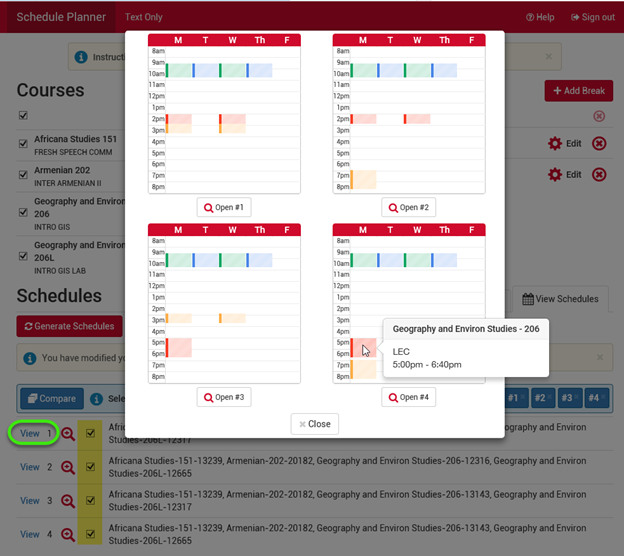
Once the Generate Schedules list has been created, you may:
- Compare up to 4 schedules. Check 2 to 4 boxes and select the "Compare" button to view them side by side.
- Hover the mouse to preview each color-coded course or break.
- Use the magnifying glass in the list for a thumbnail view of a single schedule.
- View schedule details using the “View” link (ex. View 1).
When you find a schedule you like, select its “View” link to navigate to the “Send to Cart” page.
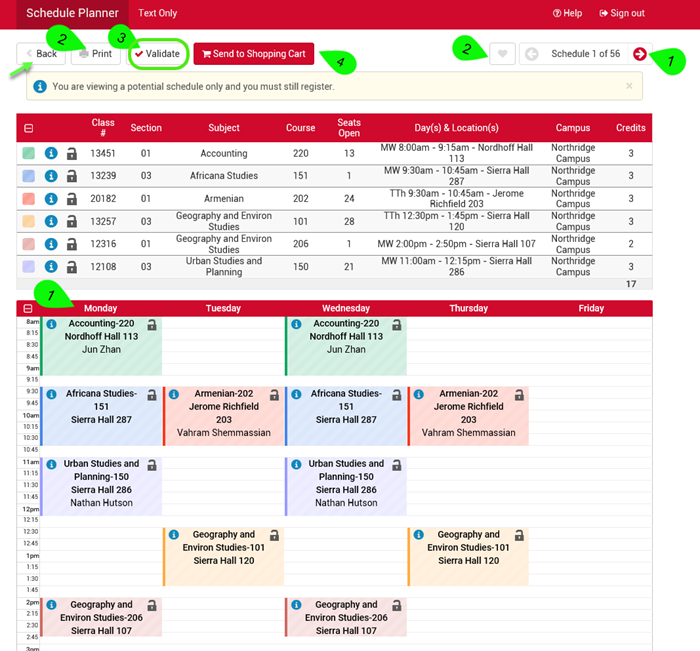
Step 11
Your preferred possible schedule displays in detail. The actions you can take on this page are numbered in the image below. Here you can:
- View schedule details and scroll horizontally through the other schedules you generated.
- Print schedules or save favorites with the heart icon.
- Select the Validate button* to check for errors such as:
- Missing course prerequisites and co-requisites
- Exceeding maximum unit load
- Time conflicts with your enrolled classes and those in your cart
- Repeated courses - Registration Planner reads your course history.
- Send a preferred schedule to your enrollment cart to finish registering.*
*NEW! Click Validate to detect any errors before sending a schedule to your cart. A “Validate Results” pop-up window (not shown) will display errors or confirm success. See examples at Registration Planner Features Guide.
To fix any errors, select the Back button to return to the Registration Planner home page. Then generate new schedules, select one to view, and validate it again. If success, click the Send to Shopping Cart button.
Step 12
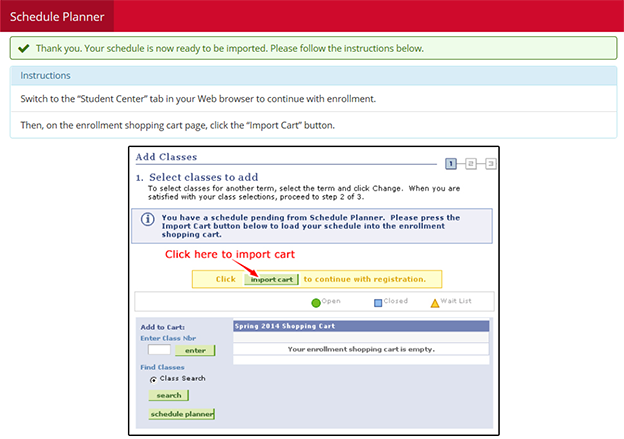
When you select Send to Shopping Cart, a pop-up window asks you if you want to close Registration Planner and send the schedule to your cart. Choose Cancel or OK.

If you select OK, Registration Planner closes and a new Confirmation page (shown below) provides these instructions:
- Switch to the “Student Center” tab in your Web browser and click “Continue Enrollment.”
- Then on the enrollment shopping cart page, click the “Import Cart” button.
Close the Registration Planner window in your Web browser and switch to the "Student Center" tab.
![]() IMPORTANT!
IMPORTANT!
- Registration holds will prevent you from accessing the SOLAR Student Center to import your preferred schedule and from viewing your enrollment cart.
- The CSUN Schedule of Classes may change before you enroll, especially if you sent a schedule to your cart well before your registration appointment. To include any new class sections and update available seats, return to Registration Planner closer to your enrollment time, generate new schedules, and send one to your cart.
Step 13
On the Student Center tab of your Web browser, the Registration Planner Instructions page displays.
Select the Continue Enrollment button to go to the enrollment pages and finish the import process.
Step 14
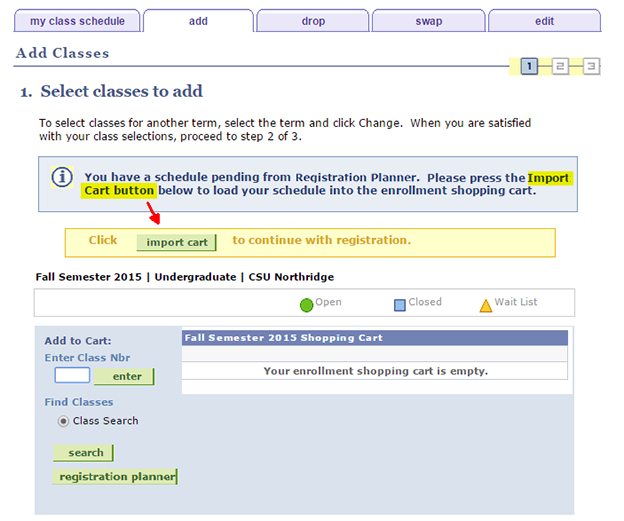
The Student Center Select Classes to Add page displays, including your enrollment shopping cart.
- Select the “Import Cart” button to load your proposed schedule into the cart.
Step 15
The Select classes to add – Enrollment Preferences displays the first class to import from Registration Planner to your cart.
![]() While this process imports each class from Registration Planner, it does not enroll you. When it’s your time to enroll, revisit the Enrollment Preferences page to enter a Permission Number or wait list for closed classes if necessary.
While this process imports each class from Registration Planner, it does not enroll you. When it’s your time to enroll, revisit the Enrollment Preferences page to enter a Permission Number or wait list for closed classes if necessary.
To continue the import process:
- Review the Enrollment Information for course requirements.
- Select Next to advance to the next class to import.
- Repeat this step to finish importing each class to your cart.

Step 16
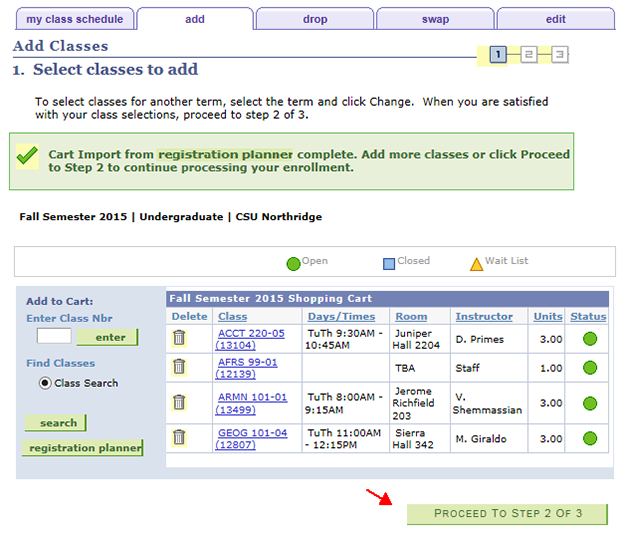
Review your enrollment cart to verify the imported schedule.
![]() If your registration appointment has arrived, proceed with enrollment.
If your registration appointment has arrived, proceed with enrollment.
Step 17
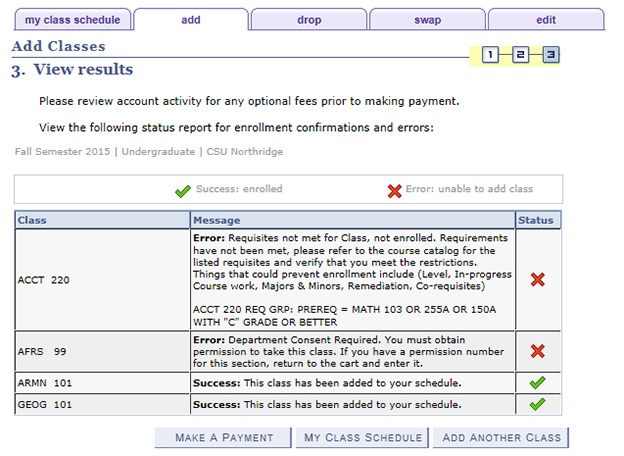
The View Results page displays errors or confirms success for the enrollment request.
- An “X” means an error occurred and SOLAR was unable to add the class.
- A check mark means your request was successful.
Informational Only 
When you start a new Registration Planner session, the application will read and update your current schedule of enrolled classes and any classes pending in your shopping cart.
When editing your course selections to generate additional schedules:
- Check the Breaks checkbox (defaults to unchecked in a new session).
- Refresh Registration Planner in your Web browser after changing your enrolled classes or shopping cart on the enrollment pages to update the information. This is critical if you changed your schedule or cart while Registration Planner was still open.
- Log out of Registration Planner and the CSUN Portal when done.