This is a tutorial only. No login is required.
INTRODUCTION
We want to communicate with you! Please take a moment to review and, if needed or desired, update your personal information:
- Emergency contacts and alerts
- Identity (e.g., gender expression), preferred first name, and pronouns (see Why Pronouns Matter for Everyone)
- Legal matters
- Mailing address and diploma address if graduating, and phone numbers
Please take a moment to proofread and update your personal information. This guide shows you how.
 TIP - You can record the pronunciation of your name and opt to display your student ID card photo in class rosters. Learn more at myCSUNprofile.
Step 1
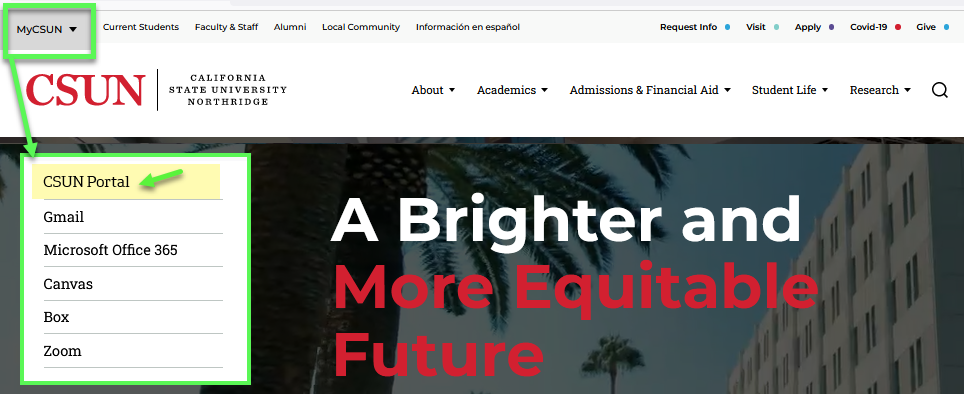
Go to the CSUN home page at www.csun.edu and:
- Select CSUN Portal from the MyCSUN menu in the top navigation.
- Log in with your CSUN user ID and password.
Step 2
Your CSUN Portal home page displays.
In the Top Tools area, select the Student Center backpack icon link.

Step 3
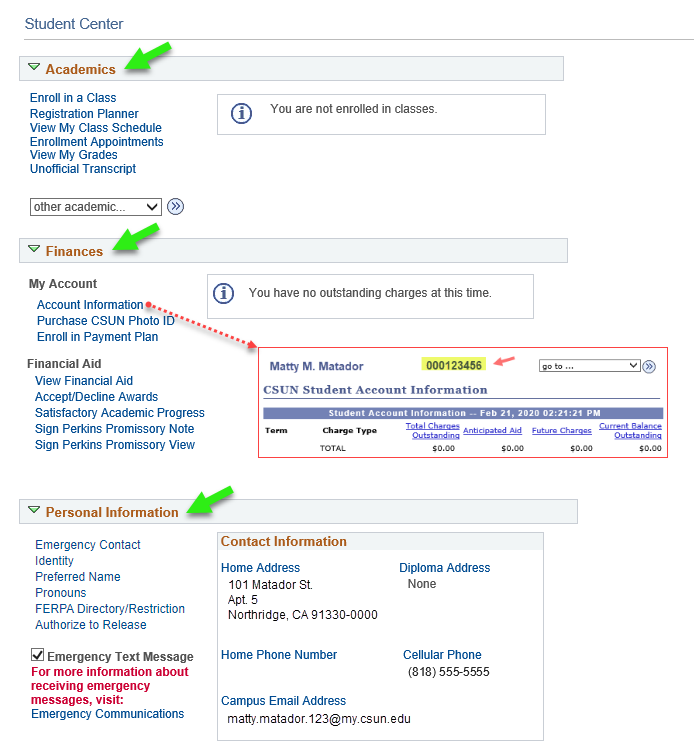
The SOLAR Student Center home page displays in three sections:
- Academics
- Finances
- Personal Information
Quick Tip: Forgot your 9-digit Student ID Number? In the Finances section, select the “Account Information” link. Your ID number displays at the top center of the page (see inset).
Let’s look at the Personal Information section.
Step 4
In the PERSONAL INFORMATION section, you can edit preferences for:
- Emergency contacts, email and text messages
- Identity, preferred first name, and pronouns
- FERPA and Authorization to Release (legal matters)
- Contact information: home and diploma addresses, phone, and email
Select the links above to jump to details for that transaction in this guide.
Let’s start with the emergency links.
Step 5
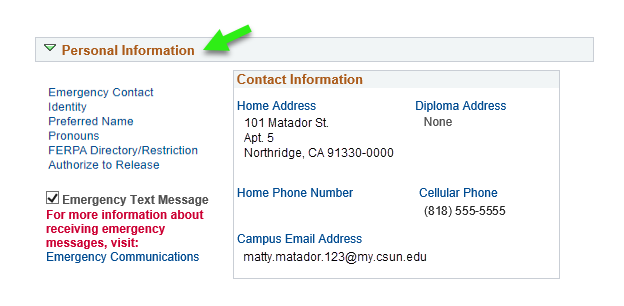
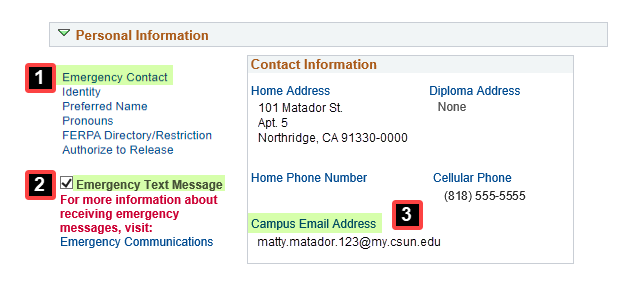
Emergency Contacts and Messages – Use the links and the checkbox to edit your preferences in case of an emergency:
- Select the “Emergency Contact” link to add or edit your contact persons.
- Check the “Emergency Text Message” box if you want CSUN’s Office of Emergency Management and Preparedness to text your mobile phone in an emergency. (Be sure to enter your cell phone number in the box on the right.)
- Select the “Campus Email Address” link to add a personal email address to receive any school emergency alerts. They will be sent to both your CSUN and non-CSUN email accounts. For all other purposes, university communications will be sent only to your CSUN email account.
Select the Emergency Contact link.
Step 6
The Emergency Contacts page displays, along with tabs to navigate to the other “Personal Information” pages.
- Select the Add an Emergency Contact button to add people, their phone numbers, addresses, relationship to you, and status as primary contact (or not).
- Select the pencil icon to update existing contacts.
- Select the trash icon to delete a contact.
- Select Save to keep your changes.
Tip: To return to the SOLAR Student Center, select it from the drop-down menu (upper right) and click the “go” button.

Step 7
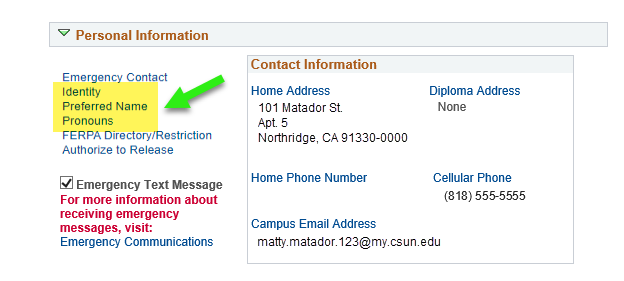
Identity, Name and Pronoun Preferences – Back in the SOLAR Student Center Personal Information section, use the 3 links on the left to set your preferences for Identity, Preferred (first) Name, and Pronouns:
- Select Identity to indicate sexual orientation, gender identity, and gender expression if desired. Responses are private and secure as explained on the page. Helpful: CSUN Pride Center
- Select Preferred Name to view your first, middle and last name of record. You can edit your preferred first name to display on CSUN Gmail and/or the Canvas learning platform for your instructors and classmates to see.
- Select Pronouns to choose your subject, object, and possessive pronouns. Helpful: Why Pronouns Matter for Everyone
Select the Identity link.
Step 8
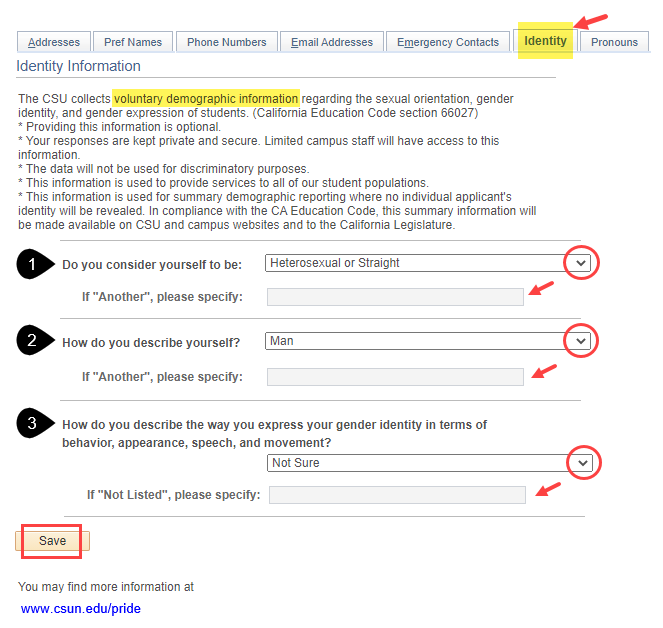
The Identity tab and page display options that allow you to specify your sexual orientation, gender identity, and gender expression. Providing this information is optional. For more info, please visit CSUN Pride Center.
- The first section of the page explains how any data you submit will be used:
- The data collected is voluntary demographic information, pursuant to California Education Code Section 66027.
- The data are kept private and secure. Limited campus staff will have access to this information.
- The data will not be used for discriminatory purposes.
- The information is used to provide services to all of our student populations.
- The data is reported in aggregate summary without revealing anyone’s individual identity.
- This summary information will be made available to the general public on CSU and campus websites, and to the California State Legislature.
To proceed, select your choices from the 3 drop-down menus on the Identity page:
- Sexual orientation
- Gender identity
- Gender expression
If your choice does not appear in the drop-down menu, enter it into the If “Another,” please specify box.
Select the Save button to submit your selections.
Now let’s look at the Preferred Names tab.
Step 9
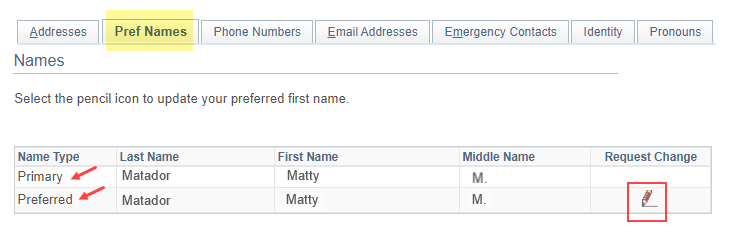
On the Pref Names tab and page, your primary and preferred names display in two rows.
Notes:
- Your preferred first name is the same as your primary first name unless you change it.
- Your preferred first name will display on class and grade rosters, in Canvas, and in the CSUN Directory. However, all official transcripts, diplomas, FERPA directory information, etc., will reflect your legal name.
- To change your full legal name, use the Legal Name Change Request (PDF).
Select the pencil icon to edit your preferred first name.
The Preferred Names page displays your current names.
To request a preferred first name:
- Enter your preferred name in the First Name box.
- Check the CSUN Gmail and/or Canvas Learning Platform boxes to indicate where you want to use your preferred first name.
- Select Save.
- On the confirmation screen (not shown), select the OK button to return to the first Pref Names page.
Please allow approximately 2 business days for your preferred name to appear in your CSUN Gmail or Canvas accounts. You will receive a confirmation email once your request is received.
Select the Pronouns tab (see next step).

Step 10
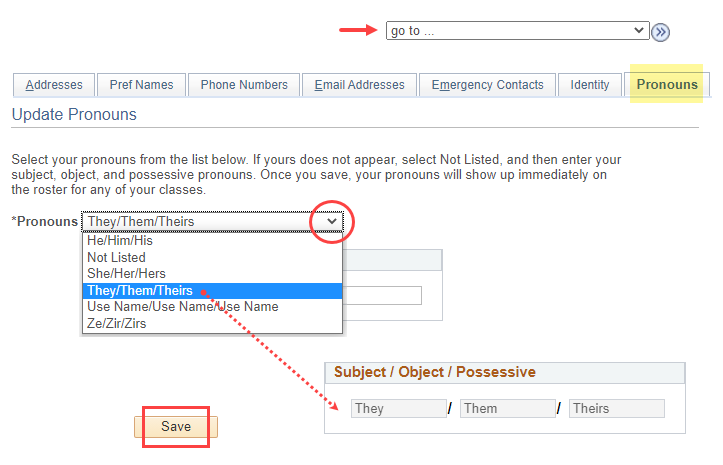
The Pronouns page displays.
- Use the drop-down menu to select your preferred subject, object, and possessive pronouns and populate the 3 boxes.
- You can also select “Not Listed” to enter other pronouns into the boxes. See the helpful chart at Why Pronouns Matter for Everyone.
- Select the Save button.
Your preferred pronouns will immediately show up on the rosters for your classes.
Return to the Student Center using the drop-down menu and “go” button in the upper right corner of the page.
Step 11
FERPA and Authorize to Release - Before changing the default settings on these legal matters and authorizations, please review:
- FERPA Directory/Restriction: Privacy Rights of Students in Education Records
- Authorize to Release: Release Authorization Guide
You may also contact Records and Registration for assistance.

Step 12
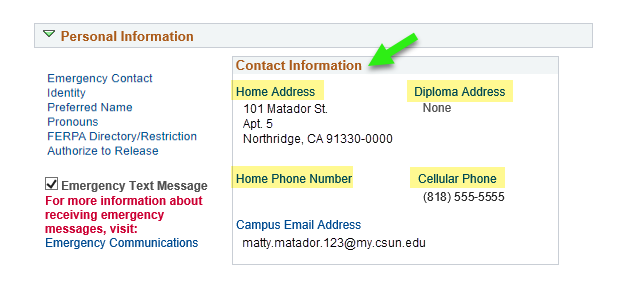
Contact Information – Select any link to update your info.
- Select Home Address to verify your home mailing address in case you made a typo on your admission application or you recently moved.
- Select Diploma Address if you’re graduating and want your diploma sent to a different mailing address.
- Select Home Phone or Cellular Phone to add or update your numbers.
Select the Home Address link.
Step 13
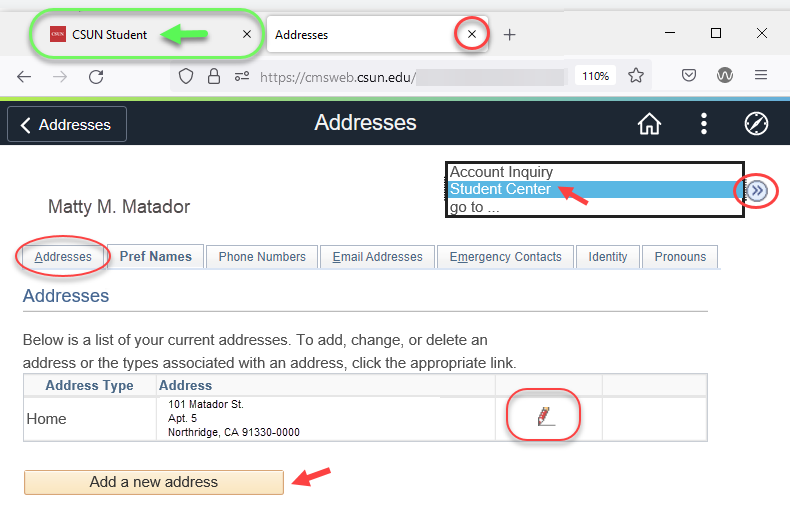
The Addresses tab displays your home/mailing address and other addresses if any.
- Select the pencil icon to edit your current address
- Select the Add a New Address button to enter a diploma or other type of address.
Save your updated information. Then you can:
- Navigate to other personal information pages using the tabs
- Return to the Student Center using the drop-down menu and "go" button at the top.
- Exit this page by closing the "Addresses" tab in your web browser.
- Return to the CSUN Portal by selecting that tab in your web browser.
Remember to log out of the portal when done. Thank you for updating your personal information!