
Advisors, please go to the special DPR/Planner Guide for Academic Advisors.
This is a tutorial only. No login is required.
INTRODUCTION
The Degree Progress Report (DPR) is an audit that provides a full picture of your progress toward degree completion. Undergraduate, master's degree and doctoral students have access to a DPR audit.
This guide covers both components of the interactive DPR and Planner tool:
- The Audit tracks your graduation progress, displaying completed courses and remaining requirements.
- The Planner allows undergraduates to drag and drop courses from an audit into a personalized term-by-term plan for completing your remaining requirements. Planning your future courses will help departments better analyze and meet student course demand in the future.
Your Degree Progress Report:
- Lists course work completed at CSUN and at other schools from which you submitted official transcripts
- Places your course work into degree requirement sections
- Identifies CSUN requirements you still need to satisfy in order to graduate
- Changes to reflect your progress toward degree and major objectives
- Helps you prepare for meetings with your academic advisor
- Can be output as a print-friendly PDF file (see DPR Step 5 and Planner Step 6 below)
Undergraduate students can create a personalized term-by-term plan for completing remaining requirements.
Note: Always use an Audit in consultation with your advisor before finalizing any decisions related to your academic major.
 Additional Resources: Degree Planning Tools
DPR Step 1
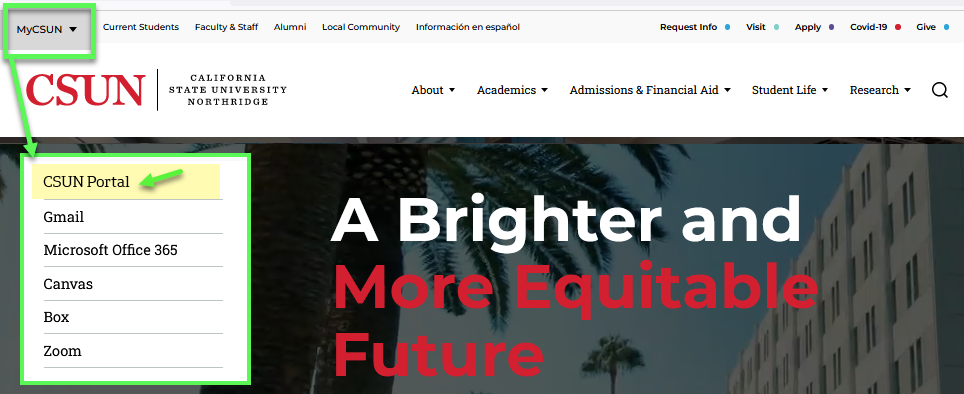
Go to the CSUN home page at www.csun.edu and:
- Select MyCSUN in the top menu.
- Select the CSUN Portal link.
- Log in with your CSUN user ID and password.
DPR Step 2
Your CSUN Portal home page displays.
- Select Academics from the top navigation.
- In the drop-down menu that displays, select Advising & Degree Planning.

DPR Step 3
The Advising & Degree Planning menu includes links for advisement, transcripts, and these three degree planning tools:
- Degree Road Maps
- Degree Progress Report and Planner
- Registration Planner
Learn how these tools can help you stay on track at Plan Your Degree.
To get started, select the Degree Progress Report link.

DPR Step 4
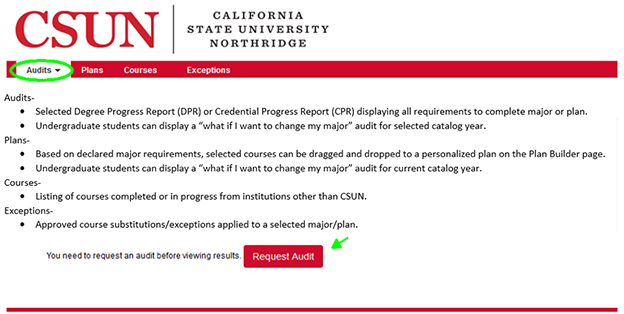
The instructional landing page displays when no audits exist or if this is your first time running an audit.
Click the Request Audit button to run a Degree Progress Report.
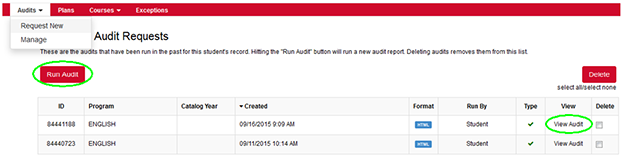
If an audit exists, the Completed Audit Requests page displays.
Select from two options:
- Request a new audit: Click Request New (Audit drop down menu) or click the Run Audit button.
- View a previously saved audit: Click Manage (Audit drop down menu) or click the View Audit link.
DPR Step 5
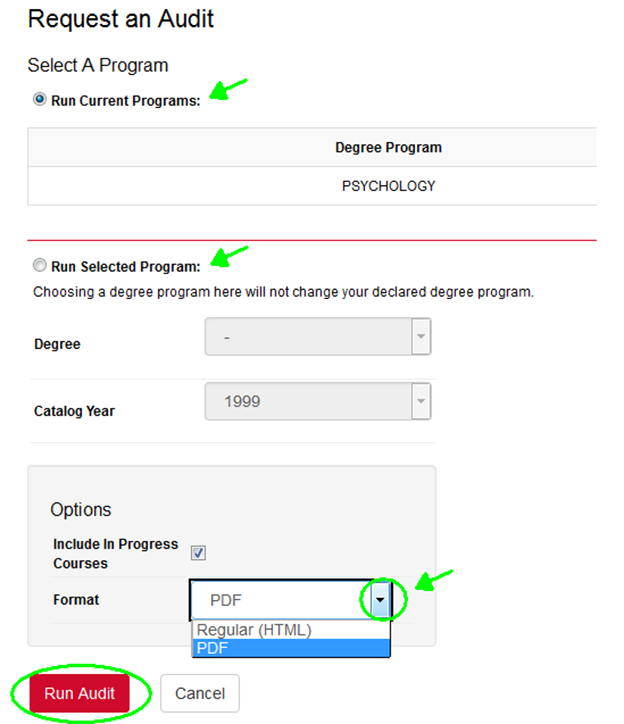
Select a program:
- Run Current Programs (Undergraduate and Graduate students) to run an audit for your declared program/major.
— or — - Run Selected Program (Undergraduate students only) to run a "what if I want to change my program/major" audit for a different major. This will not officially change your declared major. From the drop down menu:
- Select a Degree (program/major).
- Select a Catalog Year.
- Format defaults to HTML with the option to open and close requirements. Select PDF format to print, save or email entire DPR.
When done, click the Run Audit button.
The Running Audits page displays while processing your request.

DPR Step 6
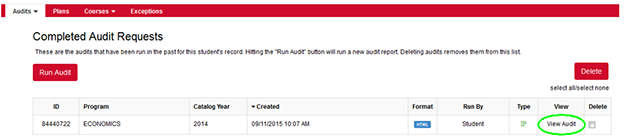
The Completed Audit Requests page displays. Audits that you requested will be stored here.
To open an audit, click the View Audit link.
DPR Step 7
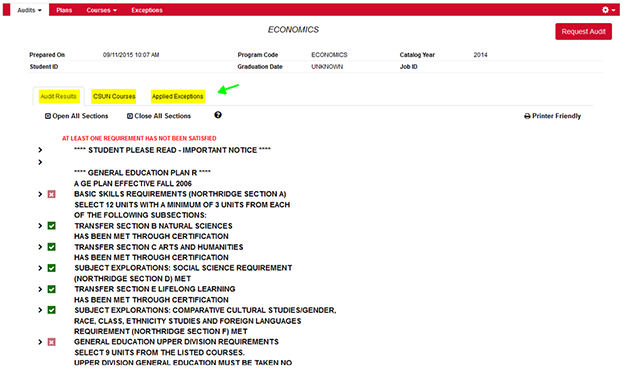
The report header displays your personal information and these three (3) tabs:
- Audit Results tab: Displays requirements for degree completion.
a) A green check indicates a satisfied requirement.
b) A red X indicates an unsatisfied requirement. - CSUN Courses tab: Lists courses you have completed at CSUN.
- Applied Exceptions tab: Lists your approved course exceptions and substitutions.
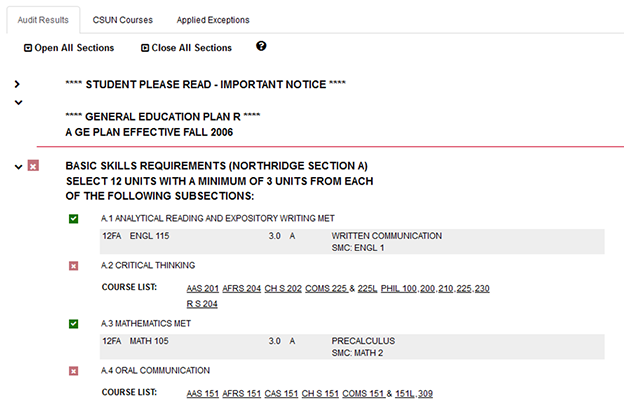
To view requirement details, click the arrow (>) to expand the desired requirement or select Open All Sections to expand ALL requirements.
DPR Step 8
Example Audit Report.

Navigate the Planner
INTRODUCTION
This interactive planning tool allows undergraduates to drag and drop courses from your degree audit to a personalized term-by-term plan to complete remaining requirements. Using this tool will help CSUN offer more of the courses you want in future terms.
By creating a Plan, you can:
- Enhance your advisement appointments with prepared plans.
- Visualize your timeline for degree completion.
- Produce course data for departments to predict future course demand.
Planner Step 1
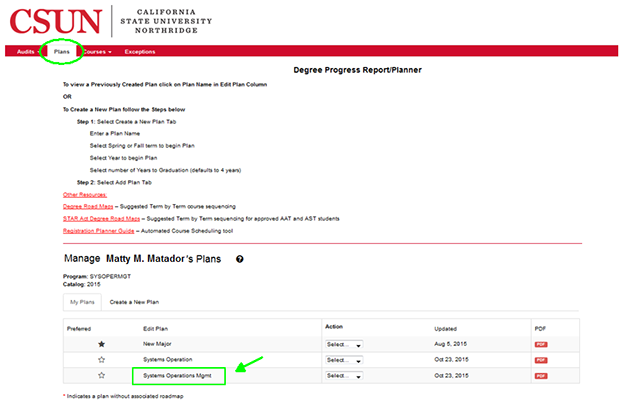
Select the Plans tab to create a unique academic plan towards degree completion. The Plans landing page displays.
If you have previously created a plan, the My Plans tab displays it. Click a plan name to open and modify it.
Planner Step 2
To create a new Plan, click the Create a New Plan tab. The Manage Plans page displays, defaulting to your current degree program/major.
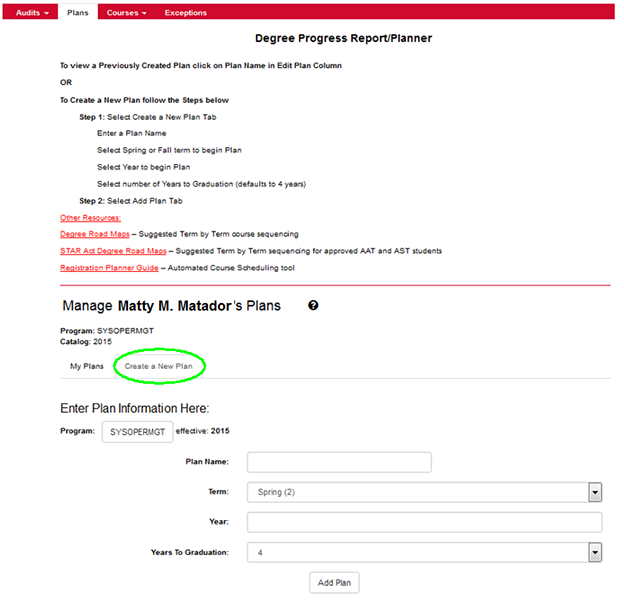
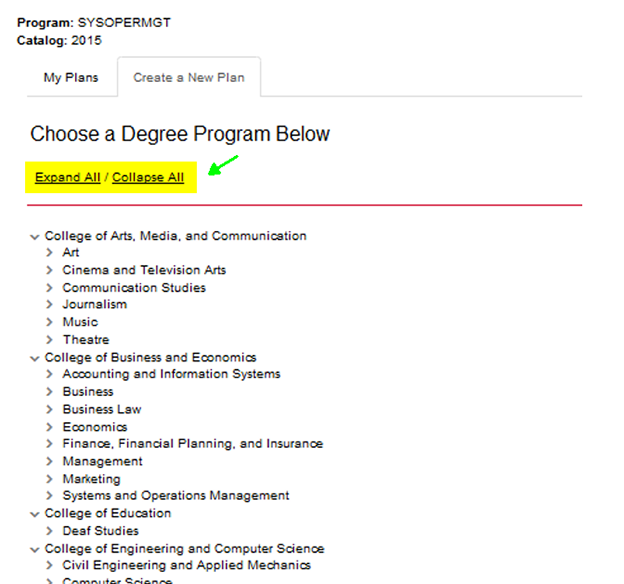
To change the degree program/major, click the Program button and select one from the list of available degree programs/majors.
Planner Step 3
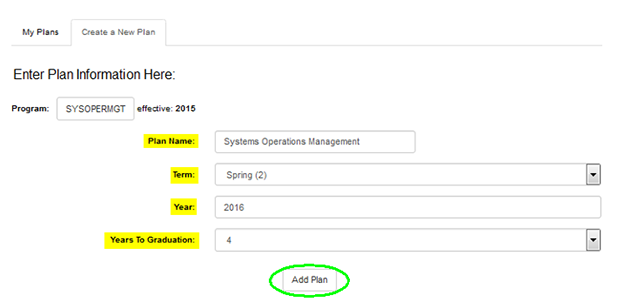
Fill-in the following fields to begin:
- Enter a Plan Name
- Select a Term (spring or fall) to begin plan
- Enter a Year to begin plan
- Select the number of Years to Graduation (defaults to 4 years)
When done, click the Add Plan button to continue.
Planner Step 4
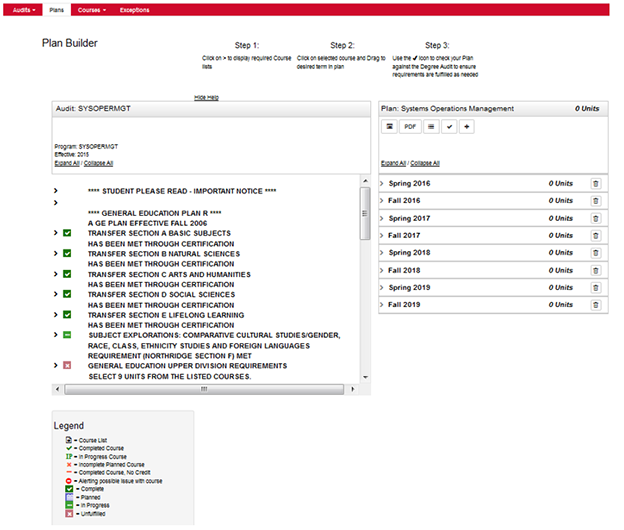
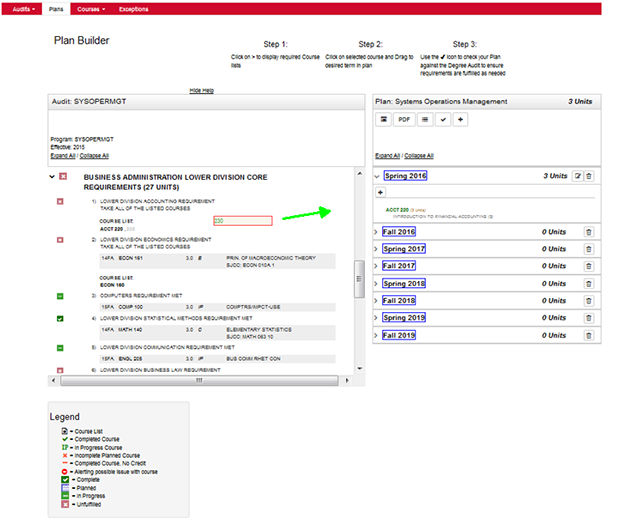
The Plan Builder page displays your Degree Program Audit (left column) and your personalized plan (right column)
Click an arrow (">") to display required courses.
- A green check indicates the requirement is complete
- A red X indicates course(s) are still needed to complete the requirement
Planner Step 5
Drag and Drop courses from the audit to a desired term in your personalized plan. Units will be added to the plan and deducted from the audit.
For the department-suggested course sequence to degree completion, view Degree Road Maps.
Planner Step 6
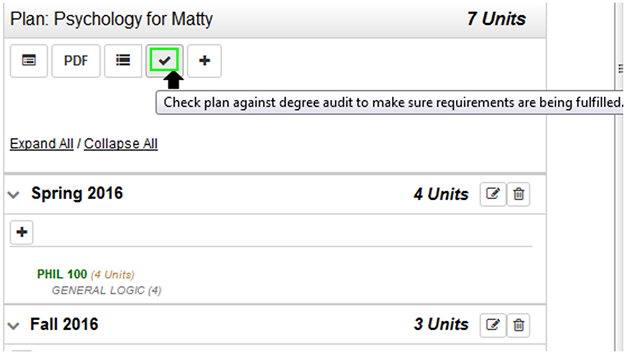
Select the Check Plan icon to refresh and validate your audit and ensure that requirements are being fulfilled. When courses double count in both GE and major requirements, the validation displays completion in both areas.
Icons You Can Use:
- Click the Audit icon to display planned courses on the audit.
- View a PDF of your term-by-term plan and print or save it to share with your advisor.
- Click the List icon to view a list of all your previously completed courses. Includes both CSUN and transfer courses.
- Click the Check icon to refresh and validate the plan.
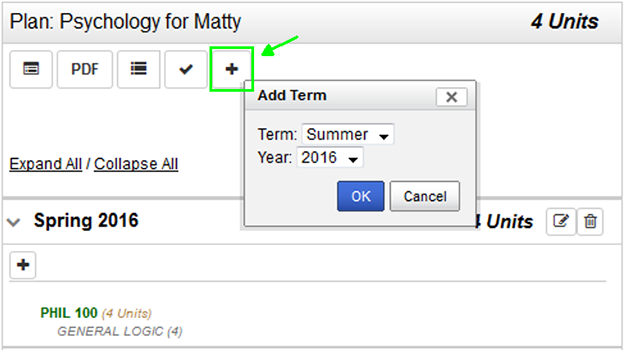
- Click the Plus Sign (+) icon to add a new term. The Plus Sign (+) listed in a term will add a course.
Features You Can Use:
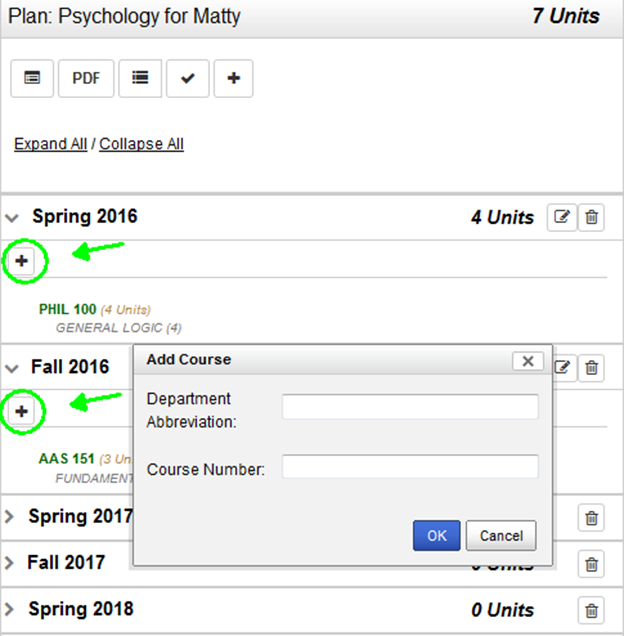
ADD A COURSE: Click the plus sign (+) within a term to add a course not listed on the audit. Enter the department subject abbreviation and the course number (BIOL 100), then click the OK button.
ADD A TERM: Click the plus sign (+) icon to add a term to your plan.
DELETE A COURSE OR TERM: Select the Edit icon to delete a course in a term; click the Submit button to refresh the plan. To delete an entire term, click the Trash icon.
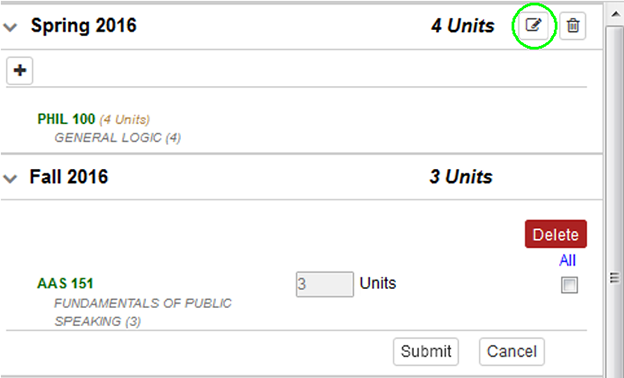
VIEW A COURSE DESCRIPTION: Left-click a subject to view the course description.

Planner Step 7
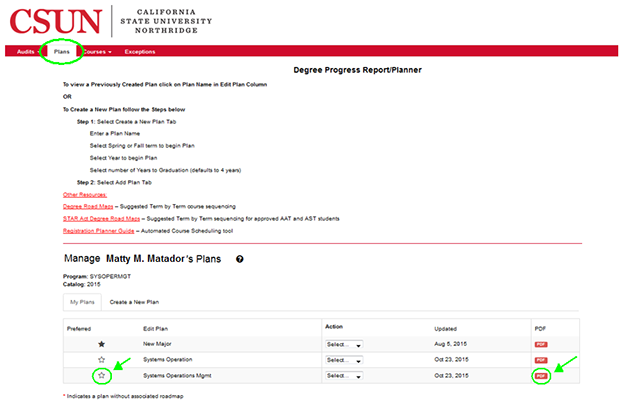
Select Plan from the menu bar to return to the Manage Plans page.
Click the Star icon to make a plan a preferred/favorite plan. CSUN will use the course demand data from the Preferred Plans to create future course schedules.
To view a PDF of your Plan, select the PDF button.
Additional Information
If the DPR report does not run successfully and generates an error message, submit a DPR Review Request to explain the problem. You may also submit a DPR Review Request for other specific questions.
Do NOT submit a DPR Review Request if you have received a DPR Graduation Evaluation or if you have questions about major requirements. Instead, contact Undergraduate Degree Services at the phone number listed on the DPR Graduation Evaluation, or consult your academic advisor about major requirements.
Additional Resources: Degree Planning Tools