
Using Templates for Consistent Design
Dreamweaver provides two types of assets that can help you create Web pages with a consistent content and design — templates and libraries. This document describes the basics of creating and using an HTML template to an generate an identical layout for a set of pages. See also Using Libraries to Reuse or Update Page Elements.
- Creating a Basic HTML Template in a New Document Window
- Creating a Basic HTML Template from an Existing Document
- Designing the Page and Defining Editable Regions in a Template
- Using a Template
- Modifying a Template
- Detaching a Document from a Template
- Using the Assets Panel to Work with Templates
- How to Learn More
Designing with Templates
A template contains locked and editable regions. The locked regions contain the fixed content you want repeated on every page. The editable regions are the areas where the variable content will be placed when you use the template to create a web page. Changing the fixed content on all pages created from a particular template is as easy as modifying the locked regions of the template. When you resave the template, all pages based on that template are automatically updated. It's then simply a matter of republishing the affected pages (or the entire site) to the web server.
You can create a template from an existing page or from scratch (in a new document window). Dreamweaver gives template files the extension .dwt and places them in a folder named Templates within the local site folder.
Creating a Basic HTML Template in a New Document Window
There are a number of ways to start the template creation process. You can make appropriate selections from the File menu, the Assets panel, or the Insert toolbar. This section describes the latter method. See also "Using the Assets Panel to Work with Templates" (below).
On a new, blank document page, click the Templates
tab on the Insert toolbar. Click the Make Template
button ![]() to save the document as a template. Then
design the web page the way you want it to look, define editable regions
(as described below), and save the file.
to save the document as a template. Then
design the web page the way you want it to look, define editable regions
(as described below), and save the file.
Creating a Basic HTML Template From an Existing Document
Open the document from which you wish to create a template. Save the file as a template — File | Save As Template (or click the Make Template button on the Insert Template toolbar). Remove any content that you don't want to be part of the template (text and graphics that will change from document to document, for example), define editable regions (as described below), and then resave the file.
Notes:
- The advantage of creating a template from an existing document is that the design work is most likely already done. However, bear in mind that the document from which you create the template will not be based on the template, which means that any subequent changes to the template will not affect the document from which it was created in the first place.
- If you want to create a template from a document that was created from another template, you'll have to detach the document from the template before you can save it — Modify | Templates | Detach from Template.
Designing the Page and Defining Editable Regions in a Template
Design your page positioning text, graphics, and links that you want to be included in all documents based on the template (locked regions) and defining areas that can be changed (editable regions).
Page Properties
Specify page properties as you would for any web document:
Modify | Page Properties
Page properties will be inherited by all documents created from a template.
Links
To ensure that relative links will point to the correct files in documents created from the template, create links using the folder icon or the Point-to-File icon in the Property Inspector (i.e., do not type the link path in the link text box because it's easy to enter the wrong path by mistake).
Editable Regions
Editable regions are the areas of the page that can be changed in documents based on the template. If you don't define editable regions, all areas of the web page will be "locked" in template-based documents. Locked regions are those areas that will remain the same in every document.
Position the insertion point where you want to define
a new editable region and click the Editable Region button
![]() on the Insert Templates toolbar. Enter
a name for the region when prompted. A placeholder will be inserted into
the template identifying the editable region by name. A colored rectangular
outline will enclose the area (by default the outline is light yellow).
on the Insert Templates toolbar. Enter
a name for the region when prompted. A placeholder will be inserted into
the template identifying the editable region by name. A colored rectangular
outline will enclose the area (by default the outline is light yellow).
Notes:
- Editable region names cannot include the following characters: single or double quotation marks (' "), angle brackets (<>), or ampersands (&).
- If the rectangular outline isn't visible choose View | Visual Aids | Invisible Elements.
Example
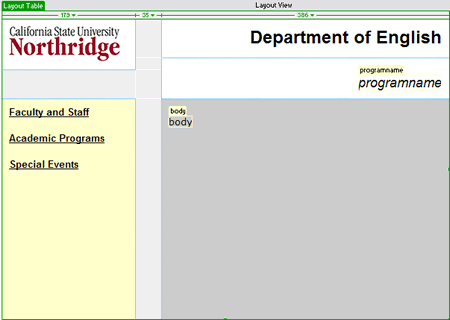
An example of a template that contains both locked and editable regions is shown in Figure 1 (below). In this example, the layout table cells containing the University word mark, the name of the department, and links to departmental pages are locked. The cells that will contain a program name (programname) and information about the program (body) are editable.
Using a Template
You can create new document based on a template or apply a template to an already existing document.
Creating a New Document Based on a Template
- From the File menu choose New.
- In the dialog box that appears click the Templates tab to display the templates available for your defined sites.
- Choose (click) the desired site in the left panel (if you've only defined one website, it will already be selected).
- Then choose (click) the desired template within that site from the "Site 'sitename'" panel.
- Finally, click the Create button to create a new document based on the selected template.
When you
open a new document based on a template, you'll see all template components,
but the only areas you'll be able to edit are the unlocked (editable)
regions (as shown in Figure 1, above). If you move
the mouse over the document screen, you'll see the mouse pointer become
the ![]() symbol in areas that cannot be edited. In editable areas, simply replace
placeholder text with page content.
symbol in areas that cannot be edited. In editable areas, simply replace
placeholder text with page content.
Applying a Template to an Existing Document
- Open the document to which you wish to apply a template.
- From the Modify menu choose Templates.
- From the submenu choose Apply Template to Page.
- Select the template desired from the Select Template dialog box.
- Specify
where to place page content using the Resolve Inconsistent Region
Names dialog box:
- For a document not already based on a template, all content is considered "document body", so everything on the page will be placed in the editable region you choose.
- For a document based on some other template, page content will automatically be placed in comparable editable regions (i.e., regions with the same name). Where there is no matching name, you'll have to choose where to place the material.
You can undo the "Apply Template to Page" by choosing Edit | Undo Apply Template.
Finding the Editable Regions of a Document
Editable regions of a document are bordered in light yellow (by default) and labeled by name. You can simply click in an editable region and enter new material or edit existing material.
In addition, the editable regions are listed at the bottom of the Modify | Templates submenu. You can use this list to select a region for editing.
Modifying
a Template
(and Documents Based on the Template)
You can open a template just as you would any other document. Choose a template from the Templates folder and modify as desired. When you resave the file you'll be asked if you'd like to update all documents based on the template. Typically the answer will be Yes. If, for some reason, you prefer to update selected documents you can open each document individually and choose Modify | Templates | Update Current Page (to use the most current version of the template).
Detaching a Document from a Template
In the document you want to detach from a template, choose Templates from the Modify menu and Detach from Template from the submenu.
Use this option only if you want to edit the locked regions in a single document. Once detached, the document becomes a normal document with no further connection with the template on which it was based. Any subsequent changes to the template will not affect the detached document.
Using the Assets Panel to Work with Templates
You can use the Assets panel to create a new template, edit an existing template, apply a template to an open document, change the template file name, or delete a template.
Open the
Files panel group and click the Assets
button (or, from the Window menu, choose Assets)
to open the Assets panel. Then
click the Templates button ![]() .
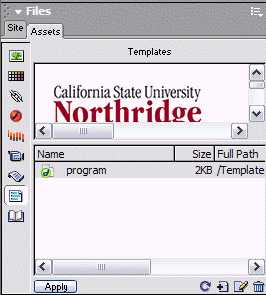
The Templates asset panel is shown in Figure 2, below.
.
The Templates asset panel is shown in Figure 2, below.
FIGURE 2. Templates
Asset Panel
To create
a new template, click the New Template button ![]() .
A new "untitled" template will appear in the Templates folder.
Name the template and then double-click the new template to open it. Design,
define editable regions, and save.
.
A new "untitled" template will appear in the Templates folder.
Name the template and then double-click the new template to open it. Design,
define editable regions, and save.
To edit an existing template, double-click the template name to open the file; then modify as desired and save.
To apply a template to an open document, you can highlight the template name and click the Apply button, or you can click and drag the desired template into the document window. Resolve inconsistent region names, if necessary, as described above.
To change the template name, highlight the name and then right-click (Windows) or Control-click (Macintosh) and choose Rename from the popup menu.
To delete a template, highlight the template name and then click on the Delete button (a trash can) at the bottom of the Assets window.
How to Learn More
You can use the Dreamweaver Help feature to learn more about both standard and layout tables. To use the Help Index, do the following.
- From the Help menu choose Using Dreamweaver.
- In the left panel of the Help window choose the Index tab.
- Type template in the keyword text box.
- From the listing that displays, click the desired topic.
- Click the Display button at the bottom of the panel to display the topic text in the right panel.
August 14, 2003
Prepared by Gail Said Johnson, User Support Services
ITR's technology training guides are the property of California State University, Northridge. They are intended for non-profit educational use only. Please do not use this material without citing the source.