
Web Publishing at CSUN
Web Publishing to a Group Web Folder with Dreamweaver MX
The instructions in this document pertain to group web folders — special accounts with web privileges but no shell access (i.e., you cannot log directly into a web folder). Access is through the campus account of an authorized user. If your department or organization publishes to a campus account rather than a group web folder, see Web Publishing to a Campus Account with Dreamweaver MX. If your department maintains its own web server, please contact the server administrator for publishing instructions.
- Defining a New Website
- Transferring Files (i.e., Publishing Pages)
- Other File Management Features
- The Web Address(es) of the Published Site
- Questions?
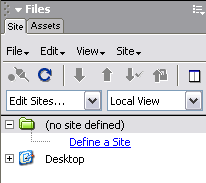
Defining a SiteDreamweaver's site maintenance function includes the ability to transfer files between your desktop computer and the campus web server. Once you have defined a site as described below you can use Dreamweaver's "Site Files" window to view the local and remote locations and transfer files between them.Note: Only the settings required to publish pages to central CSUN web server are described in this document. Please refer to your Dreamweaver manual for additional information. If you've never defined a site, you can click the Define a Site link in the Site window of the Files panel group to begin the process (see Figure 1, below). You can then go through the site definition wizard (a step-by-step setup process) or click the Advanced tab and enter the necessary information in the Site Definition dialog box. FIGURE 1. Site
Window of the Files Panel Group Using the Site Definition WizardDo one of the following to begin:
If not already selected, select (click) the Basic tab. Then go through the wizard, making selections and/or entering information on each screen and clicking the Next button to move to the next screen. There are three main sections in the procedure:
A bolded selection at the top of the each wizard screen indicates where you are in the process. The individual screens are explained in the table below.
|
| Site Name: | Type a short, descriptive name to identify your site (e.g., COMSweb for the Communication Studies department website) |
| Local Root Folder: | Click the folder next to the text box and locate the folder on your desktop computer where your site files are or will be stored (e.g., C:\MyFiles\COMSweb) |
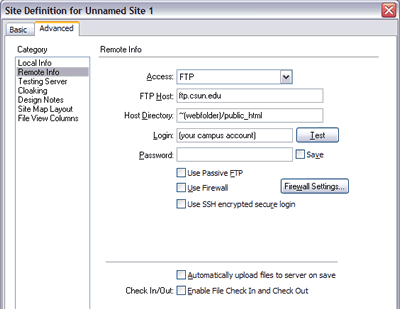
- In the Category panel of the dialog box, select (click) Remote Info.
- From the Access drop-down menu, choose FTP.
- Enter the following information in the text boxes that appear.
| FTP Host: | ftp.csun.edu |
| Host Directory: | ~webfolder/public_html (where webfolder is the group's web folder) Note: If your access is to a subfolder of public_html (rather than the main folder), include the subfolder name: ~webfolder/public_html/subfolder |
| Login: | Enter your campus account here (e.g., xyz12345) |
- When finished, click OK.
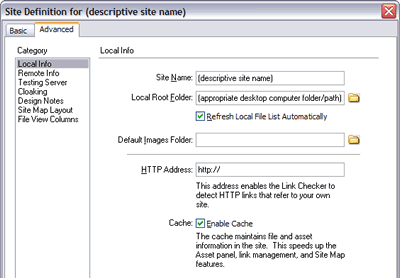
Site Definition dialog boxes (Local Info and Remote Info) are shown in Figures 2 and 3, below.
FIGURE
1. Local Info Dialog Box for a New Site Definition
|
FIGURE
2. Remote Info Dialog Box for a New Site Definition
|
Transferring Files
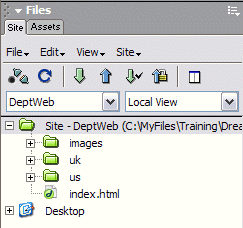
To transfer files from the local folder (on your desktop computer) to the remote site (on the University's central web server), do the following:- In
the Site panel of the Files
palette (as shown in Figure 4, below), select the folder or file(s)
you want to transfer (upload). For example:
- To transfer the entire site, select (click) the top-level folder. You may want to make this selection the first time you publish the site. Once the site is published you'll probably want to transfer only files that you add or modify.
- To transfer a single file, select (click) the desired file.
- To transfer several files, hold down the CTRL key and click each file to be transferred.
- Click the Put File(s) button (a blue upward pointing arrow) or choose Put from the Site menu.
- When the "Enter Password" dialog box appears, enter the password for your campus account and click OK.
-
A question appropriate to your transfer selection file(s), folder(s),
or the entire site will appear in a dialog box. For example:
- If you choose to transfer the entire site, the question will be "Are you sure you wish to put the entire site?" Click OK to continue with the transfer; click Cancel to cancel the procedure.
- If you choose to transfer one or more files, the question will be "Include independent files?" Make your selection Yes, No, or Cancel. You can also choose not to see this question in the future by clicking the box next to "Don't ask me again".
FIGURE 4. Site Window
Other File Management Features
In
addition to uploading files (put) to the campus web server, you
can also download (get) files from the site. Click the Connects
to remote host button![]() to
display the remote site. Then select (highlight) the desired file(s)
and click the Get File(s) button (a green downward-pointing
arrow) — or choose Get from the Site menu.
to
display the remote site. Then select (highlight) the desired file(s)
and click the Get File(s) button (a green downward-pointing
arrow) — or choose Get from the Site menu.
Deleting files from your site — either local or remote — is simply a matter of selecting (clicking) the desired file(s) and taping the Delete key.
To
update the file listing, click the Refresh button![]() .
.
In short, you can use the Dreamweaver Site window in much the same way as you can use any FTP (file transfer protocol) software. For additional information about the Site window click the Displays help for this window button (a question mark in a gray circle).
The Web Address(es) of a Group's Published Site
The web address or URL (Uniform Resource Locator) for any page published on CSUN's central web server includes either the name of the web account or some form of a group name (see Custom Web Addresses, below).If your group's main web page file is called index.html your web page address is:
http://www.csun.edu/~webfolder
The web page address for any page other than index.html is of the form:
http://www.csun.edu/~webfolder/filename
where filename is the name of your web page file (homepage.html, for example).
Custom Web Addresses
If a custom web address (URL) has been assigned for your department, organization, or other campus group, replace the "~webfolder" portion of the URL with the assigned alias.
If an alias exists for the group and the main web page file is called index.html, the web page address is:
http://www.csun.edu/GroupAlias
where GroupAlias is a unique name assigned to your group.The web page address for any page other than index.html is of the format:
http://www.csun.edu/GroupAlias/filename
where filename is the name of your web page file (homepage.html, for example).
To request a custom web address, contact the University Help Desk at campus extension 1400.
A Note About Multiple URLs: If more than one alias has been assigned for your group, any one of those may be used.
Example: Academic departments might have four custom addresses, as exemplified by those for the Department of Communication Studies shown below. All four URLs are correct and all go to the same site.
- Full department name: http://www.csun.edu/CommunicationStudies
- Lowercase department name: http://www.csun.edu/communicationstudies
- Catalog abbreviation: http://www.csun.edu/COMS
- Lowercase abbreviation: http://www.csun.edu/coms
Questions?
If you have questions about these procedures, please contact the University Help Desk at (818) 677-1400 or via email to helpdesk@csun.edu.September 2, 2003
Prepared by Gail Said Johnson, User Support Services
ITR's technology training guides are the property of California State University, Northridge. They are intended for non-profit educational use only. Please do not use this material without citing the source.