
Using Tables in Web Page Design
One way to give vertical and horizontal structure to a page is to format a web page using tables.
- Standard View vs. Layout View
- Creating a Table in Standard View
- Designing a Page in Layout View
- How to Learn More
Standard View vs. Layout View
The Layout tab of Dreamweaver's Insert toolbar provides two views for creating tables: Standard View and Layout View.
When you open Dreamweaver for the first time the Standard View is selected and the Layout options are dimmed (as shown in Figure 1, below). In Standard View you can insert tables using the Insert Table button to create a standard table containing rows, columns, and cells.
FIGURE 1. Layout Tab
With Standard View Selected
![]()
Selecting Layout View dims the Insert Table option and enables the Layout buttons — Draw Layout Table and Draw Layout Cell. Layout View gives you the flexibility to draw tables and cells wherever you want them on your page. The program creates an underlying borderless table structure, adding cells to complete the table. (You can see the table structure by switching to Standard View.)
Note on Table Widths: When you design for a particular screen size, table widths should be smaller than the screen width.
| Screen Size | Maximum Table Width |
|---|---|
| 640x480 | 610 pixels |
| 800x600 | 760 pixels |
Creating a Table in Standard View
Use
the Insert Table button —![]() —
to insert a table at the insertion point. The button is available from
either the Common tab or the Layout
tab (as shown in Figure 1, above) on the Insert toolbar.
—
to insert a table at the insertion point. The button is available from
either the Common tab or the Layout
tab (as shown in Figure 1, above) on the Insert toolbar.
Specify table properties in the dialog box that appears. The first time you insert a table the specifications shown in Figure 2 (below) will appear — i.e., rows = 3, columns = 3, width = 75 percent (of the screen width), and border = 1 (pixel). Whenever you subsequently insert a table, the last settings you specified will appear in the dialog box.
FIGURE 2. Insert Table
Dialog Box
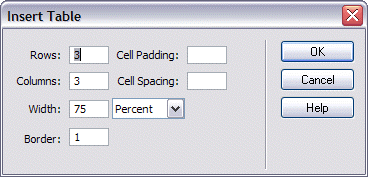
Notes:
- Include a Cell Padding setting (number of pixels) to add space within each table cell.
- Include a Cell Spacing setting (number of pixels) to add space between cells.
- The table width may be specified in % (of screen width) or pixels (72 pixels = 1 inch).
- To eliminate the table border, leave the Border setting blank. A setting of zero (0) may display a faint border (particularly when viewed in older versions of Netscape).
Add text or images to the cells of the table as you would anywhere else on a web page. You can create a table within a table (a nested table) by clicking in a cell and inserting another table (as described above).
Formatting Options
Select the cells you want to format and then use the Property Inspector to change the properties of the selection.
Modifying Table Layout Properties
First, select the entire table. (The easiest way to do this is to click in any table cell and then click the <table> tag in the Tag Selector at the bottom of the document window.) Then make changes in the Property Inspector. If necessary, click the expander arrow to display all options available. Point at any option to see a pop-up description.
The Tables property inspector is shown in Figure 3 (below).
FIGURE 3. Table Properties

Modifying
Column, Row, and Cell Properties
First, select the cells to be modified:
- Single Cell: Just click in the cell.
- Multiple Cells: Hold down the CTRL key (Windows) or Command key (Macintosh) and click each cell you want to select.
- Column: Click in the top cell to be selected and drag down to the bottom cell.
- Row: Click in the leftmost cell to be selected and drag to the rightmost cell.
Then make changes in the Property Inspector (shown in Figure 4, below). If necessary, click the expander arrow to display all options available. The top part of the palette provides text options; the expansion, cell formatting options.
FIGURE 4. Property
Inspector for Selected Table Cells

Cell formatting options include:
- Header: Be sure to check this box to identify the header row when using a table to display data.
- Vert(ical): The default for vertical spacing is "Middle". For readability, it's usually a good idea to change this setting to "Top".
- Merge
Cells —
 :
You can merge any selection of cells that forms the shape of a rectangle.
 - Split
Cell —
 :
You can split any selected cell into a specified number of rows or columns.
 - No Wrap: Prevents text from wrapping, expanding the width of the cell. By default cells expand horizontally to accommodate the longest word and then expand vertically.
Table Formatting with Preset Design Schemes
Make sure the table is selected first and then choose Format Table from the Commands menu. In the dialog box that appears, choose a design scheme for the list at the top left and make any modifications desired. Click the Apply button to see how your table will look. Click the OK button when you're finished making selections. The choices you make in this dialog box will override any you made using the Property Inspector.
Sorting Table Data
Simple sorting can be done by selecting the table, choosing Sort Table from the Commands menu, and making selections in the dialog box that appears.
Designing a Page in Layout View
When you change to Layout View — by choosing (clicking) Layout View from the Layout tab of the Insert toolbar — an instructional dialog box appears (as shown in Figure 5, below). Use the Layout Table and Layout Cell buttons as described to draw tables and cells.
FIGURE 5. Layout View
Instructions
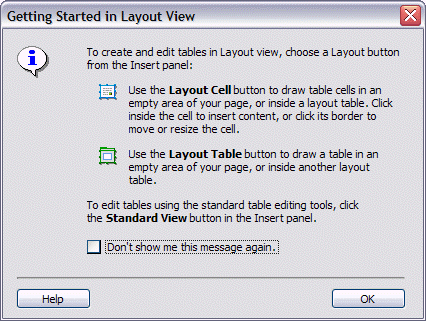
You can draw layout tables in the following locations in your document window:
- Empty areas of your page layout, but only below any existing page content
- Inside an existing layout table (nesting), but only if the parent cell is empty (i.e., has no content). If you want to add a table within a table after content has been added, switch to Standard View and insert a table in the desired cell. Then switch back to Layout View, if desired.
- Around existing layout cells and tables
A layout table drawn in a blank document will snap to the top left corner.
Table Dimensions
When you draw a table, the table is created with a fixed width and height measured in pixels. If you create a table by drawing a cell, the automatically-created table will take on the dimensions of your document window.
The table width is shown in the Column Header area at the top of the table. Both width and height are shown — and can be changed — in the Property Inspector. Once you've drawn layout cells in a table, you'll see a Column Header for each "behind the scenes" column (as shown in Figure 6, below).
FIGURE 6. Layout Table
and Property Inspector
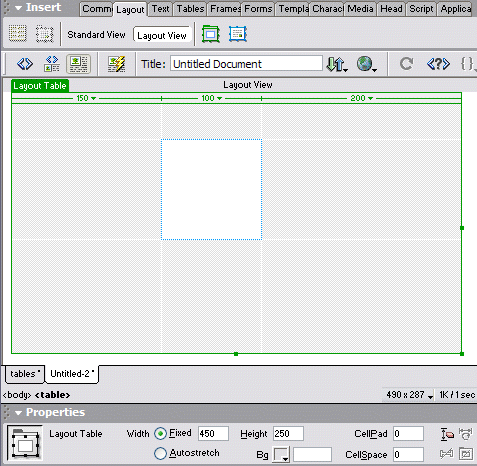
Fixed Width vs. Autostretch. If you prefer to have your page expand (or contract) to fit the browser window, you can select the table and choose Autostretch from the Property Inspector. However, only one column in a layout table can have the auto stretch property (indicated by a wavy line in the Column Header for that column). From the Column Header dropdown menu for the chosen column, select Make Column Autostretch (as shown in Figure 7, below).
FIGURE 7. Column Header
Dropdown Menu
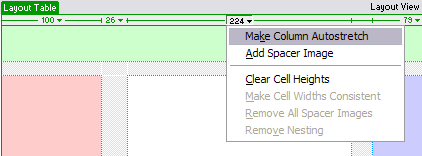
Note: When you use the Autostretch feature, you should also include a spacer image — a transparent image that does not show in the browser window — to control spacing in your fixed-width columns. If you don't, those columns may change size or visually disappear. When you choose Autostretch, you'll typically be asked if you want to use a spacer image. You can save a new spacer image or select an already existing on. You can also choose Add Spacer Image from a Column Header menu.
Layout Grid
From the View menu choose Grid and then make a selection from the following options on the cascading menu:
- Show Grid: To display a layout grid.
- Snap to Grid: To enable snapping.
- Grid
Settings : To specify gridline Spacing and
other settings (see Figure 8, below).
FIGURE 8. Grid Settings Dialog Box
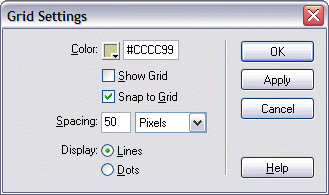
Table Content
Text, images, and other content can be added to layout cells only, so you have to draw a Layout Cell wherever you want to include content within a layout table. A layout cell expands automatically if you add material that's larger than the cell, which affects the column containing the cell and may affect surrounding cells.
How to Learn More
You can use the Dreamweaver Help feature to learn more about both standard and layout tables. To use the Help Index, do the following.
- From the Help menu choose Using Dreamweaver.
- In the
left panel of the Help window choose the Index tab.
- To locate information about standard tables, type table in the keyword text box.
- To locate information about layout tables, type layout table in the keyword text box.
- From the listing that displays, click the desired topic.
- Click the Display button at the bottom of the panel to display the topic text in the right panel.
August 14, 2003
Prepared by Gail Said Johnson, User Support Services
ITR's technology training guides are the property of California State University, Northridge. They are intended for non-profit educational use only. Please do not use this material without citing the source.