
Using HTML Styles to Format Text
An HTML style is similar to a Word (or other word processing) style in that it can be defined to specify one or more text-formatting features that can be applied to a paragraph or selected text. As with a Word style, you can apply an HTML style over and over. Unlike a Word style, an HTML style only affects specified text at the time you apply the style. This means that if you later change an HTML style, any text to which the style has been applied will not be affected by the change. This characteristic is more like Word's Format Painter, which applies text formatting only at the time of application.
- The HTML Styles Panel
- Creating an HTML Style Based on Existing Text
- Creating an HTML Style from Scratch
- Creating an HTML Style from an Existing Style
- Applying an HTML Style
- Editing an HTML Style
- Deleting an HTML Style
- How to Learn More
The HTML Styles Panel
FIGURE 1. HTML Styles
Panel
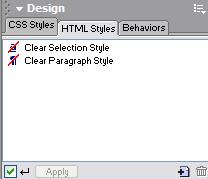
You'll use the HTML Styles panel when creating, editing, or applying a style. The HTML Styles is one of the tabs on the Design palette (as shown in Figure 1, left). You can also display the HTML Styles panel by choosing HTML Styles from the Windows menu.
Creating an HTML Style Based on Existing Text
To a word
or other section of text, assign attributes as desired using the Property
Inspector. To define a style based on those attributes, make
sure the insertion point is somewhere within the formatted text and then
click the New Style button —![]() —
at the bottom right side of the HTML Styles panel.
—
at the bottom right side of the HTML Styles panel.
In the dialog
box that appears (shown in Figure 2, below), enter a descriptive Name
for the style you're defining and make further specifications, if desired.
FIGURE 2. "Define
HTML Style" Dialog Box
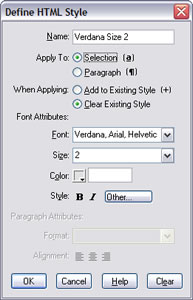
The Font Attributes displayed in the dialog box are those you assigned to the text on which the style is based. These can be further refined here.
By default, Apply to: Selection is specified. Change this setting to Paragraph if you want the font attributes to be applied to a paragraph rather than selected text. If you make this change, the section of the dialog box labeled Paragraph Attributes becomes available for further refinement of the style.
Also by default, when applying a style, the existing style will be cleared first (i.e., the HTML style will override all previously-defined attributes). If you prefer to Add (attributes) to Existing Style, make that choice.
Creating an HTML Style from Scratch
With the insertion point positioned in a blank part of a document window, click the New Style button in the HTML Styles panel to display the "Define HTML Style" dialog box. Enter a name for the style and make attribute and application selections (as described above).
Creating an HTML Style Based on an Existing Style
First, position the insertion point in a blank part of the document window. Then select a style in the HTML Styles panel and right-click (Windows) or CONTROL-click (Macintosh) to display a popup context menu. Choose Duplicate to display the "Define HTML Style" dialog box. Enter a different Name and make attribute and application modifications as desired.
Applying an HTML Style
To apply a Paragraph Style, click anywhere in a paragraph and choose (click) the desired style from the list in the HTML Styles panel. To apply a Selection Style, first select (highlight) the text to be formatted and then choose (click) the desired style from the list in the HTML Styles panel.
Note: These instructions assume the Apply checkbox is checked. If it isn't, first choose (click) the desired style and then click the Apply button.
Editing an HTML Style
Before editing an HTML style make sure the Apply checkbox at the bottom of the HTML Styles panel is deselected. Then double-click the desired style to display the "Define HTML Styles" dialog box. Make desired modifications. If you want to clear all settings first (which resets the default options), click the Clear button before setting attributes and applications.
Note: Editing a style does not change any text to which the style has already been applied.
Deleting an HTML Style
Before deleting an HTML style make sure the Apply checkbox in the HTML Styles panel is deselected. Then select (highlight) the desired style and click the Delete Style button (a trashcan).
Notes:
- You cannot undo deleting a style.
- Deleting a style does not change any text to which the style has already been applied.
How to Learn More
You can use the Dreamweaver Help feature to learn more about both standard and layout tables. To use the Help Index, do the following.
- From the Help menu choose Using Dreamweaver.
- In the left panel of the Help window choose the Index tab.
- Type html style in the keyword text box.
- From the listing that displays, click the desired topic.
- Click
the Display button at the bottom of the panel to display
the topic text in the right panel.
August 14, 2003
Prepared by Gail Said Johnson, User Support Services
ITR's technology training guides are the property of California State University, Northridge. They are intended for non-profit educational use only. Please do not use this material without citing the source.