Netscape Composer 7
 dding
an Image to a Web Page
Provided below are basic instructions for adding an image to a Web page. For additional information refer to the Netscape Help feature as described in the How to Learn More section of this document.
Image Files
The two file formats most commonly used (and recognized!) on the Web are GIF (.gif) and JPEG (.jpg). Generally speaking, GIF files are most suitable for black & white images, line drawings, or other images containing a maximum of 256 colors. JPEG files are best for photographs (the file size is smaller and there is full-color support — i.e., 16.7 million colors).You can create images using a graphics program, scan images, use photos taken with a digital camera, buy clipart images, or download royalty-free clip art from various Web sites (as described below). Once you have an image file saved in either GIF or JPEG format you can include it on your Web page.
 There
are websites from which you can obtain royalty-free graphic images — clipart,
buttons, icons, and more. You can use your favorite search engine to find
"free clipart" or "free images" or "free graphics".
Note: The decorative letter A at the beginning of this document is a GIF file downloaded from Leo's Icon Archive (Decorative Caps) — http://www.iconarchive.com/. The striped cat is from the clipart section of Cool Archive — http://www.coolarchive.com.
Once you find an image you want to use, copy (download) it, and then publish the image along with the page itself to your account on CSUN's Web server.
To download an image file from a website, do the following.
- Go to the site from which you wish to download an image file.
- When you find an image you want to copy, position the mouse pointer over the image.
- Access the context-sensitive pop-up menu as follows:
- On a Windows computer, click the right mouse button.
- On a Macintosh, hold down the mouse button until the menu appears (about one second).
- Choose Save Image As...
- In the "Save As" dialog box, choose the folder where you want to save the file. For the purposes of these instructions, this should be the same folder where you save your Web page (HTML) files.
- Click the Save button to save the file.
Inserting an Image on a Web Page
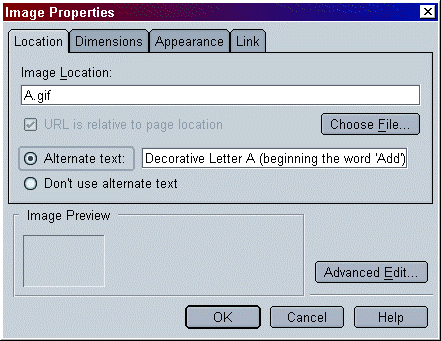
For the purposes of these instructions, make sure the image file you want to use is saved in the same folder as the Web page where it will appear. Then follow the instructions below to insert an image and provide alternate text that describes the image.- Click
the Image button on the Composition Toolbar to get to the "Image
Properties" dialog box (see Figure 1, below).
FIGURE 1. "Image Properties" Dialog Box: Location

- Make sure the Location tab is selected and then click the Choose File button.
- Locate and highlight the name of the file you want to insert, and then click the Open button. You'll return to the "Image Properties" dialog box and the name of the file chosen will appear in the "Image location" text box.
- Next,
enter a text description of the image in the "Alternate text:"
text box.
Type a word or phrase that describes the image (as shown in Figure 3,
above), then click the OK button to return to the "Image Properties"
dialog box.
Note: It is important to enter alternate text, so that screen reading software (used by the visually impaired) can "read" the image. Without the alternate text someone who uses such software will have no idea what the picture is. See "How to Make Your Web Pages ADA Compliant" — http://www.csun.edu/itr/guides/webpageaccess.html — for more suggestions on making your pages accessible to all who read them.
- If desired, you can further modify image properties using the Dimensions, Appearance, and Link tabs.
- You can change the dimensions of your image using the Dimensions tab, but this is NOT RECOMMENDED. It 's usually better to size an image using a graphics program of some kind — and then only to reduce the size (which will also reduce the size of the file). If you reduce the size in this dialog box, you won't also reduce the file size. The smaller the file, the faster the image will load when someone views your page.
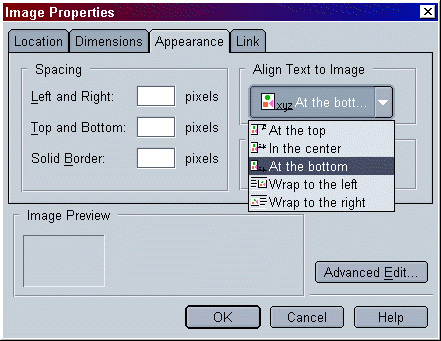
- Use the Appearance tab (as shown in Figure 2, below) to set spacing around the image, add a border, and/or specify text alignment in relation to the image. Spacing settings are measured in pixels. There are 72 pixels in one inch. Try the different text alignment options (using the drop-down menu) to see how they look. The default is "At the bottom" with no wrapping. Save and preview the page to see the result of your selection.
FIGURE 2. "Image Properties" Dialog Box: Appearance
- Choose the Link tab if you want to add a link to an image. Use the Choose File button to locate and select the desired local location (relative link) or type the URL for an outside location (absolute link).
- When finished, click the OK button.
Save the file and Preview the page to see how the image will look on the published page.
If you leave the dialog box and want to get back there, simply double-click the image whose properties you want to modify.
How to Learn More
You can use Netscape's Help feature to find additional information about working with images. The following steps will get you to the section about inserting images on a Web page.
- Click Help on the Menu Bar and select Help and Support Center.
- In the dialog box that appears, click Search.
- In the text box type images and click the GO button.
- Make
a selection from the list that appears; e.g., Adding Images to Your
Web Page.
August 14, 2003
Prepared by Gail Said Johnson, User Support Services
ITR's technology training guides are the property of California State University, Northridge. They are intended for non-profit educational use only. Please do not use this material without citing the source.
