Penny Stove Home | Instructions & FAQs | Original Instructiions | Alcohol Stove Myths | Penny Wood Stove | Favorite Recipes | Other Gear

Also take a look at the FAQs section
How can I make a small pot stove?


1/2 Penny - Small Pot Stove
Developed by Chuck Bodner for use with his 24 oz. Heineken can pot.


History:
Chuck Bodner shared with me a very small version of the Penny using tiny energy drink cans. I built one using his specs and other than needing extra help in priming, it worked well. Mini cans don't have a large outside bevel to hold the priming fuel on top of the burner. Chuck wrapped fiberglass candle wick (held with JB Weld) around the stove to heat the cup faster and help with priming. Small diameter pots are inherently slower to boil but have advantages in terms of size and weight. Chuck's stove deals with these problems by concentrating heat in the center and using the penny to maintain relatively a consistent jet size.


Ready to light.

Later, I built the stove with V8 cans and after some tweaking, and the addition of an insulating top/base, I was able to boil in my titanium mug using as little fuel as the original Penny does with a larger pot. With the insulating base it will prime most of the time by filling the top and lighting immediately. Another option is to fill the cup with fuel to cover the center holes - then add the penny. With fuel at that level, the stove primes every time. The disadvantage is that your are required to fill the stove each time you burn. But if you design the stove for the amount liquid you normally heat, this is not a problem. Another is to use one of the Tohru Ohnuki Jet location options below pictured below.


Lid/base protects the top edge holds the penny inside.

Performance:
The stove I made filled to the center holes with 20 ml. (2/3 oz.) of fuel. It boiled 72° water in 7-8 min. and burned for 14-16 min. total. I was actually able to bring one quart to a simmer but not full boil. If you normally boil only 2 cups, you may want to make the burner AND cup 1/8" - 1/4" shorter than the specs below. Then you can fill the cup to the center holes with about 15 ml. (1/2 oz.) of fuel.
The original Penny is faster. Ah, but not as efficient with a small diameter pot. And as Chuck said: If you're in such a rush, why are you walking?


Note the focused flame and center flame just starting.

Instructions:
Chuck asked me to share how I made my version of his Half Penny. I used the same construction techniques outlined in the original Penny Stove instructions, but used two 5.5 oz. V8 cans for the stove and one Coke can for the base/lid.
* Cut the cup 1 1/4" high and the burner 7/8" high.
* Drill three 1/16" holes under the penny area and three equally spaced just inside the raised area.
* Crimp the burner as usual but used only 6 crimps - one for each of the three jets holes and one centered between each of these.
* Tap the crimped burner into the cup, then use the top of the V8 can to drive down to the bottom.
* For the top/base, drain the Coke can using a side hole and twisted the pop-top off without opening the can.
* Trim the side of the can top leaving about 1/4" of side wall. "Screw" it on the stove as a protecting top, and set it face up to be used as an insulating base.


Always use the insulating lid/base under the stove.

Pot Stand:
Chuck made a regular double "U" style pot stand to hold his 24 oz. Heineken Can. I had best performance with the pot set about 1-1/4 above the stove so was able to use the original Penny pot support - upside down for my 400 ml mug.

Using the stove:
With the penny removed, fill the cup until fuel covers the center three holes, then put the penny in the puddle covering the holes.
Or, put the penny in place and fill the entire top (about 1/2 oz. of fuel) and light immediately - before fuel runs down the jet holes. This works most of the time.
Or, light the stove as above and use a priming pan or wick material to heat the cup from the outside.

After about 1 minute, watch to make sure the jets light. If they don't, place your hand over the stove to check the flame is out. Then remove the pot, drop a few drops of alcohol onto the burner, and light again.

Testing:
Always test with the top/base under the stove and the pot you usually use on top - with some water of course. Once the jets get going, you should see a center flame start to develop. If this grows into a giant flair, the stove is getting too hot and wasting fuel. To slow the burn, shave a little off of the top of the cup until the center flame never gets too big.

Jet Location Options:
Tohru Ohnuki found two options that making this stove prime reliably - both should make the stove burn a little hotter but for less time.

He finds that "The problem is that unlike the original penny design, the jets are pointed inward and not enough heat is conducted through the cup to heat the alcohol. So i tried a few modifications, and the two best results are as follows. Cut the burner a bit shorter to seat deeper into the cup and drill the 3 jets pointing straight up in the 'dimple' ring that forms the base of the can (it's easier to do this from inside prior to assembly.) Or keep the original 3 jets pointing inward and just add 3 vertical jets. Obviously the 3 jet is slower than the 6 jet, but i like being able to select the fast boil or simmer behaviors."


The Three jet version - note how much more heat the cup receives.


Note that the three jet version on the right has the burner
set lower (or cup rim taller).

Thank you Chuck & Tohru

 
1/2 Penny - Pop Can Option
as built by Don Trapp
 

Don Trapp sent theseinstructions for the full size version of the small pot Penny system along with a cool pot support and useful advice on mixing alcohol brands to make the flame more visible.

"1. I decided to use a SnowPeak 450 titanium mug as my only cookpot.

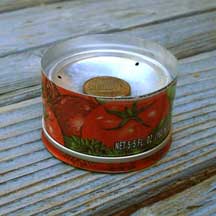
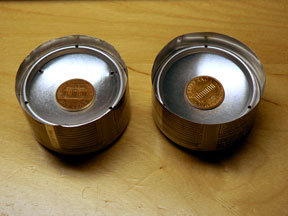
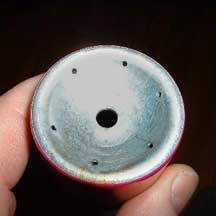
2. I made my penny stoves from diet Coke cans,
which worked great. The burner was 3/4" high, and the fuel cup was 1 3/8" high.

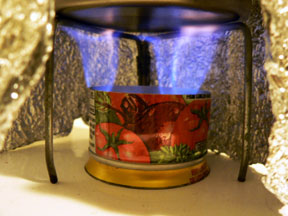
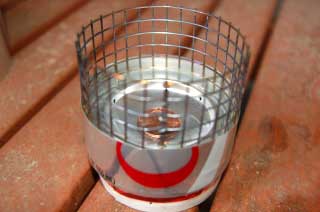
3. I used a paper cup for the base.

Unable to find a suitable base for the Coke cans, I cut down a 32 ounce paper Coke cup until it was 1/2" tall.

Boiling alcohol keeps the base between 150° and 180°, which is far below the 451° needed to ignite paper. Also, the high sides of the stove keep the jets' heat away, so the paper base doesn't even turn yellow. The paper cups were dipped in paraffin to make them waterproof, so the cup sometimes sticks to the stove slightly once it cools. The paraffin is essential, however because it prevents the paper from absorbing alcohol. Even though I've had alcohol burning all around the base many times, the base itself has never burned, although it does have some scorch marks on it.

4. I used 1/4" stainless steel welded wire mesh for my pot support.
The mesh was cut 8 1/4" x 1 1/2" high, and was formed into a cylinder that fits inside the pop can on top of the burner. It was extremely sturdy for my SnowPeak 450 Titanium mugs. It is actually too sturdy; I think it could be lighter if a finer screen were used.

5. I moved the burner jets just inside of the burner.
I had to do that so they would hit my tiny pot. Six holes was far too many, making fire roar up the side of he mug, so I used 3 holes.

6. I tried a new fuel mixture to make the fire visible, with fantastic results.

I mixed 50% S-L-X Denatured Alcohol (from Home Depot) with 50% Isopropanol alcohol (Red Bottle of Heet from the gas station). The mixture makes enough yellow flame to make the fire visible, without creating as much soot as pure isopropanol gives. A mix of 73% (1 quart) SLX and 27% (1 bottle) Isopropanol worked as well. I got the idea from Daniel Perlman, who patented a mixture that includes water, in US Patent 5,858,031.

My mix allows you to see the tips of the fire, and in the event of an out of control fire, see the entire fireball. Of course, I agree that Everclear is the superior liquid in the field. Anytime you camp overnight, you should use Everclear. But I find my mixture works great for picnics.

7. For a lid, I use brass quart jar lids.
Drill a 1/16" hole, then attach a piece of 5/16" wood dowel, with a #2 brass wood screw, to make a lid handle.

8. I used JB Weld to seal the seam at the edge of the burner.

The seam needed to be sealed, not to prevent vapors from escaping, but to make the stove hold priming fuel long enough to ensure that the stove would light every time.

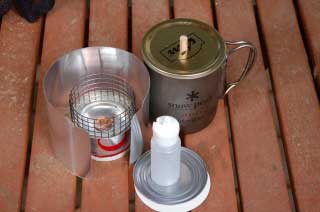
9. The windscreen, base, stove, pot support, lid, and penny all fit inside my titanium mug,

making a compact, very lightweight water-boiling system - stove, stove holder, stainless steel mesh pot support, windscreen, priming pan, insulator for priming pan, drip bottle for alcohol, mug, and lid. My goal was to have everything fit inside the mug, including a Lexan spoon, knife, and matches.

Operational notes:
1. I found the best way to prime it is to put the penny in, pour one full ounce of alcohol on top of the burner, and light it immediately.
2. Yes, my stove burns very hot, but my main criteria is reliability and not economy since I don't backpack for weeks anyway. So for me, wasting fuel is OK as long as I know it will light everytime!

I switched to using 1 ounce Nalgene drip bottles from REI, which are perfect!, and prevent spills. I calculated that about 80% of the energy is wasted, so the original Penny stove is definitely more efficient than mine. I believe the primary reason for my inefficiency is the small pot size.

Cold weather:
Obviously, the downside of the paper base is that you can't prime the stove by pouring fuel in the paper cup beneath the stove in cold weather. Using a side-cutting can opener, I cut the lid off a #300 can to create a little fuel pan for priming. For thermal insulation, the priming pan sits on top of a 3" disk of wax cardboard cut from the side of a half gallon milk carton. In cold weather, I use the priming pan instead of the paper base. It all fits inside the bottom of the mug for storage.
"

Thank you Don for the great ideas!

Also take a look at the FAQs section How can I make a small pot stove?

Back to Top

 
Mini Penny - 6 jet stove
Developed by Todd Stark using hair mousse cans.
 

Tod Stark sent these instructions for a mini stove with 6 jets and full burning potential. The Mousse cans he are heavier than pop cans. The also have a deeper concave bottom area and can be assembled without an extended cup lip. He also shows a very nice pot support with full access to the stove as well as an integrated priming pan.

"Here is my version of the Mini Penny; it has thicker aluminum than drink cans:
Two cans of hair Mousse from Wal-Wart - $.94 each. Cut two bottoms and press together using common methods, and use the same jets as the original Penny Stove. The trick is to drill the jets so there is some sidewall for the heat feed-back. Primer wick wrap would help in colder climates, but indoors it will blossom with the alcohol pool on top of the penny."


"I used conventional construction where the top can is pressed over the bottom half - opposite the penny stove. I did dimple (or crimp) the bottom half to fit inside the upper half.

The top half, i.e. burner, is pressed down until flush. The upper half is 1 3/4" tall, so the finished stove will be that dimension. The bottom can be just about any height, mine was 3/4".

You could probably use a quarter as a template to draw a circle inside the burner concave, and radially drill the jets on that line, but I just eye-balled it.

About the primer pan:
The set-up you see in the photos would be my "hotel cooker" kit. It is a large soup can for the pot, and the lid from the soup can becomes the primer pan. I pack it into a suitcase for travel, along with some meals. I cook the soup, then use the empty soup can as my pot. When checking out, I toss the used soup can into the trash, and pack my kit into a Zip Lock container like Tinny from MiniBull uses. This way I don't run the chance of airport security taking my expensive Titanium."


©2007 mark jurey