

 Per federal and state law, and CSU policy, instructional media (e.g., videos, captured lectures, recorded presentations) must have captions. This includes instructional media used in classrooms, posted on websites or shared in Canvas or Panopto.
Faculty: Funding is available to help faculty generate captions and transcripts for instructional media. Materials should be submitted at least six weeks in advance of their use in instruction.
Staff: For CSUN staff who do not provide classroom material, there is a cost through chargeback. For information on the chargeback, email ncod@csun.edu.
Relevant Accommodations
 Contact NCOD: Deaf and Hard of Hearing Services for professional captioning services
- Email: ncod@csun.edu
- Phone: (818) 677-2054
- Zoom ID: 380 527 5501
- Website: csun.edu/ncod
Tseng College Distance Learning faculty should contact their assigned Instructional Designer.
How do I caption my instructional materials?
The CSUN Universal Design Center is available to help faculty make instructional materials accessible, including guiding faculty through the self-service submission process. Faculty may also submit instructional media directly to the NCOD: Deaf and Hard of Hearing Services.

Captioning Video Content through the NCOD: Deaf and Hard of Hearing Services
Tseng College Distance Learning faculty should contact their assigned Instructional Designer.
Zoom Live Automated Captioning
Please note that Zoom live automated captioning feature does not meet full accommodation standards. If a class has a student with a relevant approved accommodation, whether the class will be taught live or feature pre-recorded videos, please see the Relevant Accommodations above section.
To use live automated captioning, the Host of the meeting must activate this feature in the meeting for participants to access the Automated Live Transcription.
Turning on Live Captioning in Zoom
Follow these steps to activate live captioning for your Zoom meetings and webinars:
- Before your meeting, navigate to csun.zoom.us in a web browser
- Select SIGN IN at the top right of the page
- Log in using your CSUN credentials
- Select Settings from the navigation menu on the left
- Scroll down the page until you reach the In Meeting (Advanced) settings
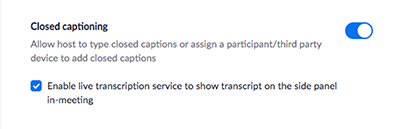
- Make sure the Closed Captioning is toggle switch is on (blue) and the Enable live transcription box is checked
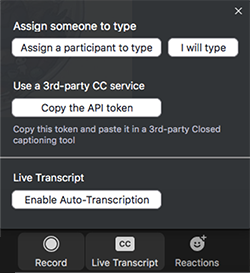
When you launch your Zoom meeting, before the program begins, select Live Transcript in the toolbar, then select Enable Auto-Transcription.
Do It Yourself (DIY) Captions
 There are several Do It Yourself (DIY) captioning tools that you can use for live captioning your lecture, video calls, or pre-recorded videos.
Important: Built-in microphones or standalone microphones and headsets can complicate things with automated captioning your lecture or video calls. For 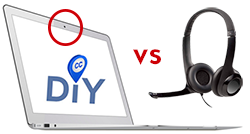 automatic captioning tools, use a laptop built-in camera and microphone or standalone microphone. This way the apps could “hear” voices in video calls to provide automatic captions. For instance, headsets with an attached microphone will not work to "hear" voices in video calls in order to provide captions. Automated captioning does have limited speaker identification, limited punctuation, and accuracy is highly dependent on audio quality.
Please note: Auto-captions are often machine-generated captions with poor quality in which content is not accurately communicated to people who depend on captions. Auto-captions should be corrected for accuracy and provide equal access for everyone.
Creators/owners should review auto-generated captions for accuracy. Accuracy highly dependent on audio quality.
- Vocabulary
- Terminology
- Acronyms
- Names
- Locations
- Unusual words
- Complex Technical Language
- Limited punctuation
- Limited speaker identification
- Incorrect words choice do not match the spoken audio (e.g. Can vs Can’t, Know vs No, Hear vs Here, Ban vs Van, Cake vs Kate, Savvy vs Say Vi)
- Add sound effects and music if applicable (e.g. (water dripping), (upbeat music), (audience cheering), (balloon pops), etc. Descriptive captions help to ensure the viewers have full experience of the sound and enjoy the media.
Learn more about Guidelines and Best Practices for Captioning Educational Video.
On this page, you will find a summary of captioning features and instructions on how to set up on-screen captions.
Google Slides
Live Captioning
This feature is available on Chrome browser. It will not work with Mac Safari browser.
Here are the steps to turn on Google Slides captions:
- Make sure your microphone is on and working.
- Open a blank Google Slide presentation.
- Select Present to go into presentation mode.
- Select CC for Captions
- Position and size of the text can also be changed on the CC dropdown menu.
If you present slides over video conferencing software (such as Zoom), captions show up on the shared screen. To set expectations for your students, it's a good idea to tell them that captions are from Google Slides and that only the speaker's voice is captioned.
Note: Unfortunately, you can’t save or download the transcript.
For instructions on the Present Slides with Captions page.
PowerPoint
Live Captioning
 Web-based version: PowerPoint for the web and Microsoft Office 365 subscription has built-in automated live captions or subtitles. PowerPoint can transcribe what a person is saying and display them as captions. Note: Unfortunately, you can’t save or download the transcript.
- Make sure your microphone is on and working.
- Visit Present with real-time, automatic captions or subtitles in PowerPoint for instructions on how to set up on-screen captions in your slides.
- Watch video Live Captions & Subtitles.
Windows Desktop version: All other versions will need to download the Presentation Translator add-in automatic captioning for PowerPoint (not available for Mac users). This add-in will let you save the transcript of your presentation. For instructions, visit Presentation Translator for PowerPoint help and FAQs. Watch the video on How Presentation Translator Works.
- Make sure your microphone is on and working.
- Open a blank PowerPoint presentation.
- Select the Slide Show tab.
- Select Start Subtitles.
- Fill out the languages and select Additional Settings link
- The Add instructional slide contains the QR Code that lets attendees see the captions on their own devices.
- Select Start Subtitles.
- When you are done with the presentation you will see a box at the bottom of the screen. At the top right of that box you will see 3 dotted icon.
- Select the 3 dotted icon.
- Select Save Transcript. You will be prompted to save the file and it will be saved as a .txt file.
Please note: Auto-captions are often machine-generated captions with poor quality in which content is not accurately communicated to people who depend on captions. Auto-captions should be corrected for accuracy and provide equal access for everyone.
Panopto
Pre-Recorded Videos
 Panopto is CSUN’s online video platform for recording, hosting, and sharing video. With Panopto, you can simultaneously record video from a webcam, capture your screen, and audio from a microphone, or upload your own video files. Panopto also makes any classroom on campus lecture capture-ready. With Panopto's integration with Canvas, you can share your videos throughout your courses wherever you find the Rich Content Editor. Once in Panopto, you can share your videos with students, anyone in the CSUN community, and beyond. With Zoom Cloud Recording enabled, your meetings are automatically added to your Panopto library. Learn more about CSUN Panopto and FAQs
Panopto also auto-captions your videos and provides an intuitive editor to correct captions so they meet accessibility standards. Viewers can search for any word spoken or shown in any video using Smart Search technology.
Are videos automatically captioned in Panopto? Are the captions good enough for students who need accommodations?
All videos are automatically captioned in Panopto. However, since they are computer-generated and not 99% accurate, they are not acceptable for students that need accommodations. If you have a student with an approved accommodation request please contact the National Center on Deafness (NCOD) on campus for support at ncod@csun.edu.
Can I correct captions in Panopto?
Yes. Only creators/owners can edit captions in Panopto. If you “hover” your mouse pointer over a video title, select Edit, then select Captions in the menu on the left of the screen, you can directly edit the captions while watching the video. Once you have edited the captions, select the Apply button in the top-right corner to save the changes.
YouTube
Pre-Recorded Videos
To upload to YouTube, you will need to create a YouTube channel. For instructions, visit Create a New Channel.
The easiest way to add captions on your own YouTube videos account is:
- Go to your Video Manager by clicking your account in the top right > Creator Studio > Video Manager
- Next to the video you want to add captions or subtitles to, click the drop-down menu next to the Edit button.

- Select Subtitles/CC
- Select Add new subtitles or CC button
- Decide if you want to add or edit subtitles or closed captions
Please note: Auto-captions are often machine-generated captions with poor quality in which content is not accurately communicated to people who depend on captions. Auto-captions should be corrected for accuracy and provide equal access for everyone.
For more ways to add captions on YouTube visit:
Amara offers a free caption/translation editor, and they’re building a community to support it.
How do I adjust YouTube default size and style of captions?
Captions are available on videos when the owner has added them or when YouTube automatically provides them. You can change the default settings for captions on your computer or mobile device. Burned-in captions/subtitles do not have these options. Visit Manage Caption Settings.
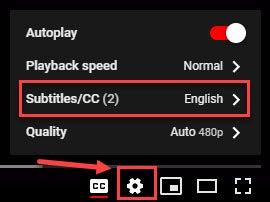
- Go to YouTube video player
- Select Settings gear icon
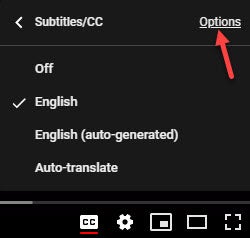
- Select Subtitles/CC
Select Options to customize
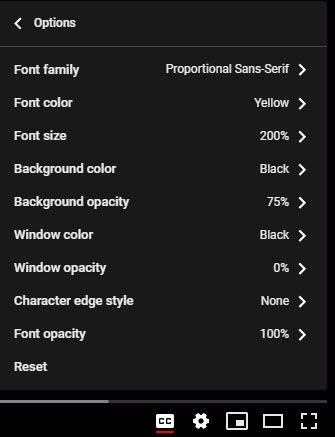
- Font, color, opacity, and size
- Background color and opacity
- Window color and opacity
- Character edge style
Note: These will be your default captions format settings until you change them again or select Reset, which will go back to the default captions format.
How do I open captions' transcript?
- Go to YouTube video player
- Select anywhere in the description box below the video
- Select the Show Transcript button
- In the transcript box, use Find or CTRL + F in your browser to search for a specific word in the transcript.
- Or use the timestamps to get to that point in the video
How do I share a YouTube video with a specific start time?
- Go to YouTube video player
- Find a video you'd like to share at a specific start time
- Select Share button
- Find the small checkbox which says "Start at:"
Camtasia
Pre-Recorded Videos

Camtasia is a powerful and easy to use screen recording and video editing tool that is available to CSUN faculty and staff. Visit CSUN Camtasia page.
Record it All: Use Camtasia's powerful screen recorder to capture anything on your screen. You can also import videos, music, and photos to customize your videos.
Create Powerful Videos: Edit and enhance your videos with Camtasia’s powerful editor, themes, animated backgrounds, graphics, callouts, and more.
Engage Your Audience: Produce interactive videos and then share videos that your viewers can watch anywhere, anytime.
Captions: Watch this video on how to Manually Add Captions to a Video.
Speech-To-Text Captions: Watch this video on how to use Speech-To-Text. This feature is only available for Windows users.
Please note: Auto-captions are often machine-generated captions with poor quality in which content is not accurately communicated to people who depend on captions. Auto-captions should be corrected for accuracy and provide equal access for everyone.
Watch this video on how to download and install Camtasia
Lecture Recording Basics Workshop - Installing Camtasia (total length 2:19 mins)
