Activity 1: Set-up of Grant File
The Office of Research & Sponsored Programs (ORSP) officially notifies TUC-Sponsored Programs (TUC-SP) of the award of a grant, by sending the relevant documents via campus mail or fax.
Step 1: Determine if all information is complete and available
TUC-SP reviews the documentation for completeness of all documents and if all necessary data for the set up is available.
The required document include:
- Award Memo
- Award Notice
- Grant Data Form
- Copy of Proposal - Continuation Application
- Budget
Step 2: Set up 'Project Control File' (Blue File Folder)
With the information sent by ORSP, the 'Project Control File' is set up as follows:
| Left | Right |
|---|---|
| Grant Award Notice Grant Data Sheet Letter ORSP | Proposal Budget Grant Data Form |
Activity 2: Assignment of Project ID & Set Up in the Billing Schedule
Step 1: Review the Billing Schedule to ensure that a project number has not been previously assigned.
Access the 'Billing Schedule at:
T:\USER\Contracts\GROUP\Sponsored Projects\Accounts Receivable\BILLSCHD.xls
Step 2: Assign a Project ID Number
A Project ID is a number consisting of 8 digits.
Assigning the first 4 digits of the Project ID
The first 4 digits of the Project ID identify the source of the grants, the granting agency or grantor.
1st digit: 4
2nd digit: Identifies the general type of grantor.
3rd & 4th digits: Individually assigned to the specific granting agency.
4 X X X
Type of Grantors (2nd digit)
- 4 0 Federal Government
- 4 1 State Government
- 4 2 Local Government
- 4 3 Private Non-Profit
- 4 4 Private For Profit
- 4 5
- 4 8 (Not Assigned)
- 4 9 Other (Outside the United States)
Federal Government (4 0 X X)
- 4 0 0 1 National Science Foundation (NSF)
- 4 0 0 2 Health and Human Services (HHS)
- 4 0 0 3 Department of Education (DoEd)
- 4 0 0 4 National Aerospace Agency (NASA)
- 4 0 0 5 US Armed Forces (ONR, Navy, Army, etc.)
- 4 0 0 6 National Security Agency
- 4 0 0 7 Department of Energy (DOE)
- 4 0 0 8 National Endowment for the Humanities (NEH)
- 4 0 0 9 Dept of Housing & Urban Development (HUD)
- 4 0 1 0 Internal Revenue Service (IRS)
- 4 0 1 1 Unassigned
- 4 0 9 8 Unassigned
- 4 0 9 9 Federal Other
State Government (4 1 X X)
- 4 1 0 1 CSU's
- 4 1 0 2 All Other State Agencies
- 4 1 0 3 Unassigned
- 4 1 9 9 Unassigned
Local Government (4 2 X X)
- 4 2 0 1 All Local Government
- 4 2 0 2 Unassigned
- 4 2 9 9 Unassigned
Private Non-Profit
- 4 3 0 1 All Non-Profit
- 4 3 0 2 Unassigned
- 4 3 9 9 Unassigned
Private For-Profit
- 4 4 0 1 All For-Profit
- 4 4 0 2 Unassigned
- 4 4 9 9 Unassigned
Unassigned
- 4 5 0 1 Unassigned
- 4 8 9 9 Unassigned
Other (Outside the United States)
- 4 9 0 1 All Other (Outside the US)
- 4 9 0 2 Unassigned
- 4 9 9 9 Unassigned
Assigning the last 4 digits of the Project ID
The last 4 digits of the Project ID are continuous numbers individually assigned to a project.
Review the Billing Schedule for the Project ID already assigned.
Go to Column F in the Billing Schedule and click on the drop-down list in Cell F1, you will find a list of already assigned numbers. Assign the next continuous number as the last four digits of your project ID.

Step 3: Set up the Project in the Billing Schedule
Activity 3: Generation of a "NOTICE OF GRANT/CONTRACT AWARD"
Go to:
- "Grants and Contracts" on "Sammy" (G:)
- Sponsored Projects
- Set Ups
- Grants budget template.xls
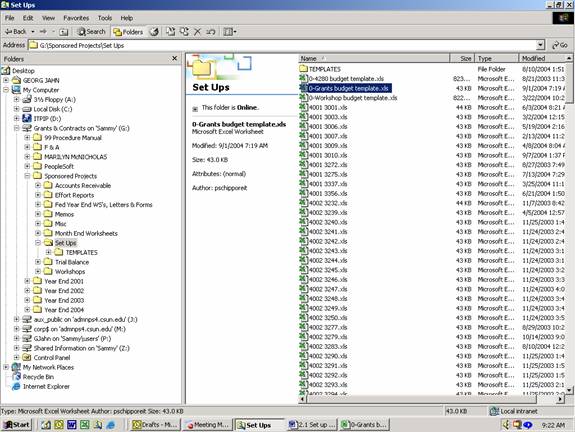
Open template
Save with Project ID (e.g. 4003 3407.xls) in the same Windows folder.
- "Grants and Contracts" on "Sammy" (G:)
- Sponsored Projects
- Set Ups
- 4003 3407.xls (Example)
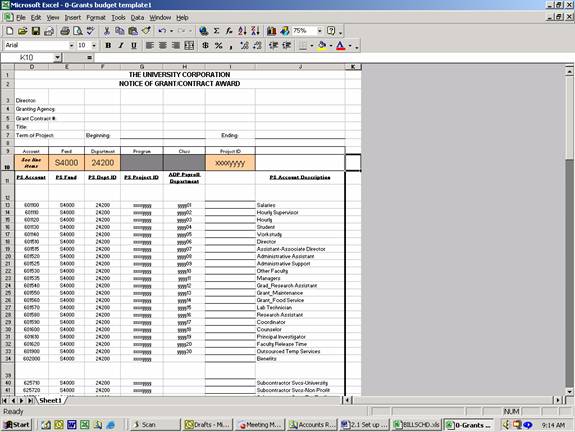
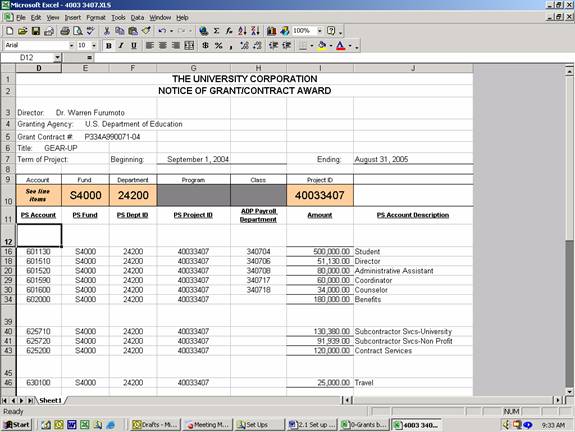
Enter relevant project data in the header:
- Director
- Granting Agency
- Grant Contract Number
- Title
- Beginning Ending
Enter the Project ID.
Assign the budgeted expenses to the related account lines.
Hide unused account lines.
Calculate the Indirect Cost Rate (IDC-Rate) and note it on the bottom of the grant notice.
If necessary, make note other relevant issues on the bottom of the grant notice.
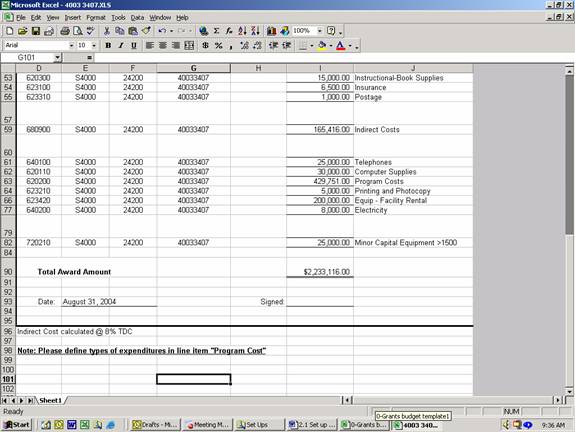
Print 4 copies of the "Notice of Grant/Contract Award" and initial them.
The 4 copies are distributed as follows:
- 1 copy is filed in the Grant File Folder (blue) on the left hand
- 1 copy is mailed to the Office of Research and Sponsored Projects (Scott Perez)
- 1 copy is mailed to the Principal Investigator (PI) of the project
- 1 copy is mailed to the Manager of Academic Resources (MAR) of the School/College of the Principal Investigator
Activity 4: Set up of Grant in PeopleSoft
Step 1: Accessing People Soft
Click on the PeopleSoft Sign-In Icon on Desktop, or:
Open Web Browser and go to website: https://admnps4.csun.edu/psp/fs84prd/?cmd=login
Enter Your User ID and Password
Click Sign In
Step 2: Set up of parameters in the Financial / Supply Chain section
Go to the Menu screen on the left and click on:
- Set UP Financials/Supply Chain
- Common Definitions
- Design ChartFields
- ChartField Values
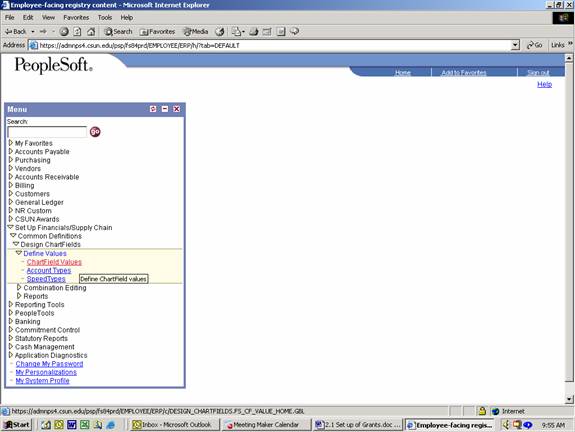
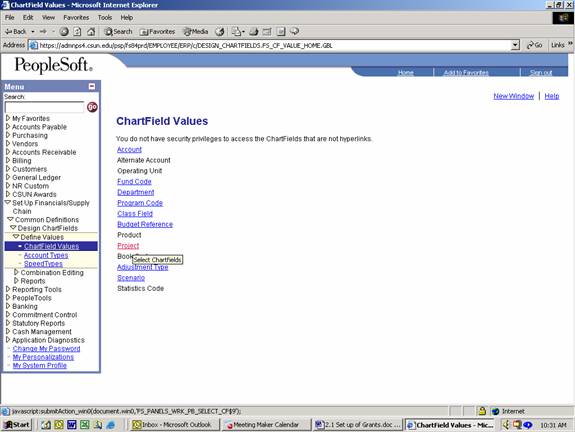
Click on Project
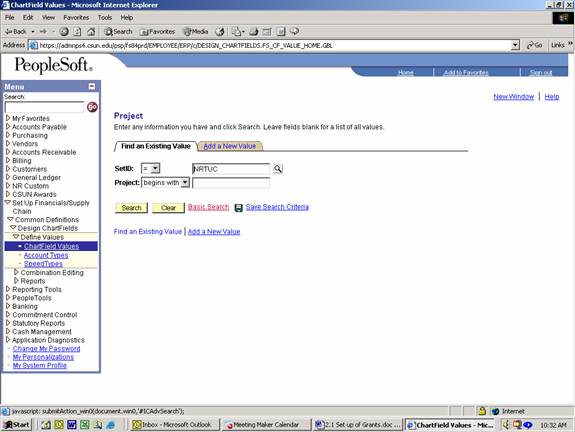
Click on Tab "Add a New Value"
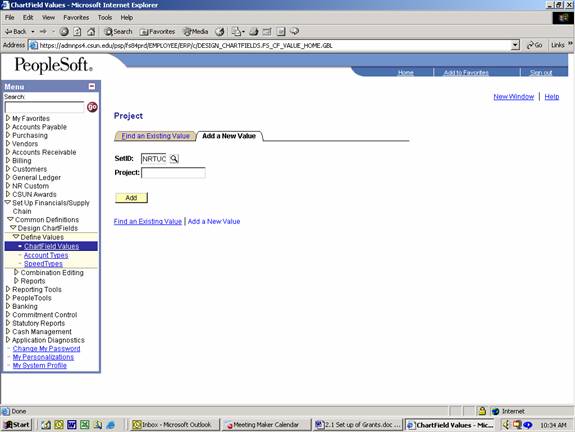
Enter the new Project ID
Click Add
Xxxxxx Picture
Use as date the 1 st of the relevant month
Enter applicable info save.
Important Note:
After setting up the supply chain it is necessary to run a "Combo Edit" procedure in order to be able to post any journal entries for the project.
This 'Combo Edit' procedure is usually run each night, automatically by the system.
Should you intend to continue setting-up the entire grant in PeopleSoft, the same day you will need to contact the Accounting Manager (Teresa Loren) and ask her to run a combo edit procedure.
In case you are setting up several grants at the same day, complete all the previous tasks for all the grants and then have the Accounting Manager run one "Combo Edit" before continuing to post any Journal Entries.
Step 3: Set up of ADP Codes
Go to the Menu screen on the left and click on:
- NR Custom
- Conversion Code Table
- Conversion Code
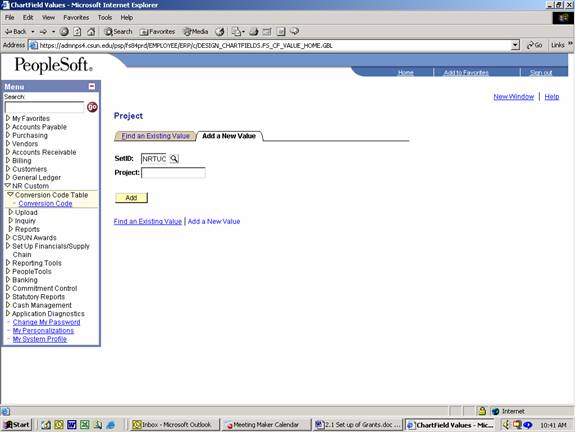
Enter the Project ID
Click Add
Use as Effective date the 1st of the relevant month.
Step 4: Set up of Award Attributes
Go to the Menu screen on the left and click on:
- CSUN Awards
- CSUN Award Attributes
- Award Attributes
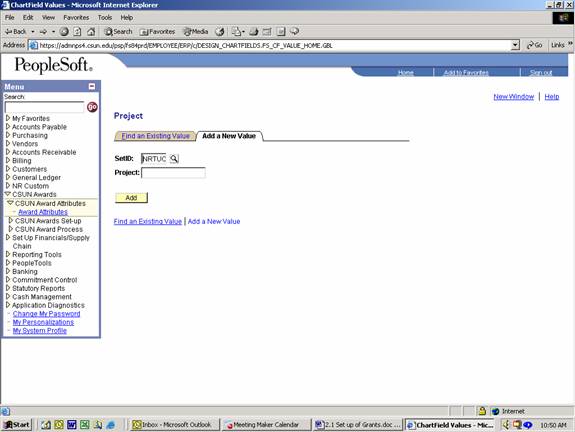
Enter the Project ID
Click Add
Fill out Tabs.
Activity 5: Enter the Project Budget into PeopleSoft via Journal Entry
Step 1: Create a Journal Entry in Excel
Go to:
- "Grants and Contracts" on "Sammy" (G:)
- PeopleSoft
- Accounts Receivable
open file: JRNL TEMP.XLS
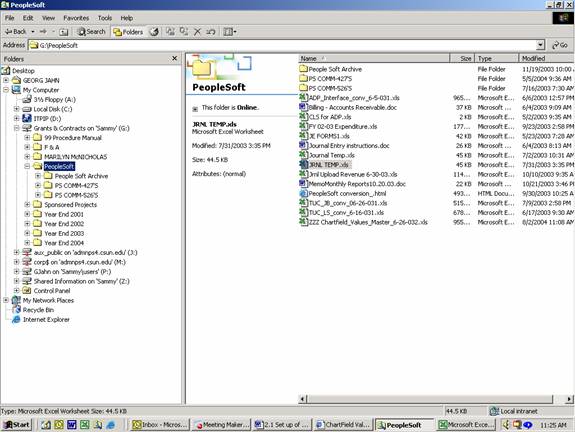
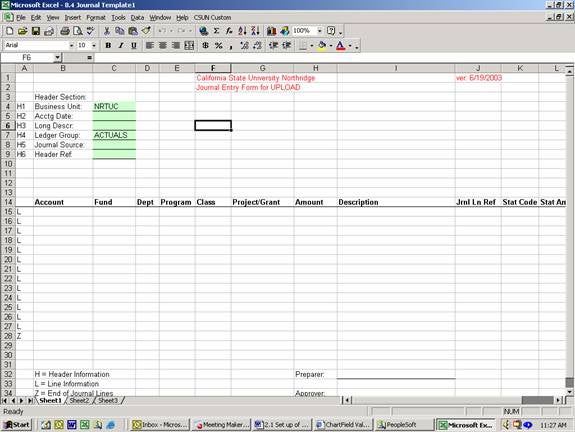
You may save this file for your records in a different directory. Next:<.p>
- Enter relevant date in the header
- Enter Budget from Notice of Grant/Contract Award
- In the column Scenario enter APPROVED
- Ensure that each line of the budget starts with the letter L, except the last line of the budget, which must start with the letter Z.
- Click in the Excel header on CSUN Custom , then in the dropdown list on Build Journal Entry.
- Assign a name (e.g. CORR.txt) to the file and click OK.
Step 2: Upload the Excel Journal Entry in People Soft
Go to the Menu screen on the left and click on:
- NR Custom
- Upload
- Journal Upload
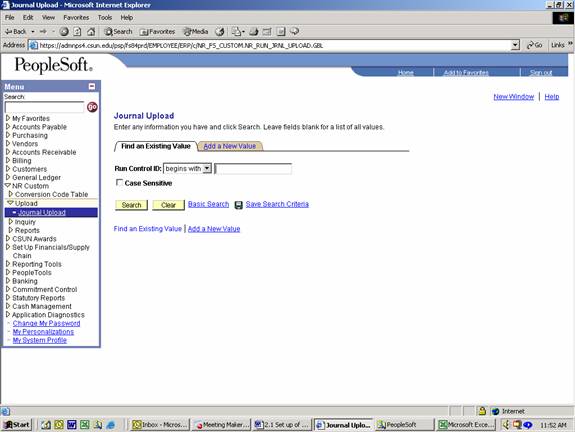
Click "Search"
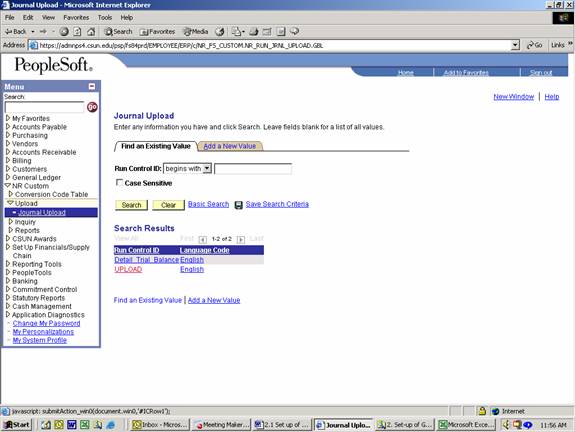
Click "Upload"
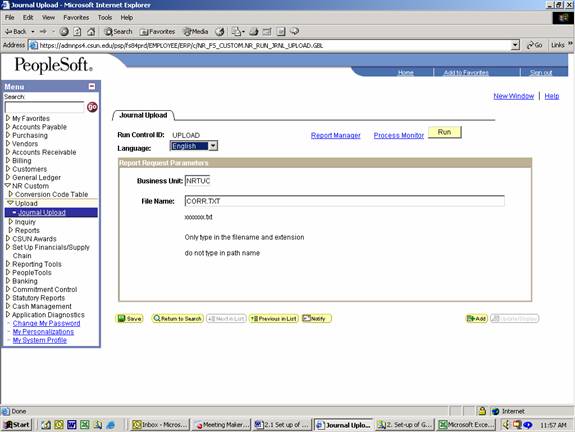
Enter the file name (e.g. CORR.TXT) you had previously assigned to your Excel Journal Entry.
Click "Run"
Click "OK"
Step 3: Create the Journal Entry in People Soft
Go to the Menu screen on the left and click on:
- General Ledger
- Journals
- Journal Entry
- Create Journal Entry
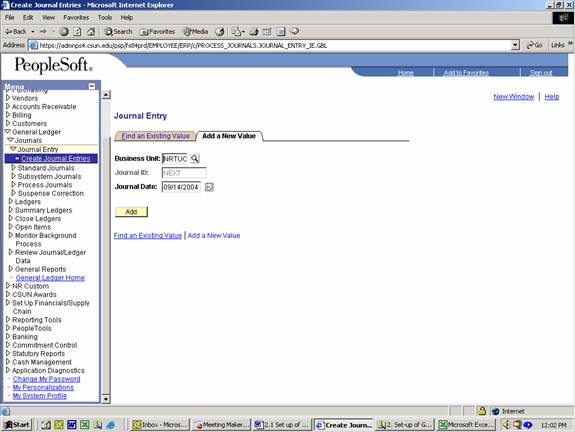
Click on Tab "Find an Existing Value"
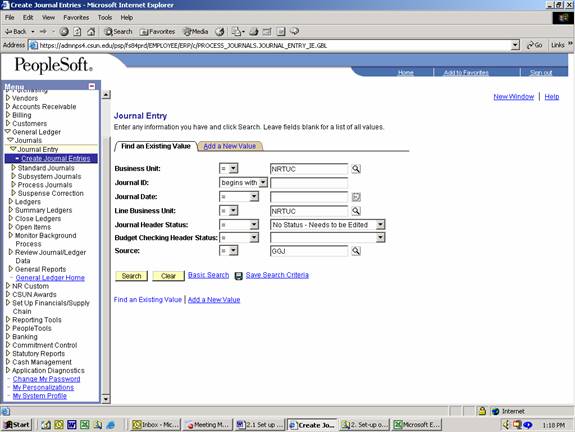
Next:
- Click on Search
- Click on Tab "Lines"
Objective: Checking for Errors
- Click on: Edit Journal Process
- Ensure that the Journal Status (bottom) is shows a "V" meaning the entry is verified and no errors have been found by the system.
Objective: Posting the Journal Entry
- Click on: Post Journal Process
- [Are you sure?]
- Click "OK"
- Ensure that the Journal Status (bottom) is shows a "P". This means the entry has been posted to the system.
Objective: Preparing the Journal Entry for printing
- Click on: Print Journal Process
This will not yet print the Journal Entry but send it to the Process Schedule, ready for printing. Ensure that you conduct the next step to actually send the Journal Entry to the printer!
Step 4: Print the Journal Entry
Go to the Menu screen on the left and click on:
- People Tools
- Process Scheduler
- Process Monitor
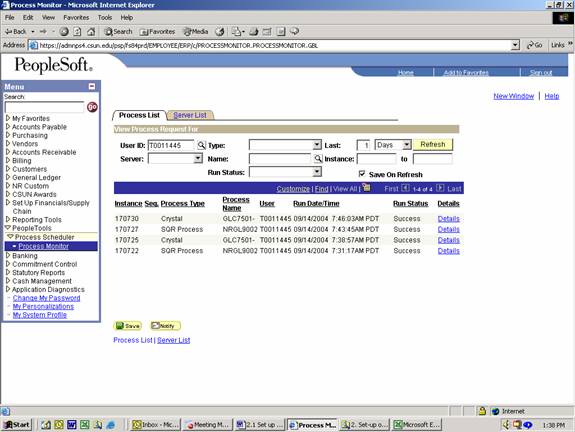
- Select the Journal Entry by selecting the related Process Type "Crystal".
- Ensure that the Run Status of the report shows the word �Success� (This means that the processes have been completed)
- If necessary, continuously click on the Refresh button, to update the Run Status.
- Click on: Crystal Success Details
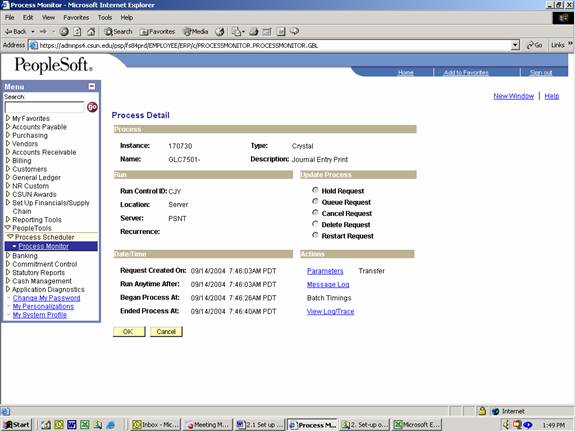
Click on "View Log/Trace"
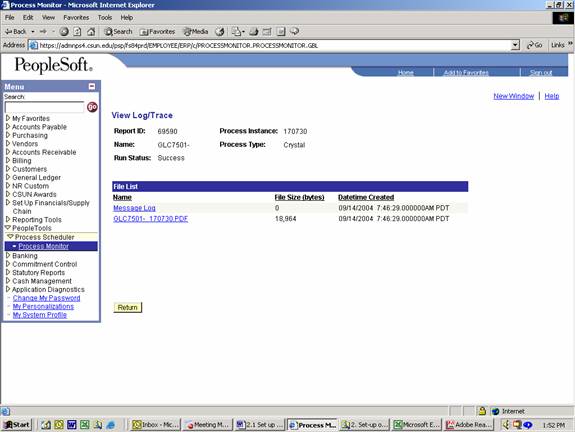
Click on the report, e.g.: GLC7501- 170730.PDF. The Journal Entry report will appear as .pdf file in Adobe Acrobat.
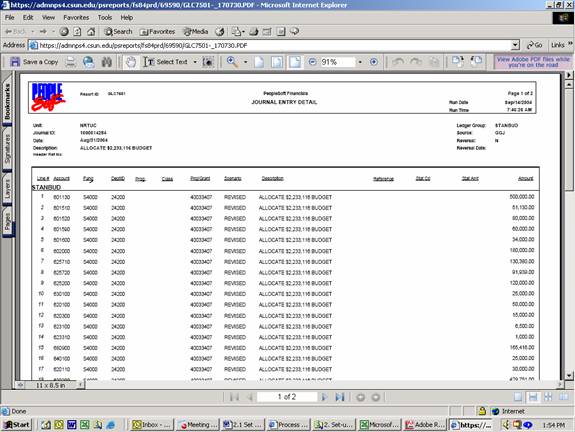
Print the report on your local or network printer.
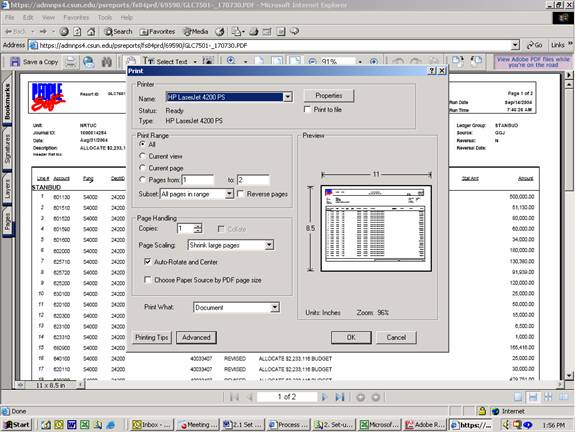
The printout of the Journal Entry is filed in the STANBUD folder.
