
INTRODUCTION
You can use the CSUN Mobile App to enroll in classes in two ways:
- Download the free app called CSUN
- Use the web version on a tablet at m.csun.edu
This guide explains how to register for co-requisite classes, use a permission number and wait list for closed classes with the CSUN App.
You may also search for classes, plan class schedules in Registration Planner, and view your enrollment appointments, weekly schedule, grades, and on-campus test scores.
Tip: We recommend having the five-digit class numbers* in hand before enrolling. While the app lets you search for classes from scratch, it’s easier to prepare the class numbers in advance.
*Note: For spring 2022 only, some class sections will have four-digit Class Numbers while others will have five digits. Use the four- or five-digit numbers to enroll as you normally would. Both will work.
Step 1
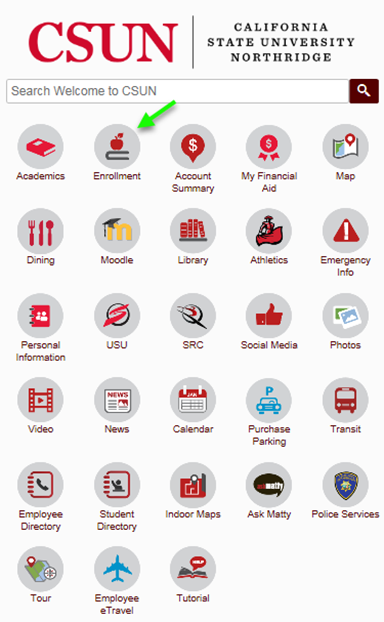
The CSUN App home page displays your navigation choices as tiles.
- Select the Enrollment tile to register in classes or adjust your schedule.
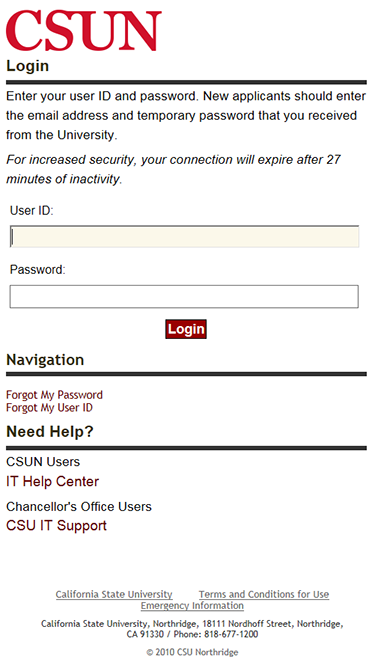
Step 2
On the login screen that displays, enter your CSUN user ID and password.
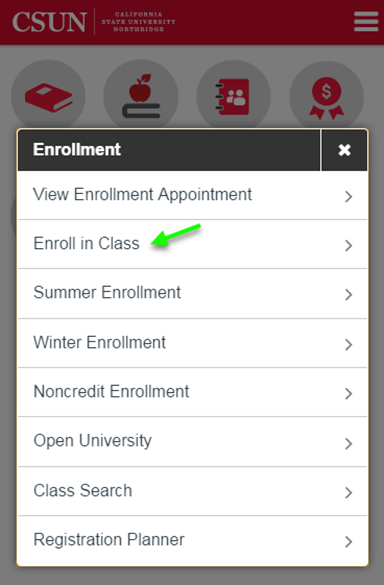
Step 3
- The Enrollment menu displays. Select Enroll in Class.
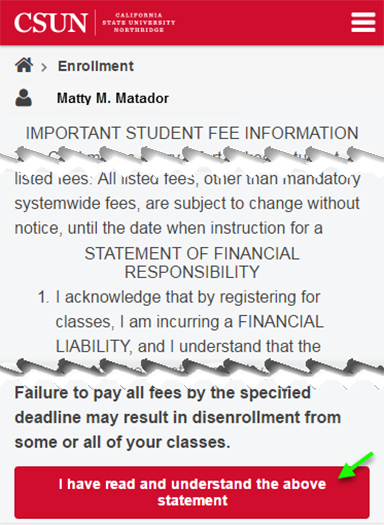
Step 4
The “Statement of Financial Responsibility” displays.
- Read the fee information, due dates and statement of financial responsibility.
- If you accept, select “I have read and understand the above statement” to proceed.
Step 5
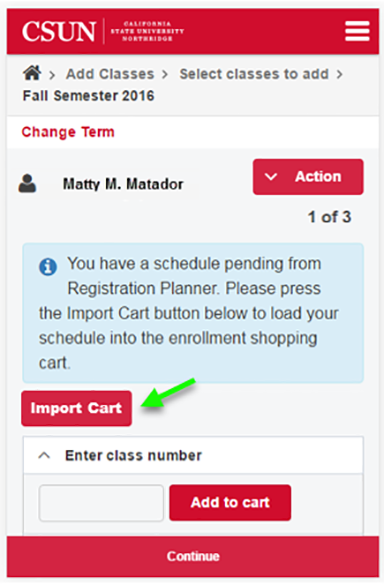
If you previously used Registration Planner to generate a favorite schedule, the Add a Class page will include a message that you have a schedule pending from Registration Planner and an Import Cart button. Skip this step if you already have class numbers handy.
- Select the Import button to transfer your desired schedule to your enrollment shopping cart.
Learn more about Registration Planner.
Step 6
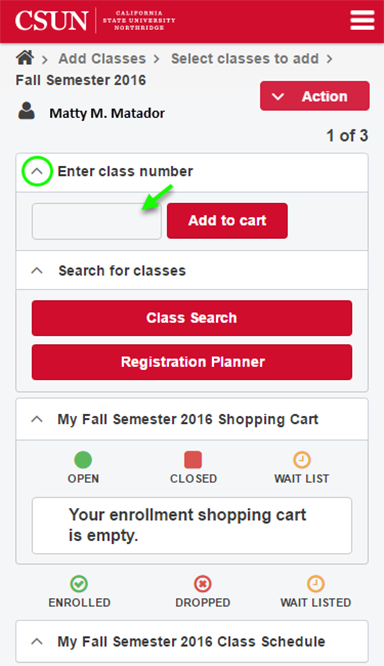
If you have no pending schedule from Registration Planner, the standard Add Classes page displays. Here you can enter a class number, search for classes, or use Registration Planner.
This guide assumes you have class numbers handy.
- Enter the 5-digit class number and select Add to Cart.
Step 7
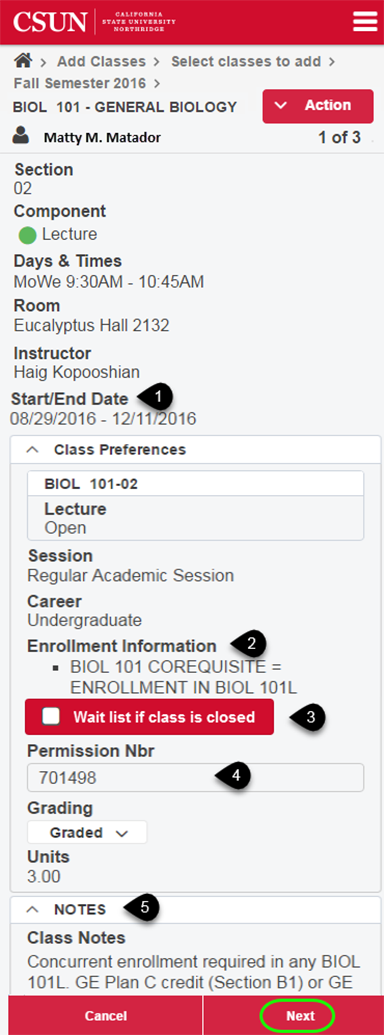
Let’s say you entered class number 17315, BIOL 101 lecture, section 02. The Details page displays.
Review details for:
- Start/End Date – Does the class start on a Saturday?
- Enrollment Information – Look for prerequisites and corequisites. BIOL 101 requires concurrent enrollment in BIOL 101L (lab).
- Wait list if class is closed – Check to wait list for a full class.
- Permission Nbr – If consent is required, enter the number given to you by the instructor or department.
- Class Notes – Look for special enrollment requirements.
Select Next.
Step 8
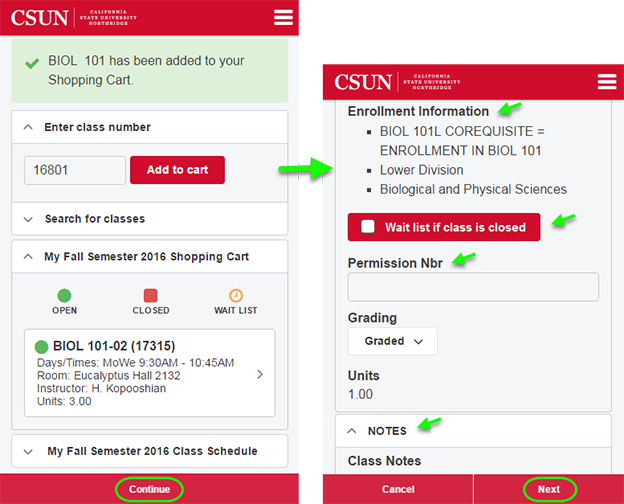
The BIOL 101 lecture has been added to your cart. Now add BIOL 101L:
- Enter the corequisite lab class number.
- Select the Add to Cart button.
- When the Details page displays, check the requirements.
- Scroll down to add a permission number if consent is required and/or wait list if class is closed.
Select “Cancel” or “Next.”
Step 9
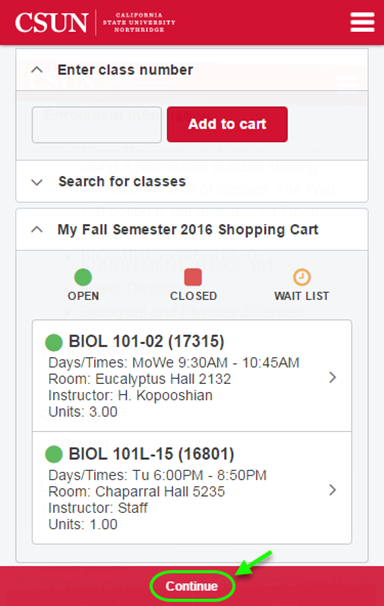
The lecture and corequisite lab classes have been added to your shopping cart.
YOU ARE NOT YET ENROLLED.
- Confirm your selections.
- Select Continue to proceed.
Step 10
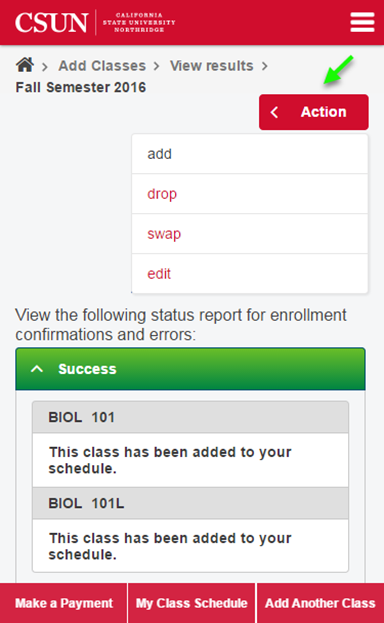
- Click Finish Enrolling.
- An enrollment results page then confirms success or displays errors.
Pay close attention to the results page for:
- Your wait list position number
- The reason your enrollment request failed. Take a screen shot if you want to discuss it with an advisor, instructor or Admissions & Records.
From here you can:
- Make a Payment
- View My Class Schedule
- Add Another Class
- Log out through the sandwich icon (upper right)

Step 11
From the “results” page, you can also adjust your schedule.
Select the Action menu to add, drop, swap, or edit classes. “Edit” means to change the basis of grading from a letter grade (A-F) to credit/no credit, but be sure you understand the limitations explained at CR/NC Grading.
To return to the CSUN App home page, select the house icon.
Step 12
You can do a lot more with the CSUN Mobile App.
Use the CSUN App “Academics” tile to:
- View My Weekly Schedule
- View My Grades
- View My Test Scores (on-campus tests only—WPE, CPT, MPT, etc.)
- Navigate to the mobile-friendly Student Academic Calendar and widget
Select My Weekly Schedule.

Step 13
Your weekly schedule for the current term or semester displays. Here you can:
- Quickly view a class location
- Select the course to view its description
- Tap the “horizontal scroll” arrow to span the week
- Show/hide the Display Options
- Navigate to a previous or future week
- Use “Display options” to customize your view
Select the house icon to return to the CSUN App home page.

Step 14
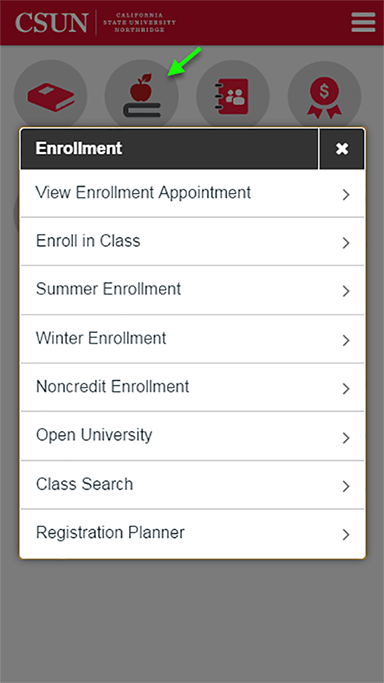
Use the CSUN App "Enrollment" tile for these actions:
- View Enrollment Appointment
- Enroll in Class
- Summer Enrollment
- Winter Enrollment
- Noncredit Enrollment
- Open University
- Class Search
- Registration Planner
The next step describes how to use Class Search.
Step 15
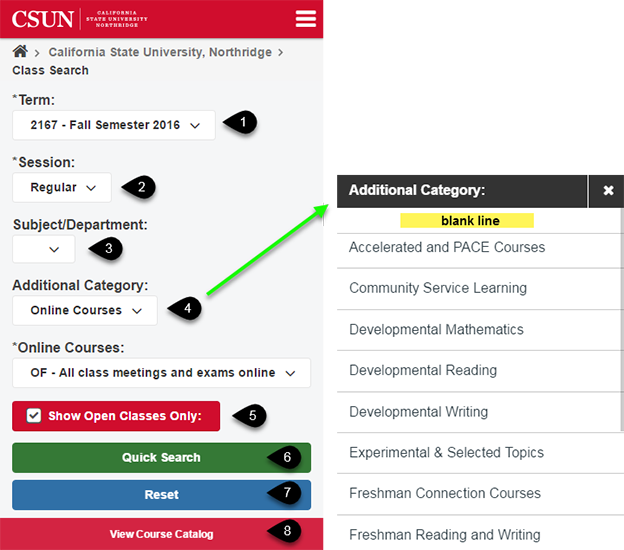
Use the filters on Class Search to narrow the search results. Fields with an asterisk (*) are required.
- *Term
- *Session – regular or extension
- Subject/Department
- Additional Category – Further narrow your search using subcategories.
- Show Open Classes Only – Do not check this box if you want to wait list for closed/full classes.
- Quick Search – Select after entering your search criteria.
- Reset - Start over. To change only one search criterion, you don't need to reset. To clear only the Subject/Dept or the Additional Category criteria, select the blank line in those menus.
- View Course Catalog
The CSUN App “Class Search” looks different but works just like regular Class Search. View the Class Search how to guide.
Step 16
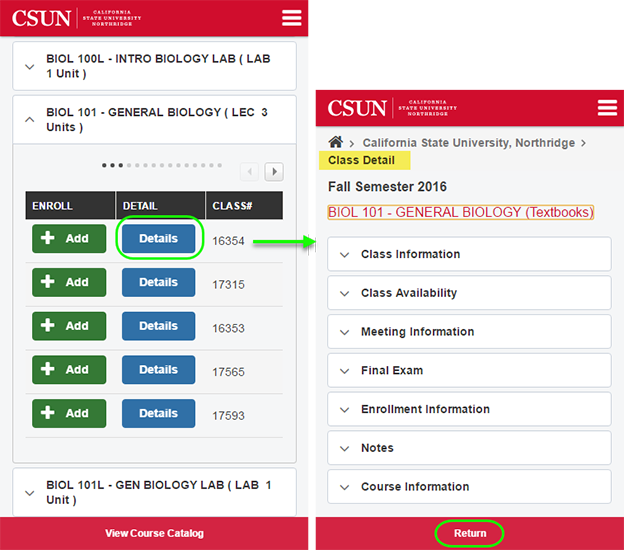
Once you’ve searched for and found a course, do the following:
- Expand the course to view the class sections.
- Select the Details button for a section to check:
- Class start/end dates
- Open/closed status
- Meeting days/times/location
- Final exam date/time/location
- Enrollment and class requirements
- Course description
Learn how to protect the personal data on your device at Information Protection.
Contact the IT Help Center:
- By phone - (818) 677-1400
- In person at the Learning Commons, Delmar T. Oviatt Library, first floor
- Online – Chat or submit a request for assistance
At any time, you can select the “sandwich” icon (upper right corner), scroll down to the “keys” icon, and tap to sign out. Always log out!