
Do you upload the videos you use in your courses to the Files area of Canvas? Do you have multiple copies of the same videos in several different courses? Do your course imports take forever because of all the videos you have? You can make your course video file management a breeze by using Panopto to host your video files. Panopto is a dedicated video platform that makes it simple to distribute and share video content. Beyond freeing up space in your Canvas course, uploading your videos to Panopto has several additional benefits:
- Panopto automatically captions your videos.
- Spoken words are indexed and searchable.
- Panopto video files don’t count against your Canvas file storage limit.
- You can make your videos interactive by inserting questions into the video.
- Panopto is a dedicated video platform which makes it easier to distribute and share video content with your students without having to put the content on YouTube
This tutorial will walk you through the process of getting your videos out of Files and into Panopto in 5 easy steps. It may seem like a lot of work at the beginning, but Panopto makes managing video in your courses much easier in the long run.
Step 1
The first step in moving your files into Panopto is having a copy of the video(s) on your computer. If you already have the videos on your computer, you can move on to Step 2. If you do not have the videos on your computer, you will need to go to the “Files” folder in the course where you have the videos. From there, click on the 3 vertical dots to the far right of the file name and click “Download”.

Step 2
Once you have the videos on your computer, open a new browser window or tab and go to csun.hosted.panopto.com.This will take you to your Panopto account where you will be uploading your videos. Once you are logged in, click on the red “Create” button on the top of the screen, and from the drop-down list select “New Folder”.

Give the folder a name that will make it easy for you to find and locate. We recommend using the course name and adding “videos” to the end. It’s also helpful to give the folder a brief description.

Step 3
Now that the folder is created, you can upload videos by clicking on the red “Create” button and selecting “Upload Media”.

This will open a window that allows you to either drag and drop or select the files on your computer. Keep in mind that you can upload multiple video files at once.

Please note that your upload time will depend on the size of the video file(s), as well as the upload speed of your internet connection. In general, download speeds are faster than upload speeds with most internet providers. Once the upload(s) are complete, Panopto will process the video(s). While processing, Panopto is generating the automatic captions and creating the searchable transcripts.
Step 4
After Panopto has completed processing the videos, you are ready to put them in your Canvas course. There are a few different ways to share the videos in Canvas.
Option 1 – Placing the video in a module.
Click on the “+” symbol at the far right of the module where you want to place the video, then select “External Tool”. In the resulting window, scroll down and select Panopto, then click on the “Add Item” button.

On the resulting screen click on the drop-down list and select the folder you created which contains the videos you uploaded to Panopto.

Once you have selected the folder, you will be able to select the videos you uploaded. Choose the video and click the Insert button. Panopto will take you back to the previous screen. Click on the “Add item” button and the video will be added to your module.
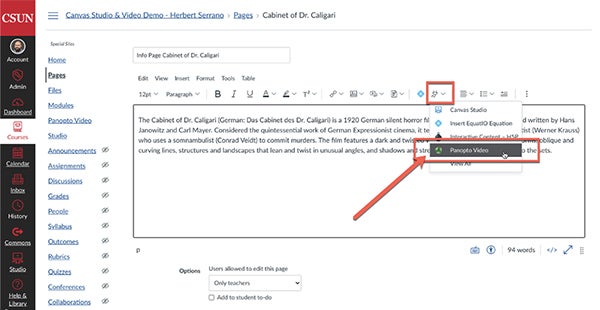
Placing the video in a content page will allow you to add helpful context or notes on a page in Canvas. You can either create a new page or use an existing page. If you are using a new page, it will be blank until you add your content. Once you have your page, click on the edit button which will bring up the Rich Content Editor (RCE) toolbar. Note: if you created a new page, you will already be in the “rich text editor” and will not see the edit button. In the RCE, click on the icon that looks like an electrical socket, and then click on “Panopto Video”. If you do not see Panopto Video from that drop-down list click “View All”.
On the resulting screen click on the drop-down list and select the folder you created which contains the videos you uploaded to Panopto.

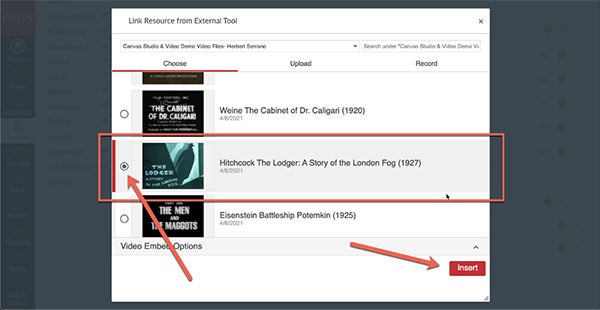
Once you have selected the folder, you will be able to and select the videos you uploaded.

Click on the “Insert” button and the video will be embedded in the Canvas Page.

Step 5
Repeat for however many videos you want to add to your Canvas course. After you have added the videos from Panopto, you can go to your files and delete the videos you had previously added to the “Files” area of the course. Future versions of the course will have the Panopto videos automatically linked or embedded after you import the course. Subsequent course imports will be much faster, and your videos will have all the benefits of being in Panopto.
For more information on Panopto, visit www.csun.edu/it/panopto. You can also check the FTC Workshop Calendar for Panopto training workshops.