
This is a tutorial only. No login is required.
INTRODUCTION
This guide reviews how CSUN staff granted security access to the Schedule of Classes (SOC) add or modify the Instructor/Advisor Table. Use the Instructor/Advisor Table and Approved Courses pages to:
- Add a new instructor record.
- Modify an existing instructor record to include a new department (Academic Org).
Tip: If you have a group of new instructors, you can add them all at once to the Instructor/Advisor Table before assigning them to their classes in the Meetings page.
IMPORTANT NOTE: Faculty Affairs language for Assigning Instructors
Troubleshooting
Two reasons why an instructor cannot be assigned to the class Meetings page:
- The effective date entered in the Instructor/Advisor Table is later than the start of the term/semester.
- The academic organization has not been added to the Approved Courses page in the Instructor/Advisor Table.
Step 1
- Log into myNorthridge Portal (learn more about logging into SOLAR).
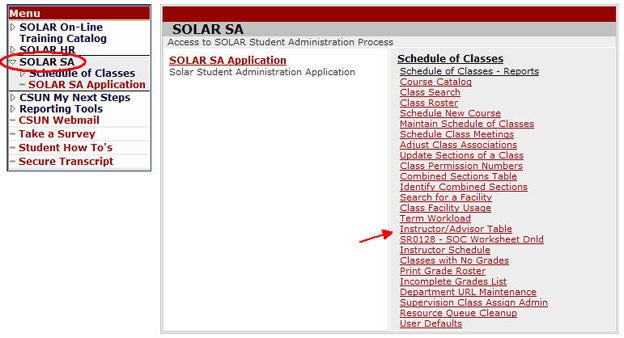
- Under the Staff Tab, click SOLAR SA on the menu.
- Click Instructor/Advisor Table.
Step 2
To Find an Existing Value page displays.
- Enter the instructor ID number (if known) or search by name.
- Click Search.

Step 3
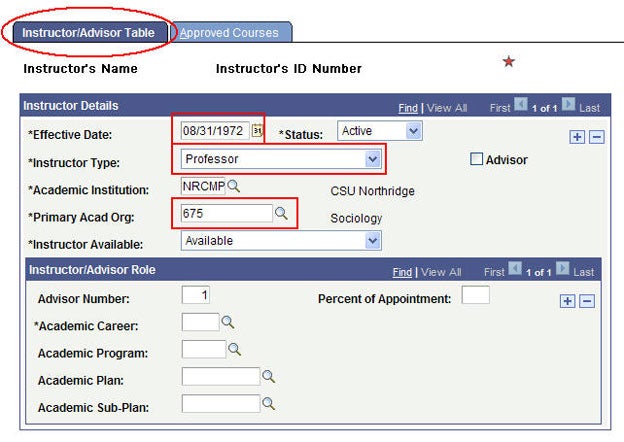
The Instructor/Advisor Table page displays. Select from two choices below:
ADD A NEW INSTRUCTOR
- *Effective Date - Defaults to the current date. Choose a date BEFORE the term start date in order for the Meetings page to display the instructor's ID.
- *Instructor Type - Select an option from the drop down menu. Except: Do not select "Advisor Only" because the Meetings page will not find the instructor's name.
- *Academic Institution - System should default to NRCMP.
- *Primary Acad Org - Enter the instructor's primary department (3-digit academic org number).
MODIFY AN EXISTING INSTRUCTOR
- Click the plus (+) sign (Instructor Details section) to create a new profile row.
- *Effective Date - Defaults to the current date. Choose a date BEFORE the term start date in order for the Meetings page to display the instructor's ID.
- *Instructor Type - Select an option from the drop down menu. Do not select "Advisor Only" because the Meetings page will not find the instructor's name.
- *Academic Institution - System should default to NRCMP.
- *Primary Acad Org - Enter the instructor's primary department (3-digit academic org number).
Step 4
Go to the Approved Courses page. Select from two choices below:
ADD A NEW INSTRUCTOR
- In the Course Description, enter the Academic Org.
- Click SAVE.
MODIFY AN EXISTING INSTRUCTOR
- Click the plus (+) sign to add a new row for each Academic Org.
IMPORTANT! Before you exit, verify the Effective Date. Once you save and exit, the date can only be changed by the APDB analyst in Institutional Research. - Click SAVE.
