Newsletter Assignment
P. 121-130 Creating a Newsletter
For this assignment, you will make a newsletter. Please make your newsletter about either 1) newsletter about your school or class or 2) making a newsletter that you can make to give out at a school function (ex. first day of class to the parents and/or students, PTA meeting, brochure and etc.)
1. Prior to starting, make a proper file structure similar to the PowerPoint 2 assignment. Basically, you will have a folder labeled 'word3_folder.' Inside that folder, you will have another folder labeled 'images.'
2. When you have successfully created your file structure, you will want to go and open up Microsoft Word. As soon as you open up a page, you will want to go and save this document. You will want to save your newsletter in the 'word3_ folder' with a file name like 'newsletter_chang.' Place either a Header or Footer at this time before getting started. You will probably want to place a footer instead of a header.
3. As soon as you save your document, you will want to hit return about 7 times or so. Now you will want to place a title on the document. For this, you will be using Word Art. From the toolbar, you will want to select Insert, Picture, then Word Art. From there, you can select a design and then choose OK. From there, you will want to type in your title and change the font and/or size.

4. Once you insert your title, the word art will probably appear in the middle of the document. From there, you can resize the word art and then you will want to move the word art to the top.
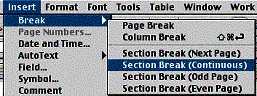
5. Place your blinking cursor below your word art and enter a continuous section break. To do this, select 'Insert,' 'Break,' and 'Section Break (Continuous).'
6. You are now ready to insert columns. Prior to doing this step, make sure your cursor is below the title and section break that you have created. If so, you are ready for the next step. You can choose to have 2, 3 or more columns and you can also choose to have a line to divide the columns if you like. To insert columns, click on the columns icon and choose the number of columns that you want. The column icon is the one in the middle of the picture below.
![]()
7. Now that you have your columns set, you will want to type in the text and insert your pictures (at least two pictures from the following, downloaded from the Internet or personal picture) as you see fit. Remember to place your image in the image folder. Keep in mind that you may not see the columns when you are working, but they are there and you can preview them by going to Print Preview which can be accomplished by selecting 'File' and then 'Print Preview.' To get out of print preview, choose close.
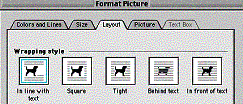
Hint: Once you insert a picture, you will want to double click on your picture and a 'Format Picture' menu will appear. From there, you can give your text and picture the look that you want.
Once you complete the above items, you might want to add, a watermark, border, drop cap and etc. to spruce up your newsletter. These are optional but and it will be good practice.
Other features to keep in mind when working with Microsoft Word.
- Spell and Grammar Check
- Thesaurus
- Find and Replace
- Header and Footer
- Landscape and Portrait
Expectations, your newsletter should be a minimum of 2 pages in length with the following.
- Word Art
- Graphics
- Proper file structure
- Continuous Section Break
- Columns
- Header and Footer