
Part I, II, & III were copied almost entirely from http://www.entheosweb.com/
For this assignment, you will need to pick an image and apply THREE different basic Fireworks assignment.
First, open up Fireworks and choose a canvas size that will be big enough to paste your image onto the canvas twice (example, if your image is 100x200, then you will need to choose a canvas with the dimensions 200x400 or larger. If you are not sure what size your image is, select a canvas size, because you will also be able to adjust your canvas size at any time by choosing Modify>Canvas>Canvas Size). Once you have selected a canvas size, then place your image onto the canvas by choosing File>Import... or copying and pasting the image. Once your image is on the canvas, copy and paste the image again and place them next to each other. Now that you have two identical images, one image will not be altered, but the 2nd image will be modified by completing part I, II, & III. Once you are finished, link this assignment to your portfolio page and leave it as a Fireworks file (meaning, the file should have .png extension, example, if your file name was school, then the file should be school.png)
Part I. Change the image color.
This is an effective technique for changing the color of an image or a particular area of an image. In this tutorial you will learn how to change the color of a particular area of the image.
Step 1
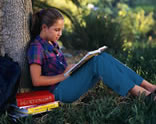
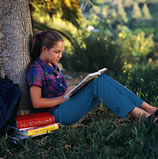
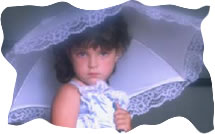
Open an image. The image below is used in this tutorial, where the color of the pants are going to be changed from white to blue.
Step 2
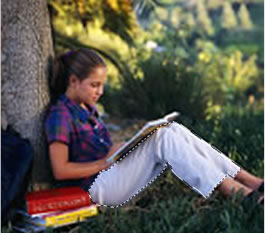
Using the Scale tool enlarge the image so that the area which you have selected to change color is clearly visible. Select Polygon Lasso Tool from the Tool bar and mark the selected area. Now you can see the area marked with a dotted line as marked in the picture below.
Step 3
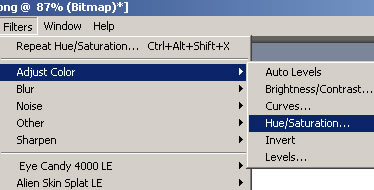
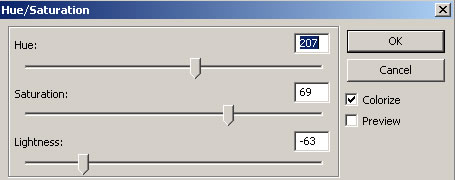
Select Filters>Adjust Color>Hue/Saturation.
Step 4
The following window will be displayed. Play with the Hue, Saturation and Lightness. Feel free to change the color.
Step 5
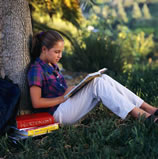
The final result is this, where the white pants are changed to blue!
Part I, II, & III were copied almost entirely from http://www.entheosweb.com/
Part II. Cool Photo Frames
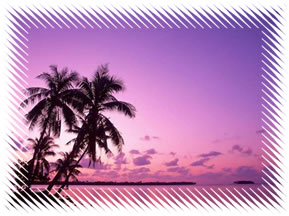
Try out these classy edge effects on your photos. It gives a cool look!
Continue working with the image from part I. Select the image and click on Filters>Alien Skin Splat LE>Edges The Alien Skin window will be displayed. Select an option from Edge Mode. Play around with the other settings and view the result. If you need a transparent fill for the image, check the option Transparent Fill, which will deselect the color option and the image has a white background. Try out the various settings for different edges.
 |
Rough Edged Frame Settings: |
|
 |
Dot Edged Frame Settings: |
|
 |
Line Edged Frame Settings: |
|
 |
|
|
Line Edged Frame Settings: |
||
 |
Ripped Edge Frame Settings: Edge Mode - Torn Paper, Edge |
Part I, II, & III were copied almost entirely from http://www.entheosweb.com/
Part II. Cool Photo Frames
Transparent Text in Fireworks MX 2004
This is a beautiful text effect! You can also do this using Fireworks. Follow these simple steps to give this glassy text effect.
![]()
Step 1
Continue working with the image from part I & II.
Step 2
Type a text on the image and position it wherever you want it to be. In this tutorial, two texts are used as you see in the above image i.e. Blue Skies and Green fields.
Step 3
With the text selected, go to the Properties window (which is normally located at the bottom of the screen), and click on the "+" sign next to Filters and select Bevel and Emboss > Raised Emboss.
![]()
Step 4
Now the Raised Emboss properties will be displayed as seen in the image below. Different property values are given for the two texts, since both have slightly different looks. Make sure the Show object box is not checked.
![]()
Step 5
The following values are given for the properties of the text: Width - 2, Contrast - 100%, Softness - 0, Angle - 30 (this is a suggestion and you can vary the numbers)
The properties for the Green fields text is : Width - 2, Contrast - 100, Softness - 0 , Angle - 314.
In both cases the option Show Object should not be checked.
![]()
Part I, II, & III were copied almost entirely from http://www.entheosweb.com/
