Introduction
The Absence Management Business Process Guide for Timekeepers covers the overall Absence Management business process used by Timekeepers in manager self service. It describes the pages and fields used to enter, review and manage Absences in the Absence Management module.
DEFINITIONS:
The following (optional) icons may be used to draw attention to information in this guide:

PREREQUISITES/ASSUMPTIONS:
Business Process Workflow Diagram
The following diagram outlines the overall Absence Management business process for each of the Absence Management roles; Employee, Timekeeper, Manager, and Payroll/Central Administrative Unit.

Diagram Definitions:
Current Period – The current period, based on the open Absence Management calendar
Prior Period – Absences can be entered up to three periods previous to the current period.
Future Period – Absences can be entered for one future period (not depicted in diagram)
Auto-Notification – Email notifications are automatically sent to employees who are self reporters
when an Absence is entered on behalf of the employee.
when an employee’s Absence is deleted by an Approver or Timekeeper.
when an employee’s Absence is marked as “Needs Correction”.
Absence Management Roles
Each of the functions in the Absence Management process is accomplished using a specific “role”:
Employee Role
Timekeeper Role
Manager/Approver Role
Payroll/Central Administrative Unit Role
The function of the roles and the recommended Absence Management overall business process, depicted in the previous diagram, is as follows:
- Employees: On a monthly basis, employees are responsible for absence reporting, including confirmation, if applicable, that no absences were taken. Employees can enter, review, and submit their Absences in self service for the current, prior, or future period. Employees can delete Absences when they are in the status of “Submitted” or “Needs Correction”. Employees who are self reporters are notified via email when absences are marked “Needs Correction” and when Absences are entered on their behalf by a Timekeeper or Approver.
- Timekeepers: Timekeepers review Absences entered by employees for accuracy and manage absence activities by reviewing and auditing absence transactions. Timekeepers may use the Timekeeper Absence Review page to mark Absence transactions with the appropriate review status to indicate whether the transaction is correct or require further action. Employees are automatically notified via email when a Timekeeper marks their transaction as incorrect. The ‘review’ process is optional and may be performed as part of the Approver’s approval step. Timekeepers may enter Absences for employees who are not self reporters and for those who cannot enter their own Absences. Timekeeper initiated absence transactions will generate email notifications to employees who are self reporters.
- Managers/Approvers: Managers/Approvers review and approve absences for their employees. Managers may also enter Absences on an employee’s behalf in the event that the employee or Timekeeper is unable to enter the Absence(s). Absences entered by Approvers are automatically submitted with an approved status. Manager initiated absence transactions will generate email notifications to employees who are self reporters.
Payroll/Central Administrative Unit: generates Absence Management self service notifications to their campus populations, enters Catastrophic Donations, runs the prior period process, enters adjustments, executes and finalizes the Absence Management calculation, and audits all Absences.
Absence Management Self Service Pages Used to Accomplish Each Function by Role
The following depicts the roles and functions in Absence Management and the pages within the Absence Management system used to accomplish each task.

Absence Take Availability and Validations in Self Service
The following types of absence validations occur on the absence entry page.
Absences with Balance Validation: The balance validation checks the current Absence transaction against the most recent finalized Absence balance and any pending Absences entered in the current period. If the employee does not have sufficient balances to cover the usage, an error is generated indicating that the absence entered exceeds the available balance. Employees are not allowed to use more time than available.
Absences that Generate Message to the Employee: Absence transactions that require additional documentation to be submitted by the employee will trigger an online message specifying that documentation is required.
Absences that Require Comments: Certain Absence transactions require additional information at the time of submission. If the transaction requires such information, the “Add Comments” link will appear in red to indicate that a comment is needed. If the employee does not enter a comment with the transaction, an error will generate indicating that the absence entered requires an entry in the "Comments" field.
The table below lists Absence elements delivered in Self Service and the validations, notifications, and rules associated with each. The availability of each element is based on the employee’s Absence Management eligibility group. Eligibility groups are based on the collective bargaining agreements.

Timekeeper Role
Timekeepers review Absences entered by employees for accuracy and manage absence activities by reviewing and auditing the transactions.
Timekeepers may use the Timekeeper Absence Review page to mark Absence transactions with the appropriate review status to indicate whether the transaction is correct or require further action. The review process is optional and may be performed as part of the Approver’s approval step. Employees are automatically notified via email when a Timekeeper marks their transaction as incorrect. Timekeepers may enter Absences for employees who are not self reporters and for those who cannot enter their own Absences. Employees who are self reporters will receive an email notification when absences are entered for them.
Timekeeper Review – Overview of the “Timekeeper Absence Review” Page
The “Timekeeper Absence Review” page (if used) is to validate Absences entered by employees. Once employees’ entries have been reviewed, the Timekeeper can update the Absence status to “Reviewed” for entries that are ready to be approved by the Manager/Approver. Timekeepers may also update transactions to a status of “Needs Correction” and include a comment for the employee. This generates an email notification to the employee with the details of the Absence that needs correction.
Columns Displayed on the Timekeeper Absence Review
- Select – Use the check box to select the employee(s)
- Emplid – Employee ID
- Empl Rcd – Employee record number
- Current Period Absence – The status of absence entries for the employee. “Current” means the entire allowable entry period (three prior months, the current month, and one future month)
- Appr – All reported absences for this employee have been approved
- Sub – Absences have been submitted and require approval
- None –No absences have been reported.
- Name – Employee’s name
- Status – Employee’s employment status
- Dept ID – Employee’s department number
- Dept Name – Employee’s department name
- Job Code – Employee’s job code
- Job Title – Employee’s job title
- Full/Part-time – Employee’s employment status (full-time or part-time)
Note: The list of employees may be sorted by clicking any column name on the page.
Timekeeper Review - Using the “Timekeeper Absence Review” Page
To access the absence entry page, go to myNorthridge portal and locate the HR/Timekeeper- Time & Attendance portal pagelet. Select the “Review Absences” link.


Note: Select the “Click for Instructions” link to view instructions for the page.
- Click the “Select” box next to the employee’s name to select one or multiple employees.
- Click the “Select All” button at the bottom of the page to select all employees in the list.
- Click the “Deselect All” button to clear all of the selected employees.
- Click the “Continue” button to proceed to display Absence entries pending review for the selected employee(s).
The selected employees’ absence transactions will display for review. To view Comments entered by the employee, select the “Entry Comments” link. This link is only available for transactions that contain corresponding comments. Employee’s comments cannot be modified by the Timekeeper.

Update the “Review Status” to “Reviewed” if the transaction is correct. If the transaction is not correct, select “Needs Corr” for Needs Correction.

Note: Absence transactions that are marked “Needs Correction” will automatically trigger an email to the person who entered the absence, use the “Add Comment” link to include applicable comments and click “Submit”.
Use the “Add Comment” hyperlinks to add a comment. This comment will be included in the email notification to the person who entered the transaction.

Enter a comment and click “Save Comments”.

Click OK to accept the entry.

An email notification is sent to the employee with the Timekeeper’s comments.

Timekeeper Absence Entry – Overview of the “Timekeeper Absence Entry” Page
The Timekeeper Absence Entry page is used to enter Absences for employees who are not self reporters and on an employee’s behalf in the event the employee cannot enter the absence. The Timekeeper Absence Entry page includes all of the same functionality and validation as the employee entry page (Refer to the Business Process Guide for Self Reporters section 3.1 and 3.2 for details) and the following additional functionality.
Timekeeper entries are automatically updated to an Absence Status of “Reviewed” upon submission.
Timekeepers may delete Absence entries that are in “Submitted” or “Reviewed” status.
Timekeepers may navigate through their employee list by using the “Next Employee in List”, “Previous Employee in List”, and “Return to Employee List” hyperlinks.
To access the absence entry page, go to myNorthridge portal and locate the HR/Timekeeper-Time & Attendance portal pagelet.

The columns displayed are the same as the “Timekeeper Absence Review” page. The list of employees may be sorted by clicking any column header.
The “Report and View Employee Absences” page will display. The functionality on the Timekeeper entry page is the same as the functionality on the employee entry page, with exceptions noted above. Refer to the Business Process Guide for Self Reporters for details.

Absence Management Reports
Timekeepers and Approvers have access to Absence Management reports based on the security structure defined for them within the Absence Management system.
In addition to the validations that occur at the time of entry in Absence Management Self Service, it is recommended that Absence Management activities are validated by the Timekeeper as part of their review process.
Reports:
- Excess Plus/Minus-Negative - This report shows employees who are on non-standard work schedules and have negative Excess Plus/Minus balances.
- Excess Plus/Minus-Positive - This report shows employees who are on non-standard work schedules and have positive Excess Plus/Minus balances.
- Excessive Hours in a Single Day – This report shows employees who reported more hours than their schedule.
- No Time Reported – This report identifies Absence Management eligible employees who have not reported any time away from work and have not reported “No Time Taken”.
- Reported Absences – This report shows a listing of all reported absences by employee.
- Reported Absences Not Approved – This report identifies reported absences that have not been approved.
Note: All reports can be run online or via the batch process and downloaded to Excel for more detailed analysis.
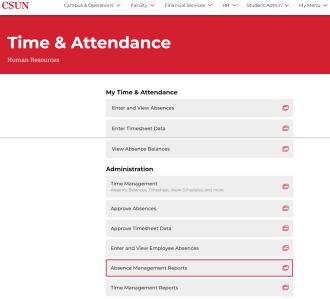
To access the reports, go to CSUN Portal, select HR > Time & Attendance > Absence Management Reports.
Enter a Run Control ID and click the “Search” button. To add a run control, select “Add a New Value.”
Note: Create only one Run Control (e.g. “REPORT”) and reuse the same Run Control every time you access this page.

Run an Individual Report:
To run an individual report, enter the search criteria and click the report name.

The report results will display online. The default display is the “Absence Info” tab on the report output.

Click the “Employee Info” tab to see additional employee information.

Run Reports in Batch Mode
Reports can also be run in batch mode. This process creates a CSV file which can then be downloaded to Excel or other programs for review. Batch reporting is recommended for reports that return large data sets.
Click the checkbox next to the desired reports or use the “Select All” link to select all of the reports in the section. Click the “Submit” button to run the report(s) via the batch process.

Allow the process to run for a few seconds then click the “Refresh” button to get the latest status. The process is complete once the Run Status shows SUCCESS and Distribution Status shows POSTED. When the process is complete, select the “Details” link. \
Note: Depending on the volume of data being retrieved and the number of jobs in queue, the process may take several minutes to finish.

Select "Actions" and then "View Log/Trace" link.
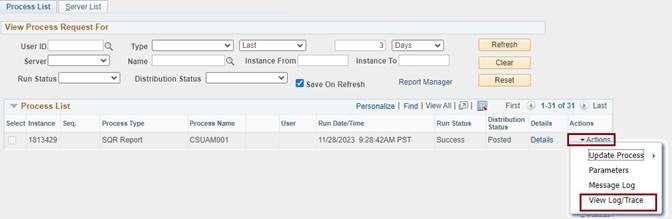
Locate the output file (csv extension) to view the report.

The report contains both employee information and absence details.

Absence Management Pay Group Determination
The table below outlines the criteria used to determine an employee’s Absence Management pay group.

Timekeeper Balance Inquiry
The “Timekeeper Balance Inquiry” page is used to view employee absence balances. Information about the functionality is detailed below.
Timekeeper Balance Inquiry Page

Search Page
- Department: Department number.
- Emplid: Employee ID
- Empl Rcd#: Employee Record number.
- Name: Employee Name. Note: This is a “wild” search. Enter a full name selection (e.g. Smith) to retrieve all employees’ whose name has the word “Smith” in it.
- Pay Group: This is the Absence Management Pay Group for which the employee belongs. Refer to the “Absence Management Pay Group Determination” section of this guide for reference.
- Union Code: Bargaining Union Code
- Payroll Status: Employee’s current employment status.
- HR Status: Employee’s current employment status by category (Active or Inactive). “Active” will select all employees who are on active pay status (e.g. an employee who is on leave with pay).
To access the balance inquiry page, go to myNorthridge portal and locate the HR/Timekeeper- Time & Attendance Portal Pagelet. Select the “View Absence Balances” link.

Enter the selection criteria on the search page and click SEARCH.

Display of Employee Data
The employee’s name is displayed on top of the page.
Information is separated into three different tabs.
- Absence Balances. This tab contains information about the accrual dated and balances for sick, vacation, and personal holiday.
- Compensatory Time. This tab contains compensatory time balances (e.g. CTO, Excess, Holiday Credit, Holiday CTO, Additional Day Off, etc.).
- State Service for Absence. This tab contains state service balances.
- “Graduated Vacation Chart”. This chart includes a summary of accrual rates and maximums by bargaining and administrative units.
View Details
The Details link provides the connection to the employee’s current absence activities and absence history.

Click the icon under “Details” to retrieve the history page.
Note that several tabs will appear across the top. Select the tab that contains the information needed. Select “All Absence Balances” to view all absence types.

Explanation of Fields:
- Period ID: The calendar period for the row of information that is displayed. Balances as of Date: The “as of” date for the information displayed.
- Previous Balance. The ending balance from the previous finalized payroll period.
- Earned. Hours earned for the absence type.
- Taken. Hours used for the absence type.
- Adjusted. Hours adjusted for the absence type.
- Catastrophic Donated. Hours donated to another employee for the absence type.
- Balance. Ending balance.


