
What is Registration Planner?
Registration Planner (found in myNorthridge Portal or the CSUN mobile app) allows you to quickly and easily create your preferred class schedule each semester. You can enter times when you want breaks for work or other activities, compare possible schedule options and save your favorites. Once you have determined your final schedule, you can send it directly to the enrollment shopping cart. Most importantly, by indicating and selecting your schedule through Registration Planner, you will allow the university to better plan and prepare to meet your needs. You’ll help to reduce class overcrowding and improve your access to the courses you need in the future.
Learn more with these tutorials:
What can Registration Planner do for me?
To get the most out of Registration Planner:
- Identify the courses you most need to move toward your degree objective in the coming semester. Use the Degree Road Maps, STAR Act Transfer Degree Road Maps, DPR and Planner, and academic advisement to do this.
- Plan your priority courses first.
- If you are already enrolled in your priority classes, use Registration Planner to find additional classes that fit into your schedule.
- Plan, save and/or print a copy of your favorite schedule in Registration Planner to take with you to your academic advisement appointment.
- Find a last-minute class that will fit into your current schedule.
Practical Tips:
- If it's early in the registration process, Registration Planner may generate over 1,000 schedules for the courses you want. Bulk edit the schedules by using filters, class padding or attributes. Learn more at Registration Planner Advanced Features.
- If it's late in the registration process, adding filters and break times will limit class options, so be flexible if you can.
- Locking one or more class sections in Registration Planner will also reduce the number of possible schedule results. This might be desirable if you have generated a large number of schedules and want to narrow down the possibilities, but it will limit your options. View a video about the Registration Planner lock feature.
- Use the "Options" button (gear icon) in the Registration Planner "Courses" grid to view all sections of the course along with the class number, instructor, meeting times, location and more. Customize the sections that you want Registration Planner to include in your schedules. View a Course Options video.
- Whenever you log back into Registration Planner, it will automatically update your currently enrolled classes and those pending in your cart. If you didn't log out but changed your current schedule or enrollment cart in SOLAR, refresh Registration Planner so that it will generate new schedules using the most recent information.
How do I navigate to Registration Planner?
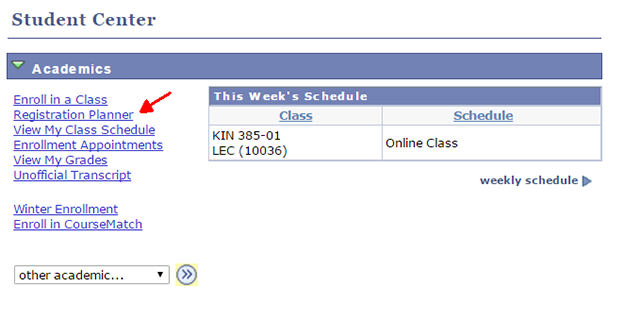
To navigate to Registration Planner, log into myNorthridge Portal, locate the Quick Links box, and select SOLAR Student Center. The Registration Planner link is located in the Student Center "Academics" section as shown below. For details, see the Registration Planner How-To Guide.
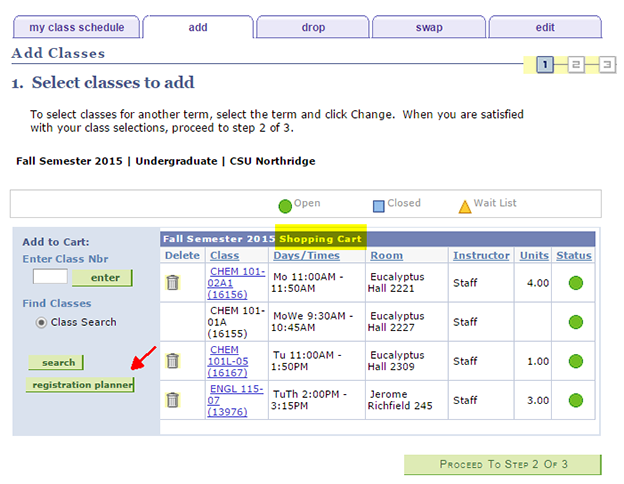
You can also access Registration Planner from the initial "Add Classes" enrollment page using the button to the lower left of your enrollment shopping cart.
How early is Registration Planner available?
If you are eligible to enroll in classes, you can use Registration Planner before and after your enrollment appointment.
You can use Registration Planner as early as:*
- early February for the upcoming fall semester
- early September for the upcoming spring semester
Registration Planner is available for fall and spring semesters, but not winter and summer terms at this time.
*The dates that Registration Planner becomes available may vary. The Registration Planner link always displays in myNorthridge Portal and the SOLAR Student Center. Click the link to check access.
When is the best time to use Registration Planner?
The Schedule of Classes will change over time. The earlier you plan possible schedules, the more likely the Schedule of Classes will change. New class sections may be added and others cancelled or closed (full). The number of available seats may also change before it's your time to enroll. Still it's a good idea to start planning early.
Tips:
Because available classes may change before your registration appointment arrives, consider these timing strategies:
- Plan your class schedule in Registration Planner before your enrollment appointment and save a favorite. Just before your appointment, validate the schedule to detect closed sections, etc. Adjust as needed and send the preferred schedule to your cart, ready to import as soon as your enrollment appointment arrives.
- Refresh Registration Planner (generate new schedules) and import the desired schedule to your cart.
Find the dates for enrolling, increasing maximum unit load, wait listing, repeating classes, etc., in the Registration Calendar.
Can I use Registration Planner if I have a registration hold?
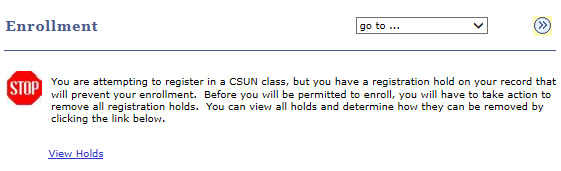
Yes, you can still generate schedules in Registration Planner, save favorites, select the one you like, and send it to your cart. However, registration holds will prevent you from viewing your cart and enrolling in the classes until you clear them.
You will see the following "stop" message when attempting to view your enrollment cart before clearing registration holds:
Strategy:
Clear all registration holds as soon as you can. Then return to Registration Planner, import a desired schedule to your enrollment cart. If your registration appointment has arrived, you will also be able to enroll in open classes or wait list for closed classes.
- Learn more about registration holds at Before You Register.
- Find enrollment dates in the Registration Calendar.
How many units can I import to my enrollment shopping cart?
You may import as many units from Registration Planner to your enrollment cart as you like. When you enroll, however, the registration system will enforce the maximum unit load rule in effect at the time of registration.
Your best strategy is to use the Validate button in Registration Planner to check for errors, including going over the maximum unit load, before sending a preferred schedule to your cart.
Tips:
- Enroll in your priority classes first. Then use Registration Planner to find additional classes that will fit into your schedule.
- Find enrollment dates in the Registration Calendar.
How many schedules can I send to my enrollment cart?
You can send only one schedule to your cart at a time, but you can import a new schedule as many times as you like.
Tips:
When you start a new session, Registration Planner reflects any updates to your current schedule of enrolled courses and any classes pending in your enrollment cart. If you generate new schedules that duplicate courses or create time conflicts, Registration Planner will alert you. You can then generate new schedules by unchecking the duplicated or conflicting courses in the course grid, current schedule, and/or cart sections of Registration Planner.
If you deliberately want to send to your enrollment cart a new section of a course that is already in your cart, Registration Planner will warn you that the new schedules it creates can conflict with your enrollment cart. Please keep this in mind when enrolling.
Does Registration Planner check for prerequisites and co-requisites?
Yes! The Validate button will check for errors such as:
- Missing course prerequisites and co-requisites
- Exceeding maximum unit load
- Time conflicts with your enrolled classes and those in your cart if any
- Repeated courses - Registration Planner reads your course history.
Tip: To avoid a "prerequisites (or corequisites) not met" error in Registration Planner and when actually enrolling in classes, check requirements in course descriptions and class notes before you finish enrolling.
Does Registration Planner work with the CSUN Mobile App?
Yes, Registration Planner looks great and works beautifully in the CSUN Mobile App.
How easy is it to edit my options in Registration Planner?
It's easy to edit options in Registration Planner. You can:
- Add or delete courses to generate new schedules
- Filter the sections of a single course by instructor, attribute (e.g., fully online), or start time
- Include or exclude courses already in your current schedule or pending in your cart but use caution
- Edit break times and time between classes (class padding)
- Lock one or more class sections you really want and plan possible schedules around them
Learn more at Registration Planner Features.
Because Registration Planner reflects the classes you are already enrolled in as well as those in your enrollment shopping cart, it can also generate new schedules that conflict with your current schedule and enrollment cart. Registration Planner alerts you of possible conflicts before they occur. Registration Planner will not generate new schedules until you uncheck the conflicting courses in the course grid, current schedule, or shopping cart sections of Registration Planner.
Tips:
- If you add or drop classes in SOLAR or edit your shopping cart when Registration Planner is closed, Registration Planner will automatically update your enrolled classes and those pending in your cart on your return.
- If Registration Planner is still open when you change your enrolled or pending classes in SOLAR, refresh the Registration Planner page in your Web browser to update the information and then generate new schedules.
- If it's early in the registration process, Registration Planner will generate 1,000+ schedules! You can exclude classes from possible schedules by using advanced filters, section attributes, and adding class padding.
- Entering breaks, locking class sections and limiting course options will reduce the number of possible schedules generated. Be flexible whenever possible.
What if I no longer want the class sections I imported to my enrollment cart?
To remove a class from your enrollment cart, return to the SOLAR Student Center enrollment page and delete each unwanted class from your cart. Then return to Registration Planner, refresh the page to update the information, and generate new possible schedules.
If you do not remove an unwanted class from your cart, you can still generate a new schedule in Registration Planner and send it to your cart. However, this action may duplicate (not replace) a course that is already in your cart. Please keep this in mind when enrolling.
Can I save or print schedules in Registration Planner?
Yes, you can save and print schedules.
To save a favorite schedule, open its View Schedule screen and click the heart icon. Learn more at Advanced Features.
To print a possible schedule in Registration Planner:
- Navigate to the View Schedule screen.
- Select the print button at the top left of the page.
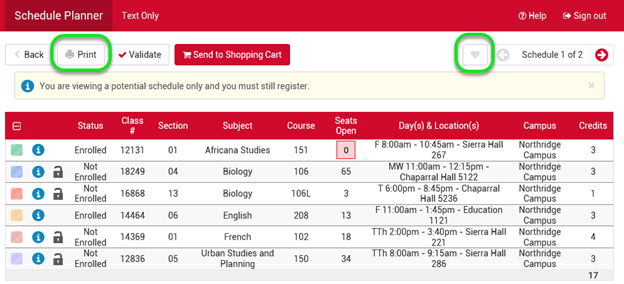
Tip: You may want to print the "Send to Shopping Cart" page (displays after you select a schedule to "View") because it includes class details, class numbers and a weekly schedule grid.